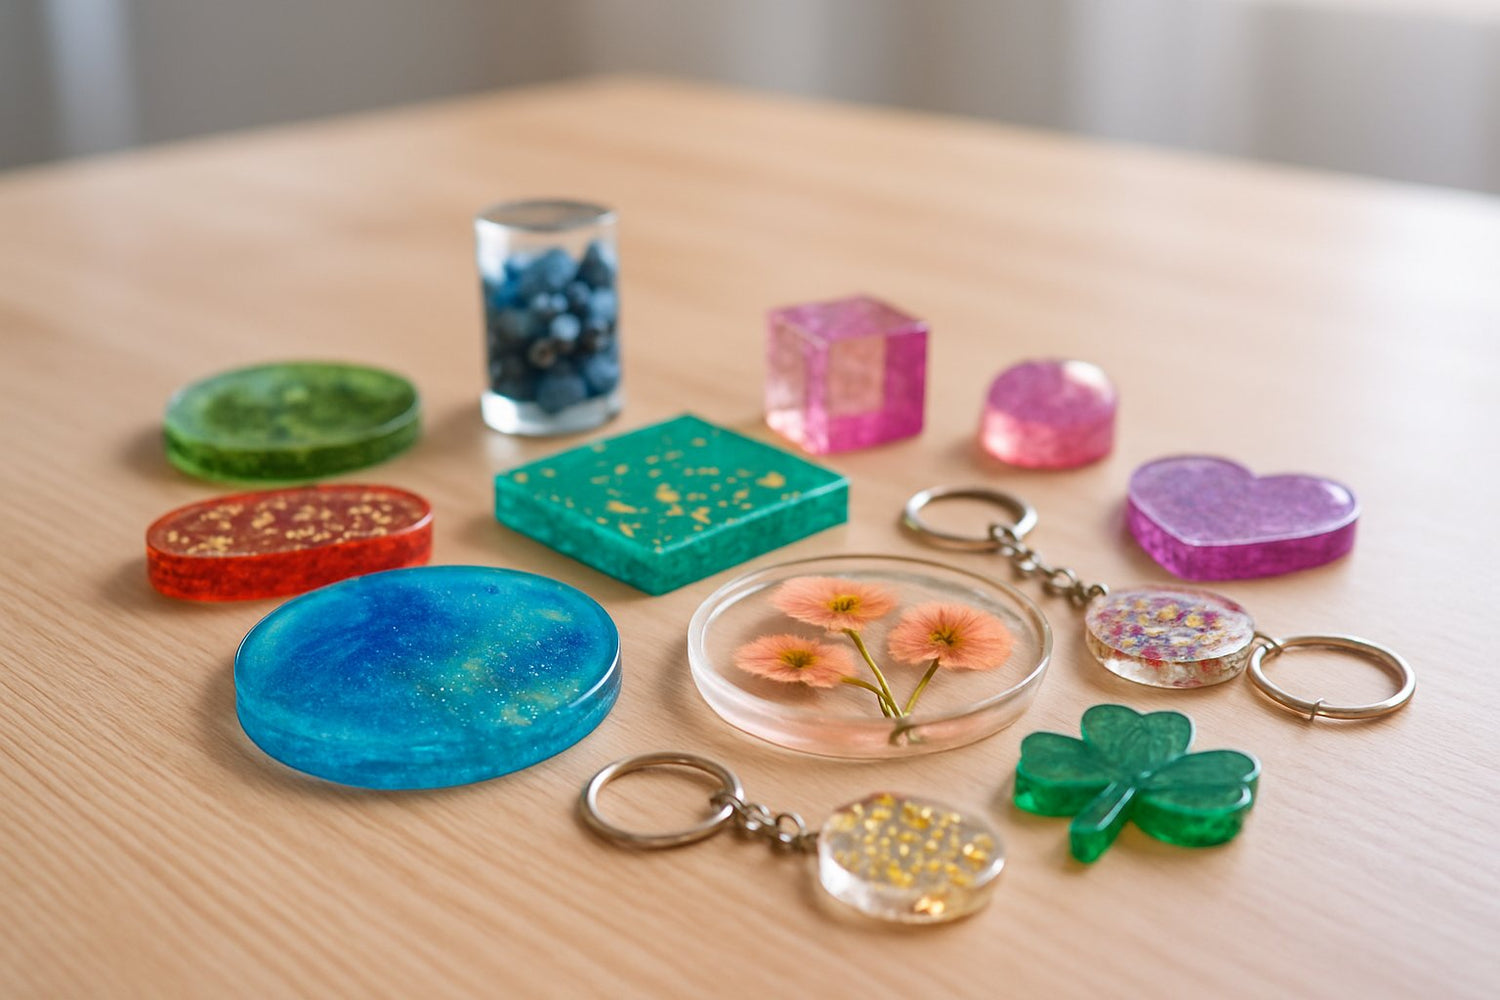
Starting with small epoxy resin projects is the perfect way to explore resin crafting without feeling overwhelmed.
You can make coasters, jewelry, keychains, or tiny art pieces with just a bit of resin and a mold. These little projects let you try new techniques, use less material, and still end up with pieces that look polished and professional.
All you need is resin, a mold, and a little creativity to design pieces that are both useful and beautiful. Small projects also cure faster, so you can enjoy your finished creations in no time. And hey, you get finished pieces you can use or gift right away.
Whether you’re a beginner or just want quick wins, these projects are a great place to start. Ready to dive in? Keep reading for ideas and inspiration.
Key Takeaways
- Small resin crafts are an easy way to start
- You can design unique pieces with just basic tools and molds
- Practicing on small projects builds skill for bigger work
The right resin makes crafting easier and more polished. Discover your options by reading our guide: Best Epoxy Resin for DIY and Professional Projects.
Getting Started With Small Epoxy Resin Projects

Working with epoxy resin on a small scale lets you experiment with color, shape, and finish. You don’t need much material or space, but having the right tools, choosing the right resin, and staying safe are key.
Essential Tools and Materials
You’ll need a two-part epoxy resin kit—that’s resin and hardener. Measure both parts carefully; if you don’t, your project might stay sticky or turn out weak.
Most small kits include clear instructions for mixing ratios. For shaping, grab some silicone molds.
They release resin easily and come in tons of shapes, from jewelry to coasters. Want custom shapes? Make your own mold with mold-making putty.
Other handy tools:
- Mixing cups (plastic or silicone, disposable is fine)
- Wooden stir sticks or silicone spatulas
- Gloves to protect your hands
- Plastic drop cloths or parchment paper for your table
Extras like mica powders, pigment inks, or glitter let you customize your work. Keep them in small containers so you don’t waste materials.
Choosing the Right Epoxy Resin

Resiners® 1 gallon/2 gallon Crystal Clear Epoxy Resin with Tailored Diversion Port
Not all epoxy resins work the same way. For jewelry, keychains, or little decor, pick a low-viscosity resin—it flows into tiny spaces and helps avoid bubbles.
Making coasters? Use a heat resistant resin. Some can handle up to 120°C, so hot mugs won’t ruin them.
Check the cure time on the label. Some resins harden in 12–24 hours, while others take days. Slower cures give you more time to play with colors and layers.
Look for UV-resistant resin if you want your pieces to stay clear and not turn yellow over time, such as Resiners’ non-yellowing epoxy resin
If you want your projects to stay bright, glossy, and glass‑like, a crystal clear epoxy resin is the way to go. Resiners’ non‑yellowing epoxy resin is specially made to resist fading and yellowing, so your jewelry, coasters, and décor keep their shine for years.
It pours smoothly, cures strong, and gives your creations that professional, polished look every crafter loves.
Adding sparkle is fun, but safety matters too. Learn more by reading our article: Is Glitter Toxic? What You Need to Know Before Crafting.
Safety Tips for Resin Crafting
Epoxy resin’s safe if you handle it right, but it can irritate your skin or lungs if you’re not careful. Always wear nitrile gloves—latex doesn’t block resin well.
Work in a well-ventilated area or use a small fan. If you’re sensitive, consider a respirator mask.
Cover your workspace with plastic or silicone mats. Resin sticks to everything, so save yourself the headache at cleanup.
Don’t pour leftover resin down the drain. Let it cure in the cup, then toss it as solid waste. That way, you won’t mess up your pipes or the water supply.
Store resin bottles tightly closed, away from sunlight and heat. Good storage keeps resin usable for longer.
Popular Small Epoxy Resin Projects

With just a little epoxy resin, you can make all kinds of decorative and useful stuff. These projects let you try out new colors, molds, and materials—no huge workspace or fancy tools required.
Resin Keychains and Charms
Resin keychains and charms are quick, easy, and super customizable. Pour resin into silicone molds shaped like letters, animals, or simple geometric designs.
Add glitter, dried flowers, or beads for a personal touch. Keychains are practical—you use them every day, or give them as gifts.
Resin charms work great on zipper pulls, bags, or phone cases. Use a small mold that fits on a keyring, and insert the eye screw when the resin is soft but not sticky. That way, it bonds well and won’t crack.
Tip: Keep designs lightweight so they don’t stress the keyring or snap off.
DIY Epoxy Coasters and Bookmarks
Epoxy coasters protect your table and show off your creativity. Clear resin is perfect for pressed flowers, shells, or patterned papers.
Use shallow molds for coasters and sand the edges smooth after they cure. Bookmarks are also easy. Just use a long, thin mold and decorate with foil flakes, pigments, or tiny charms.
Add a tassel for a finished look. Both coasters and bookmarks make great gifts and are perfect for beginners. They use little resin and cure evenly in small molds.
Materials to try:
- Dried leaves for a natural vibe
- Metallic powders for shimmer
- Alcohol inks for wild color patterns
Resin Jewelry: Hair Clips and Pendants
Resin jewelry. like hair clips and pendants, turns small molds into wearable art. Pour resin into molds shaped like bars, circles, or teardrops.
Embed tiny flowers, glitter, or stones for custom style. For hair clips, glue the resin piece to a metal base. For pendants, add jump rings and chains.
Since jewelry touches your skin, sand rough edges and polish the surface until it’s smooth. That way, it’s comfy and safe to wear.
Popular resin jewelry items:
- Hair clips with gold flakes
- Clear pendants with dried flowers
- Simple charms in solid colors
Decorative Resin Crafts for the Home
Small resin crafts add style to your home without taking up space. Try making mini trays, ring holders, or decorative magnets. These projects are perfect for testing colors and finishes.
Mini trays hold jewelry or keys. Ring holders shaped like cones or pyramids are easy to make in silicone molds. For magnets, pour resin into tiny molds and stick on magnet strips afterward.
These pieces are practical, but they’re also a great way to try out new designs. Layer colors, add mica powders, or swirl for a modern look.
Ideas for home resin crafts:
- Photo tiles with a glossy resin coat
- Resin magnets with pressed flowers
- Small trays with metallic swirls
Every project feels better when you know you’re protected. Stay informed by checking our guide Resin Safety Guide: How to Work with Resin Safely and Effectively.
Creative Techniques and Design Ideas

Small epoxy resin projects open up a ton of design options. You can shape resin with molds, play with color, and add decorative touches that make each craft your own.
Working With Silicone Molds
Silicone molds make casting resin easy. They come in shapes for coasters, jewelry, keychains, and trays. Since silicone is flexible, you can pop out your finished piece without damage.
Always check your mold for dust before pouring. Even tiny particles can leave marks. A little mold release spray helps your molds last longer and prevents sticking.
Try layering your pours. Start with a thin clear layer, let it partially cure, then add decorative bits before topping it off. This adds depth and polish to your designs.
Tip: Store molds flat and out of sunlight so they keep their shape and don’t warp.
Adding Color: Dyes, Alcohol Ink, and Glitter
Color changes everything in resin art. Liquid dyes give you solid shades, while alcohol inks create flowing, marble-like effects.
Drop alcohol ink into wet resin and watch it spread into cool patterns. Glitter is always a hit—fine glitter creates subtle sparkle, chunky glitter brings bold texture.
Stir slowly when adding glitter so you don’t trap air bubbles. Mix and match for unique results, maybe dyes and glitter for bold jewelry, or alcohol ink with clear resin for watercolor-style coasters.
- Dyes + glitter for eye-catching jewelry
- Alcohol ink + clear resin for dreamy coasters
- Layered glitter for keychains that really shine
Too much pigment can mess with curing, so measure carefully.
Incorporating Gold Leaf and Decorative Elements
Gold leaf adds a fancy metallic shine to small resin crafts. Press flakes into partially cured resin so they stay put, then pour another layer to lock them in place.
You can also embed shells, dried flowers, beads, or tiny charms. Place heavier items first so they sink evenly, then seal with more resin. That keeps the surface smooth and avoids sharp edges.
Lay out your elements before pouring for a balanced look. Sometimes, simple is better than cramming in too much. Tweezers make it easier to place delicate pieces without making a mess.
Mixing color, texture, and decorative elements gives you resin crafts that feel personal—and honestly, a little bit fancy.
Tiny bubbles can sneak into your resin work. Find out how to fix them when you read our article: Why Are There Air Bubbles In My Resin Project?
Final Thoughts
Now you’ve seen just how easy and rewarding small epoxy resin projects can be. They’re beginner-friendly, quick to finish, and perfect for experimenting with colors, glitter, or even dried flowers.
Small crafts give you the chance to practice techniques while creating gifts, décor, or accessories you’ll actually use. Plus, they don’t require a lot of resin or tools, making them budget-friendly too.
Whether you’re making a set of coasters, a pendant, or a simple keychain, each project is a chance to learn and create something unique. Gather your supplies and start your next small resin project today.
Once you’ve tried a few resin pieces, you’ll want to explore more. Get inspired by checking our article, Unique Resin Art Ideas: Creative Projects for Every Creator.
Frequently Asked Questions
What is the best beginner resin project?
Coasters are a classic beginner project. They use little resin and fit into easy molds.
Add some glitter, dried flowers, or colored pigments to make each one different. Keychains and small jewelry pieces are also good for beginners since they set up quickly and don’t need much material.
Is resin a cheap hobby?
You can keep resin affordable if you stick to small projects. Starter kits with resin, hardener, and a couple of molds usually run under $50.
Costs jump up if you buy bigger molds or lots of extras like pigments, crystals, or dried flowers. Planning ahead helps you avoid wasting resin and keeps things budget-friendly.
What sells well in resin?
Pendants, earrings, and rings usually sell well since they’re lightweight and easy to mail out. Coasters, trays, and bookmarks are also popular because people like useful things they can customize.
Add initials, pressed flowers, or favorite colors to catch more buyers’ eyes.
What useful things can you make with epoxy resin?
You can make tabletops, serving trays, and cutting boards with resin coatings for protection and shine.
Smaller projects like phone grips, pen holders, and magnets are fun and useful too. Some folks even use resin for home repairs, like sealing cracks or coating floors, though that takes a lot more material.
Can you use resin without a mold?
Absolutely, you can pour resin straight onto surfaces like wood, canvas, or even stone. It gives a smooth, glossy finish that looks fantastic on art panels or countertops.
Some folks use it to coat photos, too. If you’re aiming for freeform shapes, just grab some tape or set up barriers to guide the resin where you want it, no traditional mold required.


Hinterlasse einen Kommentar
Diese Website ist durch hCaptcha geschützt und es gelten die allgemeinen Geschäftsbedingungen und Datenschutzbestimmungen von hCaptcha.