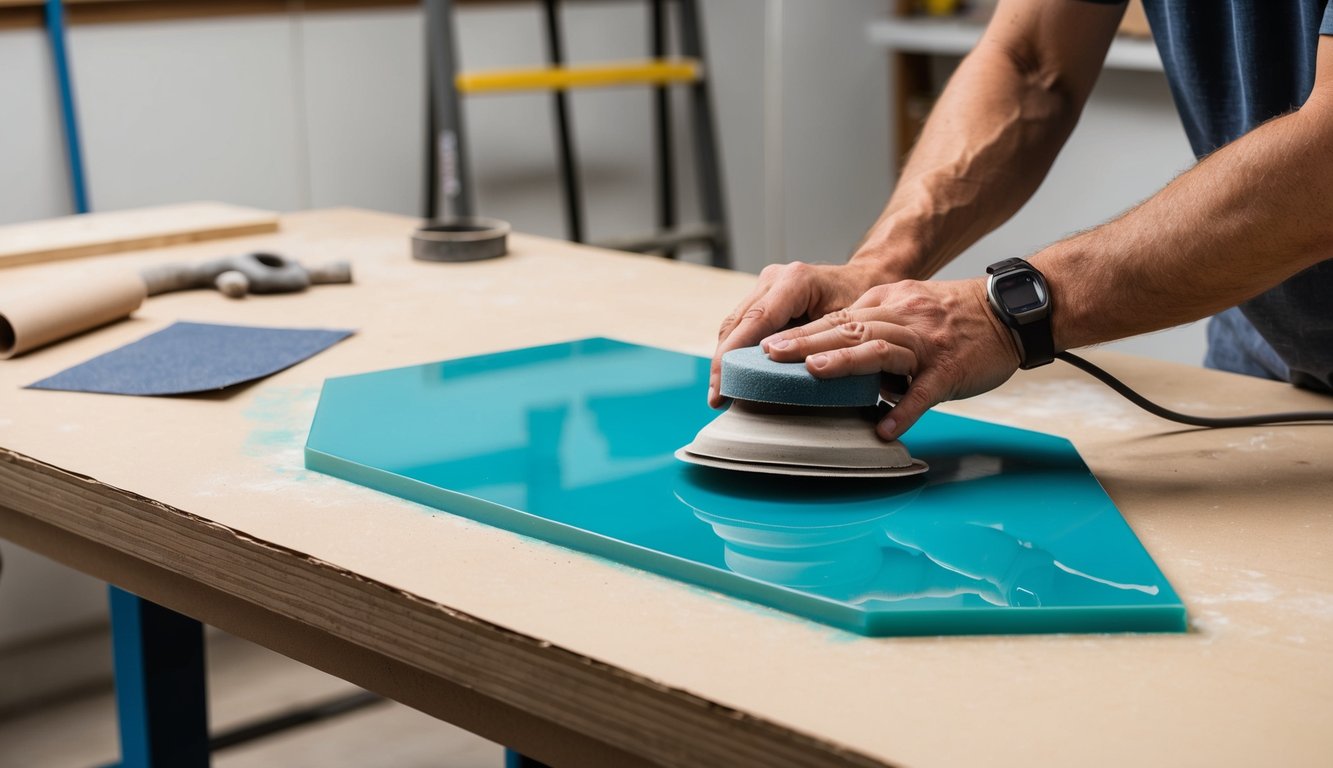
Wondering if you can sand epoxy resin after it's cured? Yes you can sand epoxy resin after it has fully hardened! This simple technique transforms your projects by removing mistakes, smoothing rough spots, or preparing for polishing.
Whether you're fixing a bumpy surface or getting ready for a glass-like finish, sanding works wonders on epoxy. The secret is starting with coarse sandpaper and slowly working up to finer grits.
Some crafters prefer wet sanding to reduce dust, while others go dry. Both methods get great results! Want to learn the pro techniques for perfect epoxy sanding? Keep reading!
Can You Sand Epoxy? The Basics
Yes, you can sand epoxy resin after it has properly cured. This process helps fix imperfections and prepare the surface for polishing or additional coats.
When and Why You Should
Sanding epoxy is necessary in many situations. If your epoxy surface has bubbles, bumps, or uneven spots, sanding will make it smooth.
You might also need to sand when:
- Removing a "tacky" layer on top
- Preparing for another coat of epoxy
- Creating a flat surface for painting
- Getting rid of drips along edges
Different sandpaper grits work for different jobs. Start with coarser paper (80-120 grit) for big problems.
Then move to finer grits (220-320) for smoothing. For a mirror finish, you'll need very fine paper (600-2000 grit).
You can sand epoxy wet or dry. Wet sanding creates less dust and keeps the resin from getting too hot.
This is important because heat can make epoxy gummy and hard to sand.
Curing Times Before Sanding Epoxy Safely
Timing matters a lot when sanding epoxy. Try to sand too early, and you'll make a mess!
Most epoxy resins need 24-48 hours of curing before you can sand them. Thicker pours might need even longer—sometimes up to 7 days. Check your product's instructions for exact times.
But how can you tell if epoxy is ready for sanding? Press your fingernail into an inconspicuous spot. If it leaves a mark, wait longer.
The epoxy should feel hard like plastic. Temperature affects curing too. Warmer rooms (70-75°F) help epoxy cure faster. Cool rooms slow down the process.
Tools and Safety for Sanding Epoxy

Sanding epoxy requires the right equipment and safety measures to protect yourself from harmful dust and achieve the best results. Without proper precautions, you could face health risks or end up with a poor finish.
Protective Gear and Workspace Setup
Always wear a dust mask or respirator when sanding epoxy. The tiny particles can hurt your lungs if you breathe them in.
Safety glasses are a must too! They keep dust out of your eyes.
Set up your workshop with good ventilation. Open windows or use fans to blow dust away from you.
A dust collection system connected to your sander works great to catch particles before they float around.
Put down a drop cloth to make cleanup easier. Epoxy dust is super sticky and hard to remove once it settles.
Work in a well-lit area so you can see what you're doing. This helps you spot imperfections as you sand.
Best Sandpaper and Tools for Epoxy Projects
For epoxy sanding, you'll need different grits of sandpaper. Start with coarse grits (80-120) to remove big bumps.
Then move to medium (220-320) and finish with fine grits (400-600) for a smooth surface.
Wet sanding helps reduce dust and prevents clogging. Just dip your sandpaper in water now and then.
This keeps the abrasive surface clean and working well.
A random orbital sander makes the job much faster. Hook-and-loop sanding discs attach easily to these tools.
For corners and edges, you'll need to sand by hand with sanding blocks.
Some helpful tools include:
- Sanding blocks for flat surfaces
- Sponge sanders for curved areas
- Sandpaper sheets in various grits
- Microfiber cloths to wipe away dust between grits
Change your sandpaper often! Epoxy clogs sandpaper quickly, making it less effective.
If you want to be familiar with all the fundamentals for epoxy resin, read our Epoxy Resin for Beginners: Essential Starter Guide to build a solid foundation for your crafting.
How To Sand Epoxy: Step-By-Step Guide
Wet vs. Dry Sanding Epoxy: Choosing the Right Method
Wet sanding uses water during the process, which helps reduce dust and prevents resin from clogging your sandpaper. It's great for getting a super smooth finish.
You'll need to dip your sandpaper in water often or run water over the surface while sanding.
Dry sanding works well for initial shaping and removing big imperfections. It creates more dust, so always wear a mask! This method is faster but can heat up the epoxy, which might cause problems.
Start with dry sanding for rough shaping, then switch to wet sanding for finer work. Many pros use wet sanding for the final grits (400 and above) to get that glass-like finish.
Your workspace matters too! Cover nearby items and work in a well-ventilated area as epoxy dust isn't something you want to breathe in.
Grit Progression for Perfect Epoxy Finishes
Start with coarse grits and work your way up. This method ensures all scratches get removed at each step.
Basic Grit Progression:
- 80-120 grit: Removes major flaws and shapes the epoxy
- 220-320 grit: Smooths the surface
- 400-600 grit: Prepares for polishing
- 800-1200 grit: Fine finishing
- 1500+ grit: For mirror finish
Don't skip grits! Jumping from 120 to 400 will leave scratches that are hard to remove later.
Each grit should remove the scratches from the previous one. Wipe the surface clean between grits with a damp cloth. This helps you see if you've missed any spots.
For small projects or detailed work, cut your sandpaper into smaller pieces. This gives you better control and saves money!
Hand vs. Power Sanding Techniques for Epoxy
Hand sanding gives you more control, especially in tight spots and edges. Wrap sandpaper around a sanding block for flat surfaces. This prevents uneven sanding and finger grooves in your work.
For larger surfaces, power tools save time. A random orbital sander works great because it doesn't leave swirl marks. Keep the sander moving and don't press too hard! Let the tool do the work.
Dremels and rotary tools are perfect for detail work and hard-to-reach areas. Use lower speeds to avoid heating the epoxy too much.
When power sanding, take breaks to let the epoxy cool down. Too much heat can soften the resin and ruin your progress. Short bursts of sanding work better than continuous pressure.
Remember to clean your tools between grits. Leftover coarse grit particles can scratch your nearly-finished surface!
Once you've mastered sanding epoxy for that flawless finish, try creating shaped pieces that require minimal sanding. Check out our epoxy molds collection to find shapes that will streamline your finishing process.
Common Epoxy Sanding Problems
Sanding epoxy can be tricky, and several issues might pop up during the process. These problems can affect your project's final look, but most can be fixed with the right approach.
Fixing Scratches, Cloudiness and Uneven Surfaces
Scratches happen when you use sandpaper that's too rough. Start with 120-grit and slowly work up to 1500-grit for a clear finish.
If your epoxy looks cloudy after sanding, it's probably because you stopped at too low a grit.
To fix cloudiness:
- Continue sanding with higher grits (600, 800, 1200)
- Wipe the surface clean between grits
- Finish with a polishing compound
Uneven surfaces need special care. Sand in small circles rather than straight lines. This helps remove high spots without creating deeper valleys.
Sometimes you might need to add a thin layer of epoxy to fill in low spots before sanding again.
Tip: Wet sanding works better for epoxy. The water washes away dust and helps prevent scratches.
Preventing Heat Damage When Sanding Epoxy
Epoxy resin and hardener can get damaged by heat. When you sand too fast, friction creates heat that might soften or even melt your epoxy.
Signs of heat damage:
- Gummy residue on sandpaper
- Sticky spots on your project
- Yellowing of the epoxy
To avoid these problems, sand with light pressure. Take breaks to let the surface cool down. This is super important for thinner epoxy layers, which heat up faster.
The room temperature matters too! Sanding in a hot room makes heat damage more likely.
Try to work in a cool space, around 65-75°F. If you notice your sandpaper getting clogged with gummy resin, stop right away. Your epoxy might not have fully cured, or you're creating too much heat.
Finishing Sanded Epoxy to Perfection

After you've sanded your epoxy, it often looks dull and cloudy. Getting back that beautiful shine takes some extra steps and the right tools.
Polishing Epoxy to a Glass-Like Shine
Start with wet sanding your epoxy using finer grits. Move from 320 grit to 600, then 1000, and finally 2000 grit sandpaper. Use water while sanding to reduce dust and prevent overheating.
Next, grab a buffing wheel or polishing pad. These tools will help you bring back the shine to your resin piece.
You can attach the buffing wheel to a drill or use a dedicated polisher. Apply a small amount of polishing compound to the wheel.
Work in small sections with light pressure. Too much pressure might create heat that damages your epoxy. The resin will gradually become clearer with each pass.
For hard-to-reach areas, try foam polishing pads or even polishing by hand. This takes longer but gives you more control.
Best Products for After-Sanding Treatment
These products will transform your sanded epoxy:
Polishing Compounds:
- 3M Perfect-It series
- Meguiar's compounds
- NOVUS plastic polish (works great on epoxy too!)
Finishing Options:
- Spray-on clear coat (quick solution)
- Thin layer of fresh epoxy (most durable)
- Specialized resin polishes (easiest)
You can also try car wax after polishing to add extra shine and protection. Apply it with a microfiber cloth in circular motions.
For a quick fix without extensive sanding, try a resin spray sealer. It adds a clear layer that brightens dull areas.
Different types of epoxy sand differently depending on their hardness and composition. Learn which resin is best for your specific project in our detailed guide, Types of Resin: A Crafter's Guide to Finding the Perfect Pour.
Final Thoughts
Sanding epoxy resin is an essential skill that can take your projects from good to amazing. With the right tools and technique, you'll be able to achieve professional-looking results every time.
Remember to work through your sandpaper grits patiently and consider whether wet or dry sanding works better for your specific project.
Ready to level up your epoxy crafting? Check out our collection of premium resin tools that make sanding and finishing a breeze.
And if you're just getting started with epoxy projects, don't miss our comprehensive article: Epoxy Resin for Beginners: Essential Starter Guide – it's packed with everything you need to know to begin your resin journey!
Frequently Asked Questions
Can you sand epoxy and make it clear again?
Yes, you can make sanded epoxy clear again. When you sand epoxy, it becomes cloudy and dull. To restore clarity, you need to polish it after sanding.
Start with progressively finer sandpaper grits. Go from 320 to 400, then 600, 1000, and higher.
After sanding, use a polishing compound to bring back the shine. Some people use car polish or specialized resin polish. The polishing process removes the tiny scratches that make epoxy look cloudy.
Can you put sand in epoxy?
You can definitely add sand to epoxy! Many people mix sand with epoxy to create textured surfaces or decorative effects. Beach sand, colored sand, or even fine silica sand works well.
Mix the sand into the epoxy before it cures. The amount of sand depends on the effect you want. Too much sand can make the epoxy harder to work with and might reduce its strength. So start with small amounts and test it first.
What dissolves cured epoxy?
Fully cured epoxy is very resistant to most chemicals. Few things can fully dissolve it. Strong solvents like acetone, methylene chloride, or paint stripper might soften cured epoxy.
Heat can also help soften it. However, these methods may damage the surface underneath.
For complete removal, mechanical methods like sanding or scraping work better than trying to dissolve it.
Why does epoxy look cloudy after sanding?
Epoxy looks cloudy after sanding because of tiny scratches on the surface. These scratches scatter light instead of letting it pass through cleanly.
Think of it like frosted glass. The scratches create a surface that diffuses light. This makes the epoxy look dull and hazy.
To fix cloudiness, you need to remove these scratches by using progressively finer sandpaper and then polishing.
How long until I can sand epoxy?
You should wait until epoxy is fully cured before sanding it. This usually takes 24-72 hours, depending on the type of epoxy. Some quick-set epoxies can be sanded after 24 hours. Deep pour epoxies might need more time.
Read the manufacturer's instructions for your specific product. If you sand too early, the epoxy might gum up your sandpaper. It could also create an uneven surface that's hard to fix later.


Laisser un commentaire
Ce site est protégé par hCaptcha, et la Politique de confidentialité et les Conditions de service de hCaptcha s’appliquent.