Mixing epoxy resin can be tricky, especially if you want a smooth, bubble-free finish for your art or DIY projects.
The best mixer for epoxy resin is a low-speed electric mixer with a paddle attachment, which blends the resin and hardener evenly without trapping air.
Whether you’re making jewelry, coating a surface, or casting a mold, having the right tool saves time and prevents waste.
You’ll explore what makes a quality resin mixer and how different types perform for small and large projects. From handheld rechargeable options to powerful dual-head mixers, each type offers unique benefits.
You’ll also find simple accessories and techniques that make mixing cleaner and more consistent.
For beginners, our resin starter kits include everything you need to confidently make epoxy resin at home.
What Makes the Best Mixer for Epoxy Resin?

Finding the best mixer for epoxy resin depends on how well it blends resin and hardener, how smoothly it prevents bubbles, and how easy it is to clean after each use.
The right tool saves time, reduces waste, and improves the final look of your resin projects.
Mixing Power and Speed
You need enough mixing power to blend resin and hardener evenly without overworking the material. A low-speed electric epoxy mixer—typically between 100 to 350 RPM—works best.
That speed range stirs resin thoroughly but gently, reducing heat buildup that can cause premature curing.
Look for mixers with adjustable speed settings. This gives you control over different project sizes and viscosity levels.
Some upgraded models, like rechargeable resin mixers with 3-speed motors, give you flexibility without cords getting in the way.
A paddle-style attachment is ideal because it moves the resin in a consistent circular motion. This keeps the mixture uniform and prevents unmixed streaks.
Hand mixing can work for small batches but quickly becomes tiring and inconsistent for larger pours.
Bubble-Free Results
Air bubbles are one of the most common frustrations when mixing epoxy resin. The right mixer helps reduce them before they ever form.
A slow and steady rotation keeps air from being trapped inside the resin mixture. To get bubble-free resin, avoid high-speed stirring or rapid motions.
Instead, use controlled mixing at a low speed for at least two to three minutes, scraping the sides and bottom of the container.
Some mixers include silicone paddles that glide over surfaces better than metal ones, preventing air pockets.
For deep pours or fine art projects, pair your mixer with a degassing step, like using a heat gun or letting the mixture rest before pouring. The smoother your mix, the cleaner your finish once cured.
Ease of Cleaning and Usage
Mixers that take too long to clean can discourage frequent use. Look for detachable paddles and non-stick materials such as silicone or coated steel. These parts rinse clean before the resin cures, saving you from difficult scraping later.
Features like a stable, non-slip base or height-adjustable stand make setup easier, especially if you mix in different container sizes.
Rechargeable or cordless mixers are also convenient when you don’t want to plug and unplug during multiple batches.
Keep a small bottle of rubbing alcohol nearby for quick cleanups after mixing epoxy resin. Simple maintenance keeps your tools lasting longer and ready for your next project.
Learn about the importance of mixer paddles and how to use them effectively by reading What Is a Mixer Paddle Attachment and How to Use It.
Types of Epoxy Resin Mixers
Choosing a resin mixer depends on how you like to work, the size of your projects, and the type of resin you use.
Some mixers focus on speed and convenience, while others give you more control for small or detailed pours.
Electric Resin Mixers
An electric resin mixer uses a low-speed motor and a paddle attachment to blend resin and hardener smoothly. The slow speed limits air bubbles and gives you a more consistent texture.
Many crafters use drill-style mixers with variable speeds, which make it easy to adjust the mixing pace for thicker or thinner resins. These mixers can handle larger batches, which helps when you work with molds or coatings that need even color and texture.
The Resiners Epoxy Mixer and similar models come with adjustable stands, keeping the container steady while mixing. This helps you avoid spills and uneven curing.
When cleaning up, many paddles are coated in silicone or made from non-stick material so resin peels off easily.
If you craft often and value precision, an electric mixer saves time and reduces waste.
Manual and Handheld Mixers
A manual resin stirrer or handheld mixer gives you full control over the blending process.
You use your hand to mix resin and hardener with silicone paddles or wooden sticks, which works best for small pours such as jewelry, coasters, or keychains.
Because you control the speed and direction, you can mix slowly to reduce bubbles.
The silicone resin mixer paddles available in various sizes help stir resin evenly while keeping cleanup simple. They are also reusable, flexible, and less likely to scratch containers.
Manual methods take longer than electric ones, especially for large batches. However, if you make small crafts or prefer a quieter, more hands-on process, they’re practical and budget-friendly.
Rechargeable and Cordless Options
A rechargeable resin mixer combines the power of an electric mixer with the convenience of handheld use.
Tools like the ISTOYO Rechargeable Resin Mixer Ultra feature built-in batteries and multiple speed settings, letting you stir different resin types without cords getting in your way.
These mixers are portable and ideal for home workshops where outlets are limited.
You can use them in different areas without losing performance. Some models include three-speed controls and silicone paddle attachments for easy cleaning and flexible use.
For small- to medium-sized batches, cordless mixers save effort and reduce clutter. If you value mobility and a cleaner workspace, a rechargeable mixer offers a good balance between control and efficiency.
To achieve smooth, bubble-free resin, check out the mixer for epoxy resin collection featuring top-rated mixers like the Resiners® Dual-Head Resin Mixer.
Essential Accessories and Attachments

Choosing the right accessories helps you mix epoxy resin more smoothly, reduce air bubbles, and keep your workspace cleaner.
Reliable cups, paddles, and attachments make each batch more consistent and less wasteful, especially when working on larger or detailed resin projects.
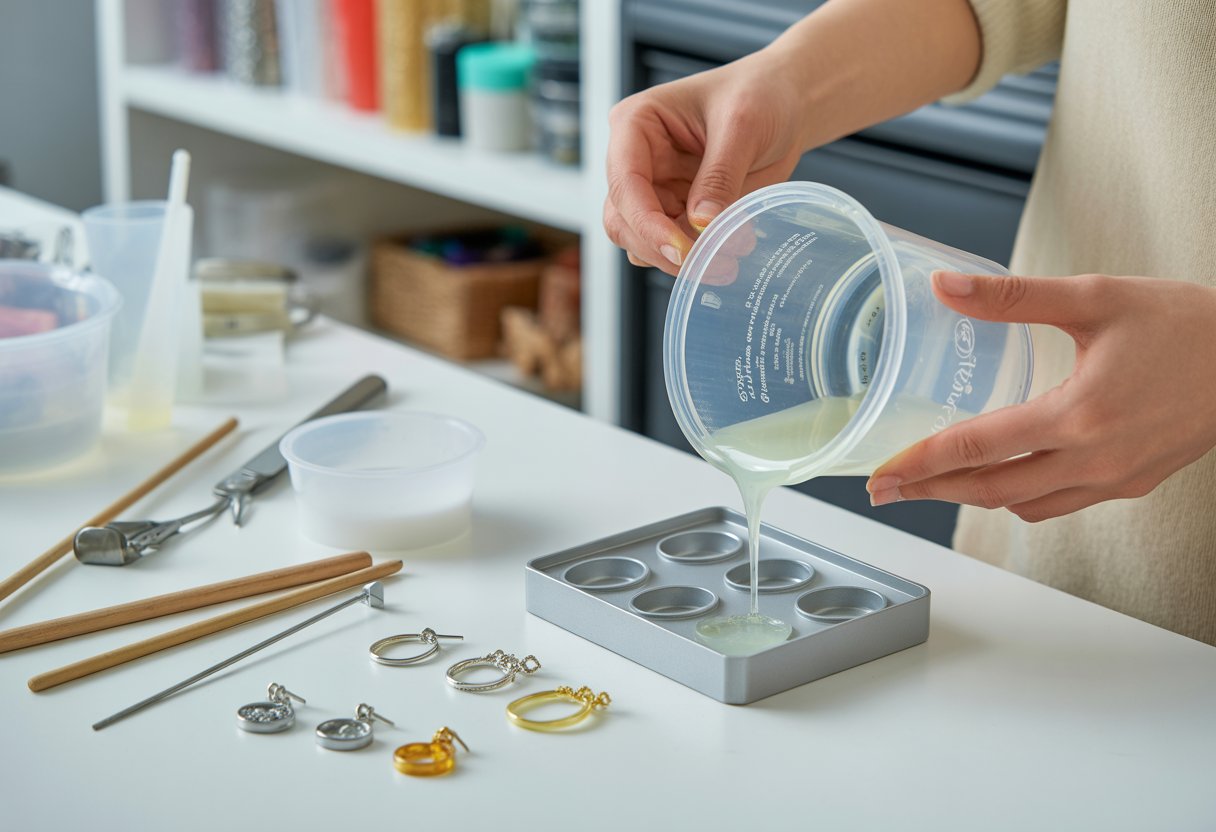
Silicone Mixing Cups and Paddles
A silicone mixing cup makes it easier to combine resin and hardener without leaving residue behind. The flexible walls let you scrape out every drop, so you waste less material.
Silicone also resists heat and chemicals, which keeps your tools safe for repeated use. You can pair these cups with silicone paddles for even mixing.
The soft yet firm paddle edges help you fold resin smoothly without trapping air.
Because silicone tools don’t crack or absorb liquids, they stay clean longer and avoid contamination between colors.
Many crafters prefer sets that include both graduated measuring marks and spout designs for controlled pouring.
These details help you measure precisely and pour into molds or tumblers with fewer drips.
A quick wipe or flex of the cup usually releases cured resin easily, saving you time on cleanup.
|
Tool Type |
Benefit |
Best For |
|
Silicone cup |
Flexible, durable, easy cleanup |
Small resin batches |
|
Silicone paddle |
Gentle stir without bubbles |
Consistent color blending |
Upgraded Paddle Designs
Modern resin mixer paddles come in improved shapes and materials that reduce mixing time and limit air bubbles.
Wide-blade designs fold rather than whip resin, which helps you achieve a clear, bubble-free finish. Some models use nylon or coated steel shafts that last longer when mixing thicker resin formulas.
Upgraded spiral silicone paddles let you mix deeper containers evenly. The spiral edges push resin down and around, ensuring both resin and hardener blend fully. These paddles are especially useful for artists making large molds or layered pours where consistency is critical.
You’ll also find paddles sized for different drills or electric mixers, making them easy to attach and remove. Look for attachments compatible with 3/8-inch or larger drills for better control and torque.
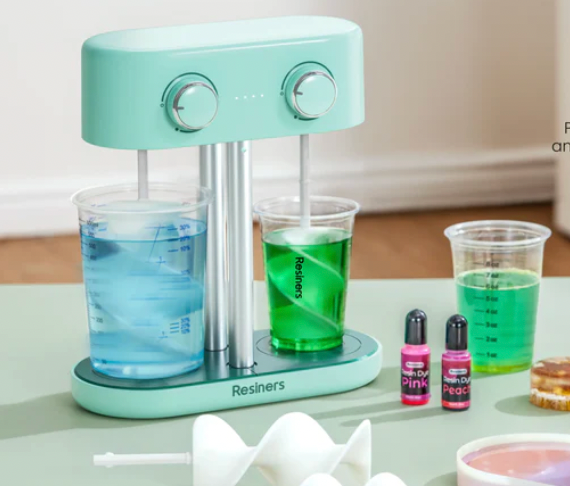
Dual-Head and Spiral Attachments
A dual-head resin mixer mixes faster and more evenly than single-paddle designs. It uses two paddles that rotate in opposite directions, creating a more complete blend with fewer air pockets.
Tools like the Resiners Dual-Head Resin Mixer uses this system to speed up preparation for large projects.
Spiral attachments, often made from durable plastic or coated metal, help direct resin flow up and down through the container.
This balanced movement produces a consistent mixture and reduces streaking or soft spots once cured.
Use low-speed mixing for the best results, especially when working with deep silicone molds or coated art surfaces.
For a hands-free mixing experience, explore our resiners machine collection, which includes bubble removal machines and mixers.
Best Mixer for Epoxy: Resiners® Upgraded Dual-Head Resin Mixer

The Resiners® Upgraded Dual-Head Resin Mixer is designed for hands-free operation, significantly reducing wrist strain and allowing users to focus on their creative projects.
It is ideal for mixing resin, silicone, paint, and even soap, making it a versatile tool for crafters. The dual-head electric mixer comes with spiral silicone paddles and offers a rechargeable, stepless speed control for precise mixing.
This mixer enhances the crafting experience by making the mixing process faster, easier, and more efficient.
Discover the best heat gun for crafts in our heat gun for crafts collection to complement your resin mixing and curing process.
Tips for Perfect Epoxy Resin Mixing

Good results with epoxy resin come from using the right tools, mixing carefully, and paying attention to temperature and ratios.
The process affects clarity, strength, and how well your project cures, so every step matters.
Proper Mixing Techniques
Start by reading the manufacturer’s instructions and checking the mixing ratio, such as 1:1 or 2:1 by volume. Use clean, dry measuring cups marked for resin only.
Pour the exact amounts of resin and hardener slowly to avoid trapping air. Stir gently but thoroughly for 3–5 minutes, scraping the sides and bottom of the cup as you go.
A slow and steady stir keeps bubbles from forming. Try the two-cup method: after the first mix, pour it into a second clean cup and stir again. This ensures every drop is properly blended.
Keep the work area between 70–75°F (21–24°C) to help the resin mix evenly and cure correctly. Warm resin flows better and releases bubbles more easily.
Quick tip: Use a wooden stir stick or silicone spatula instead of metal tools to reduce heat buildup during mixing.
Batch Size Considerations
The amount you mix at one time affects curing speed. Large batches create more heat, which shortens working time and can cause thickening or hardening before you’re ready.
If you’re working on small crafts, limit each batch to what you can pour within 10–15 minutes.
For larger projects, divide your total mixture into smaller portions and blend them one at a time. This prevents overheating and uneven curing.
Keep in mind that resin depth also plays a role—deep pours generate more heat than thin coats.
If you need to fill a deep mold, pour in layers, letting each one partially cure before adding the next.
Recording your mix times, volume, and room temperature can help you repeat results for future projects.
Common Mixing Mistakes to Avoid
Avoid guessing your ratios. Even a small measuring error can lead to soft or sticky resin that never fully cures.
Use digital scales or marked cups for accuracy. Don’t rush mixing—insufficiently blended resin can leave streaks or cloudy spots.
Always scrape the sides and bottom of your container. Keep water, dust, and oil out of your workspace since contaminants can ruin the finish.
If bubbles form during resin mixing, let the mixture sit for a minute before pouring. You can also warm the resin bottles slightly in a hot water bath (sealed tightly) to reduce viscosity.
Never mix leftover cured or partially hardened resin with fresh batches. Each mix must start with new material to achieve a clean, strong result.
If you're curious about how to get a perfect epoxy resin mix every time, our article How To Mix Epoxy: Guide for Perfect Results Every Time is a must-read.
Wrap Up
Choosing the best mixer for epoxy resin is crucial to achieving a smooth, bubble-free finish in your projects. Low-speed electric mixers with paddle attachments are ideal because they mix resin evenly without introducing air bubbles.
Silicone resin mixer paddles are popular for their non-stick surfaces, making cleanup easy and efficient. The Resiners® Upgraded Dual-Head Resin Mixer stands out for its hands-free operation and adjustable speed, reducing wrist fatigue and improving precision.
Investing in the right mixer enhances your resin crafting experience, ensuring flawless results and saving time during preparation.
Read our article How To Make Resin Shiny Without Polish: Quick Guide for a step-by-step walkthrough that simplifies this rewarding craft.
Also,don’t forget to check out our airless bubble removal machine to ensure your resin is perfectly smooth after mixing.
Frequently Asked Questions
What features should I look for in a high-quality resin mixer?
Look for a low-speed electric motor with variable speed control. This lets you mix slowly to prevent air bubbles from forming.
Choose a mixer with paddle-style attachments rather than sharp blades. Flat or spiral paddles move both resin and hardener evenly through the container.
A mixer that fits standard mixing cups and offers a comfortable grip also helps keep your process steady.
Can you recommend any mixers that are easy to clean after using with epoxy resin?
Pick a mixer with removable paddles or attachments made of stainless steel or coated metal. These materials wipe clean before the resin cures.
If you use disposable mixing cups, you can limit cleanup time. Keeping rubbing alcohol or acetone nearby makes it easier to clean leftover resin from your mixer right after use.
Are there any affordable mixers suitable for small-scale resin projects?
Yes, small handheld electric mixers or cordless drill attachments work well for small batches. They’re usually inexpensive and easy to find at craft or hardware stores.
Manual stir sticks, reusable silicone paddles, or plastic mixing spatulas also fit small projects if you prefer to mix by hand. They’re budget-friendly and give you more control.
How do I avoid bubbles when mixing my epoxy resin?
Always mix slowly and steadily to reduce trapped air. Scrape the sides and bottom of your mixing cup often to combine both parts fully.
Warming the resin slightly before mixing can also lower viscosity, helping bubbles rise to the surface. After mixing, you can let the resin rest for a minute to let remaining bubbles escape.
What's the difference between using a manual stir stick and an electric mixer for my resin crafts?
A manual stir stick gives you full control but can be tiring for larger batches. It’s better for small amounts or when precision is important.
An electric mixer saves time and keeps texture consistent for bigger pours. It produces smoother mixtures but requires slow, careful speed control to avoid excess bubbles.
How can I ensure a thorough mix without overworking the epoxy resin?
Keep the mixer speed low. Mix just long enough until the resin looks uniform.
Most two-part epoxies blend well after two to three minutes of steady motion. Avoid whipping or changing directions too quickly.
Transfer the mixture to a second clean cup—a method called the two-cup technique—to catch any leftover unmixed material.


Leave a comment
This site is protected by hCaptcha and the hCaptcha Privacy Policy and Terms of Service apply.