Resin charcuterie boards bring a creative twist to your serving setup and let your crafting skills shine. When you mix natural wood with glossy resin, you get a piece that's both useful and beautiful.
With a resin charcuterie board, you can blend art and utility, turning any meal or party into something a little more special.
You'll learn how to make your own board, from picking materials to pouring and finishing the resin. There are design ideas here, from ocean-inspired swirls to rustic wood-and-clear resin looks.
Each idea gives you a way to show off your style and add a handmade touch to your table. You'll also get some tips on care, maintenance, and safety so your board stays food-safe and keeps looking good.
Whether you're crafting for fun or making gifts, this guide should help you get started.
Start your project with our epoxy resin and hardener collection for durable, glossy results.
What Is a Resin Charcuterie Board?

A resin charcuterie board mixes natural wood and epoxy resin to make a serving piece that's both useful and nice to look at. You can serve meats, cheeses, or desserts and add some color and shine to your table.
These boards bring together art and practicality, giving your kitchenware a custom, handmade vibe.
Resin Versus Traditional Charcuterie Boards
Traditional charcuterie boards use solid wood like acacia, walnut, or maple. They look warm and rustic, but they can stain or soak up moisture over time.
Resin charcuterie boards swap in epoxy resin to fill cracks or sections of the wood, making a smooth, glassy surface that resists water and bacteria.
You can customize resin boards with pigments, metallic flakes, or even things like shells or dried flowers. Each board ends up unique and a bit more decorative than plain wood.
|
Feature |
Traditional Wood Board |
Resin Charcuterie Board |
|
Material |
Solid wood |
Wood with epoxy resin |
|
Durability |
Can warp or stain |
Moisture-resistant |
|
Appearance |
Natural grain |
Custom colors and finishes |
Resin's durability and easy cleaning make it great for both display and serving.
Epoxy Resin and Food Safety
Food safety really depends on the type of epoxy resin you use. Not all resins are food-safe, so you need one labeled as food-grade or approved for direct food contact.
After curing, most high-quality resins turn non-toxic and work for serving dry foods. Still, it's best not to cut directly on the resin part, since that can scratch it.
You can add a food-safe clear coat for extra protection. Always follow the instructions for mixing and curing times. Proper curing means the resin hardens fully and won't leach anything into your food.
Keep your board in a cool, dry spot and wash it with mild soap and water—never soak it or toss it in the dishwasher.
Popular Styles and Finishes
There are tons of ways to design resin charcuterie boards. Some people pour resin between two wood slabs for a “river” look, while others cover just part of the board for a half-resin style.
Popular color themes include ocean waves, metallic swirls, or clear layers that show off the wood grain. Mica powders and alcohol inks add shimmer and depth.
You can make the finish glossy or satin, depending on how you sand and polish. A gloss finish looks sleek and shiny, while matte feels a bit more natural.
Try matching your board to your kitchen, or just go bold and make it a centerpiece for parties or gifts.
And if you want to speed up your process, read How to Make Resin Dry Faster: 10 Proven Tips for time-saving tricks.
Essential Materials and Tools

To build a resin charcuterie board, you'll need sturdy wood, good epoxy resin, and a few tools to shape, seal, and finish your design. Each material changes the look, feel, and strength of your board, so choose carefully.
Choosing the Right Board Base
Pick a hardwood base like walnut, maple, or oak. These woods resist warping and handle lots of use. Skip softwoods like pine—they soak up resin unevenly and dent too easily.
A live edge board gives a natural look and pairs well with resin. If you want a smooth edge, just cut or sand it to the shape you like.
Before you pour resin, sand the surface with 120–220 grit sandpaper. This helps the resin stick. Wipe away dust with a clean, dry cloth.
If you want to cut food on the board, use a food-safe finish like mineral oil or cutting board wax after the resin cures. This protects both the wood and your food.
Epoxy Resin Selection
Pick a food-safe epoxy resin made for serving boards. Some craft resins look the same, but not all are safe for food surfaces.
Look for a resin with a 1:1 mixing ratio—they're easier for beginners. Clear resin is great for adding pigments, mica, or glitter.
Temperature matters. Keep your workspace between 70°F and 80°F (21°C–27°C). Cooler air slows curing, and heat can cause bubbles or weird textures.
Use measuring cups and popsicle sticks to mix small batches. Stir slowly to keep out air bubbles. Once mixed, pour within the resin’s working time—usually 20–40 minutes, depending on the brand.
Using Painter’s Tape for Clean Edges
Painter’s tape stops resin from dripping over the edges and making a mess. Put high-quality painter’s tape along the sides and bottom before pouring.
Press the tape down to seal gaps. For live edges or rough spots, use shorter strips and overlap them.
Take off the tape after the resin starts to gel but before it hardens all the way. This gives you crisp edges without peeling off cured resin.
If resin sneaks under the tape, sand off the extra after it dries. Fine-grit sandpaper (220–400) works best for smoothing those spots.
Heat Gun Techniques
A heat gun helps you pop bubbles that show up after pouring resin. Hold it about 6–8 inches above and move it in circles.
Don't hold the heat in one spot too long. Too much heat can scorch the resin or make ripples. Quick, gentle bursts work best.
If you don’t have a heat gun, try a butane torch or a blow dryer on cool. Keep airflow gentle so you don't push resin out of place.
After curing, check the surface. If you still see bubbles, sand lightly and add a thin topcoat of resin for a smooth, glassy look.
Add shimmer and depth with our mica powder collection for pearlescent effects.
Step-by-Step Guide to Making Your Own

Making your own resin charcuterie board takes some planning and patience. You'll set up your workspace, mix and color the resin, pour and spread it, and then finish the board so it's food-safe and smooth.
Workspace Preparation
Pick a flat, clean spot with good airflow. Cover your work area with plastic or parchment paper to catch spills.
Keep your tools—mixing cups, stir sticks, gloves, and a heat gun—close by. Use painter’s tape to cover any board parts you don’t want resin on, like the back and edges.
Press the tape down well so resin doesn’t leak. Wipe the board with a lint-free cloth to get rid of dust or oils.
Try to keep pets, dust, and moisture away while you work and while the resin cures.
Mixing and Coloring Epoxy Resin
Measure your epoxy resin and hardener as the label says. Most use a 1:1 ratio, but double-check. Pour both parts into a clean cup and stir slowly for 2–3 minutes.
Scrape the sides and bottom as you mix. Stirring too fast brings in air bubbles, which can cloud the resin. Divide the resin into smaller cups if you want more than one color.
Add pigment, mica, or resin dye a little at a time. Mix each color until it looks even. Test colors on a scrap before pouring them onto your board.
Pouring and Spreading Techniques
Pour the colored resin onto your taped board in small spots. Make patterns by layering or swirling colors with a stick.
Move slowly to control the flow. Use a heat gun or torch to pop surface bubbles. Hold it a few inches above and move it steadily.
Tilt the board gently to help the resin spread. If you want a thicker look, pour a second layer after the first one gets tacky. Let the resin level out before you leave it to set.
Curing and Finishing Touches
Let the resin cure in a dust-free spot, following the cure time on the label. Most epoxy resin needs 24 to 72 hours to harden. Try not to touch or move the board while it cures.
After it's cured, remove the painter’s tape carefully. Sand the edges with fine-grit paper if you find drips or rough spots.
Wipe the whole thing with a soft cloth. If you like, add food-safe mineral oil or conditioner to the wood parts. This brings out the grain and protects the surface.
Your resin charcuterie board is ready to use or show off. Not bad, right?
Smooth out bubbles and edges easily with the heat gun for crafts collection.
Creative Resin Charcuterie Board Ideas

You can design a resin charcuterie board that feels personal and artistic by playing with color and texture. Try mixing wood, pigment, and little decorative things to make a serving board that looks as good as it works.
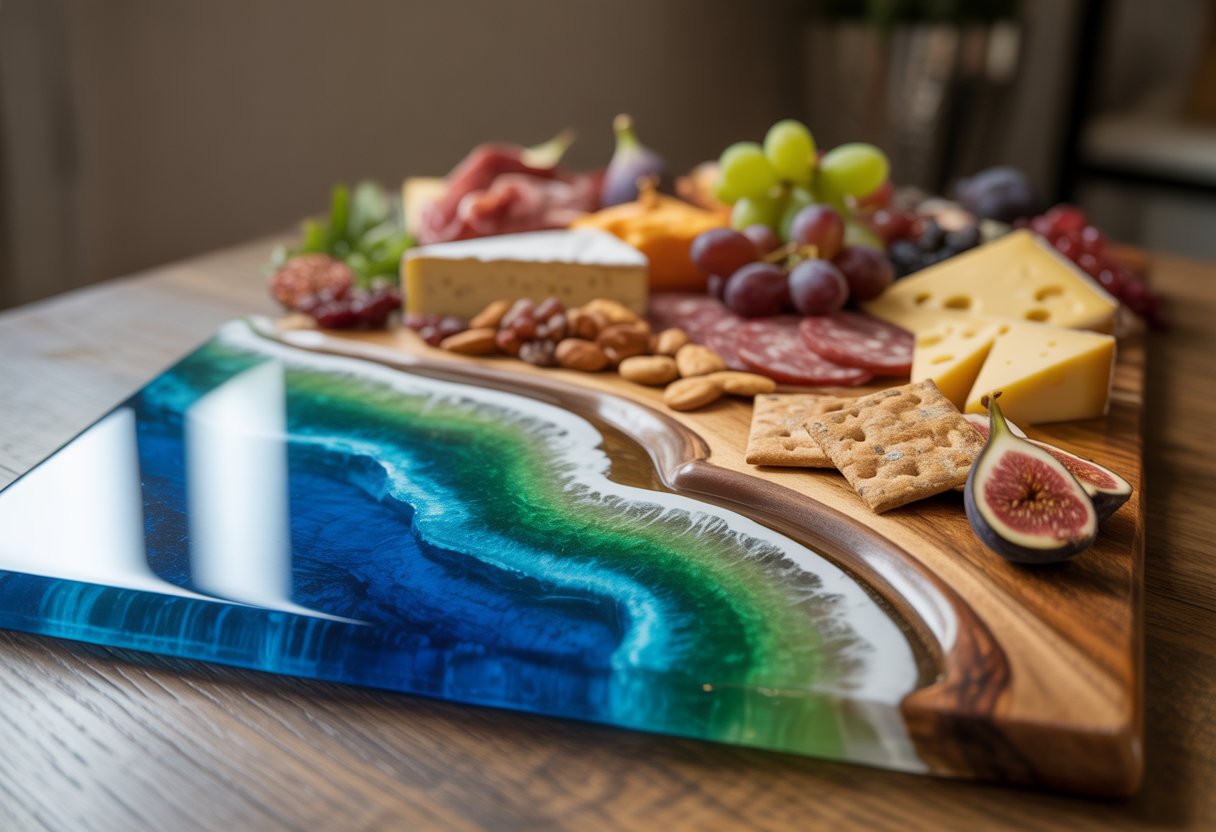
Ocean Wave and Beach Themes
A beach-inspired resin charcuterie board really captures the calm look of the sea. Use blue, turquoise, and white pigments to mimic waves rolling onto a wooden shore.
Pour tinted epoxy resin in thin layers and grab a heat gun to make soft, foamy edges that look like sea foam. Add small shells, sand, or crushed glass near the “shoreline” for extra texture and a realistic coastal vibe.
Pick a wood base with a light grain to make the ocean colors pop. Seal the surface with a food-safe resin topcoat so it stays durable and easy to clean.
Geode and Crystal-Inspired Designs
Geode-style boards use metallic pigments, mica powder, and glitter to copy the sparkle of real crystals. Start by sketching a rough geode shape, then pour tinted resin in layers, going from dark to light tones.
Highlight the “crystal edges” with gold, silver, or copper lines between colors. Mixing clear resin with crushed glass or quartz chips adds shimmer and depth.
This style stands out best on dark wood or a black resin background. If you like bold, decorative pieces, this one’s a showstopper on any table.
River Flow and Cracked Wood Effects
A river resin charcuterie board mixes wood and resin for a natural, modern look. Use two slabs of wood with a gap, then pour tinted epoxy resin down the middle to make a “river.”
Blue, teal, or smoky gray colors create a real water effect. For a cracked wood vibe, fill splits or knots in reclaimed wood with colored resin, which also helps strengthen the board.
Try a matte or satin finish to give the resin a more organic feel. This style fits rustic kitchens and gives new life to imperfect or recycled wood.
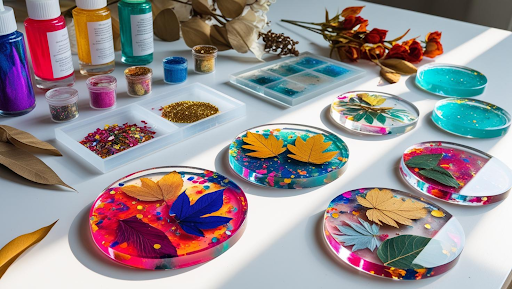
Floral and Botanical Embeds
Embedding dried flowers, leaves, or herbs in clear epoxy resin gives your board a natural, elegant style. Arrange the botanicals before pouring to keep them visible and spaced out.
Press and dry the materials flat so you don’t get any moisture trapped inside. Small blooms like lavender, baby’s breath, or fern leaves work best.
You can tint the resin a little to match your kitchen colors. This look goes nicely with light woods and adds a soft, pretty touch for everyday or special occasions.
Read our article Best Dye for Epoxy Resin: Mix, Pour, Wow! to learn how to add vibrant colors to your board.
Care, Maintenance, and Safety Tips

Keep your resin charcuterie board in good shape so it stays shiny, colorful, and safe for food. Just a few easy cleaning habits and some regular care can help your board last a long time.
Cleaning and Storage Recommendations
Wash your resin charcuterie board by hand with mild dish soap and warm water. Don’t soak it or toss it in the dishwasher—heat and water can warp the wood or mess up the resin.
Use a soft sponge or cloth to clean the surface. Skip abrasive pads or harsh cleaners, since they’ll scratch the glossy finish.
Dry your board with a towel and let it stand upright to air-dry. When you put it away, keep it in a cool, dry place and out of direct sunlight or heat.
UV light can fade resin colors or make them yellow. If you stack boards, put a soft towel or cloth between them so you don’t get marks.
Handling and Serving Guidelines
Carry your resin charcuterie board with both hands to spread out the weight. The resin can be a little slippery, so hold on tight to avoid dropping or chipping it.
When serving, use non-serrated knives or soft cheese tools to keep the surface nice. Don’t cut right on the resin area.
Keep hot pans or mugs off the board—heat can soften or damage the resin layer. Check that your board’s fully cured before using it with food.
Most food-safe epoxies are fine once cured, but double-check your product label just in case. After each use, wipe the board with a slightly damp cloth and dry it before storing.
Longevity and Preservation
To keep your board looking fresh, rub the wood part with food-grade mineral oil or beeswax every few months. This keeps the wood from drying out and helps the resin bond stay tight.
Avoid sudden temperature changes, like moving a cold board into a hot kitchen. That can make the materials expand or contract and cause problems.
Check your board now and then for little cracks or dull spots. If you spot any, lightly sand the resin with fine-grit sandpaper and add a thin coat of resin-safe polish to bring back the shine.
For a flawless finish, check How to Smooth Edges on Epoxy Resin Like a Pro and elevate your craftsmanship.
Wrap Up
Want to impress your guests? A resin charcuterie board adds sparkle to your snacks! Mix wood and resin for a beachy, galaxy, or marble look. You can pour colored resin into cracks or edges for a glowing design.
Try adding shells, gold flakes, or pigments for extra flair. It’s food-safe once cured and perfect for parties or gifts.
Make your table shine with a custom resin charcuterie board! Grab some clear epoxy resin and silicone molds to start crafting your own masterpiece today.
Frequently Asked Questions
What are some creative design themes for resin charcuterie boards?
Try coastal themes with blue and white resin to mimic ocean waves. Rustic designs using clear resin and live-edge wood bring a natural look. You can also create modern styles with metallic pigments or geometric patterns for a clean, bold finish.
How can I incorporate personalization into my resin charcuterie board projects?
Add initials, names, or short messages using vinyl stencils before pouring resin. You can embed small keepsakes like shells, dried flowers, or stones. Personalized color combinations that match a kitchen or event theme also make your board unique.
What are the best types of wood to use when making resin charcuterie boards?
Use hardwoods like walnut, maple, cherry, or oak. These woods resist warping and hold up well to resin bonding. Avoid softwoods since they can absorb resin unevenly and may dent easily.
Can you suggest any techniques for achieving stunning effects with resin on charcuterie boards?
Use alcohol inks or mica powders to create marbled or swirling effects. Layer different colors of resin while it’s still fluid to form depth and movement. You can also use a heat gun to blend pigments and remove bubbles for a smooth finish.
What safety precautions should I follow when working with resin for charcuterie boards?
Work in a well-ventilated space and wear gloves, eye protection, and a respirator if needed. Follow the manufacturer’s mixing and curing instructions carefully. Always use food-safe resin or a food-grade clear coat if food will touch the surface.
Where can I find inspiration for color schemes and patterns for my resin charcuterie board designs?
Check out craft sites, Pinterest boards, and resin art groups for cool ideas. Nature gives you tons of color options too—ocean blues, deep greens, or even sunset colors can spark something new.
Try testing small resin samples to see how your colors mix before you jump in on your main board. Honestly, sometimes you just have to experiment and see what feels right.


Leave a comment
This site is protected by hCaptcha and the hCaptcha Privacy Policy and Terms of Service apply.