Cool resin art has become one of the most captivating crafting trends, allowing creators to produce stunning, glass-like pieces with incredible depth and visual interest.
This versatile medium transforms liquid epoxy into solid masterpieces featuring vibrant colors, mesmerizing patterns, and crystal-clear finishes that other art forms simply can't match.
Whether you're drawn to ocean waves, geode slices, or galaxy-inspired designs, resin offers endless possibilities for personalization through added elements like glitter, dried flowers, or embedded objects. Even as a beginner, you can create impressive cool resin art with just a few basic supplies and techniques.
Ready to discover how to make your own eye-catching resin creations? Read on to unlock the secrets of this fascinating art form.
Popular Cool Resin Art Styles

Resin art has exploded in popularity with crafters creating stunning pieces using different techniques. Let's look at some styles that have taken the DIY world by storm.
Ocean, Geode, And Galaxy Effects
Ocean-inspired resin art captures the beauty of waves, beaches, and underwater scenes. You can create realistic shorelines using white resin for foam over blue layers. Add tiny shells or beach sand for extra texture! Many crafters use a heat gun to make those perfect wave crests.
Geode art mimics the sparkly inside of natural rock formations. You start with a center point and build outward with rings of different colors. The trick is adding glitter, metallic pigments, and sometimes real crystals to get that wow factor.
Galaxy effects let you capture space right in your artwork. Mix deep blues, purples, and blacks as your base. Then add tiny white dots for stars using a toothpick. Some crafters even include glow-in-the-dark pigment for a magical nighttime effect!
Abstract Pours And Geometric Designs
Abstract pour techniques create one-of-a-kind resin paintings with swirls of color. You can try "dirty pour" where you mix colors in a cup first, then pour them onto your surface. The colors interact in unpredictable ways!
Using alcohol inks with resin gives you dreamy, flowing designs. Just drop a few colors onto wet resin and watch them spread and blend. No two pieces ever look the same.
Geometric designs add a modern touch to resin art. You can use tape to create sharp lines and shapes. Try pouring different colors into each section for a stained-glass effect. Some crafters combine metals like gold leaf with bold colors for striking contrast.
Layering is key for depth in your abstract pieces. Let each layer cure before adding the next for crystal-clear results.
Your friends won't believe you made it yourself!
Essential Supplies For Creating Cool Resin Art

Creating amazing resin art requires the right supplies and tools to bring your vision to life. Having these essentials on hand will make your creative process smoother and more enjoyable.
Resins, Colorants, And Safety Equipment
Epoxy resin is the foundation of any resin project. Look for a high-quality, clear epoxy resin that's made specifically for art. ArtResin is a popular brand many crafters trust. You'll need to mix it perfectly according to package instructions.
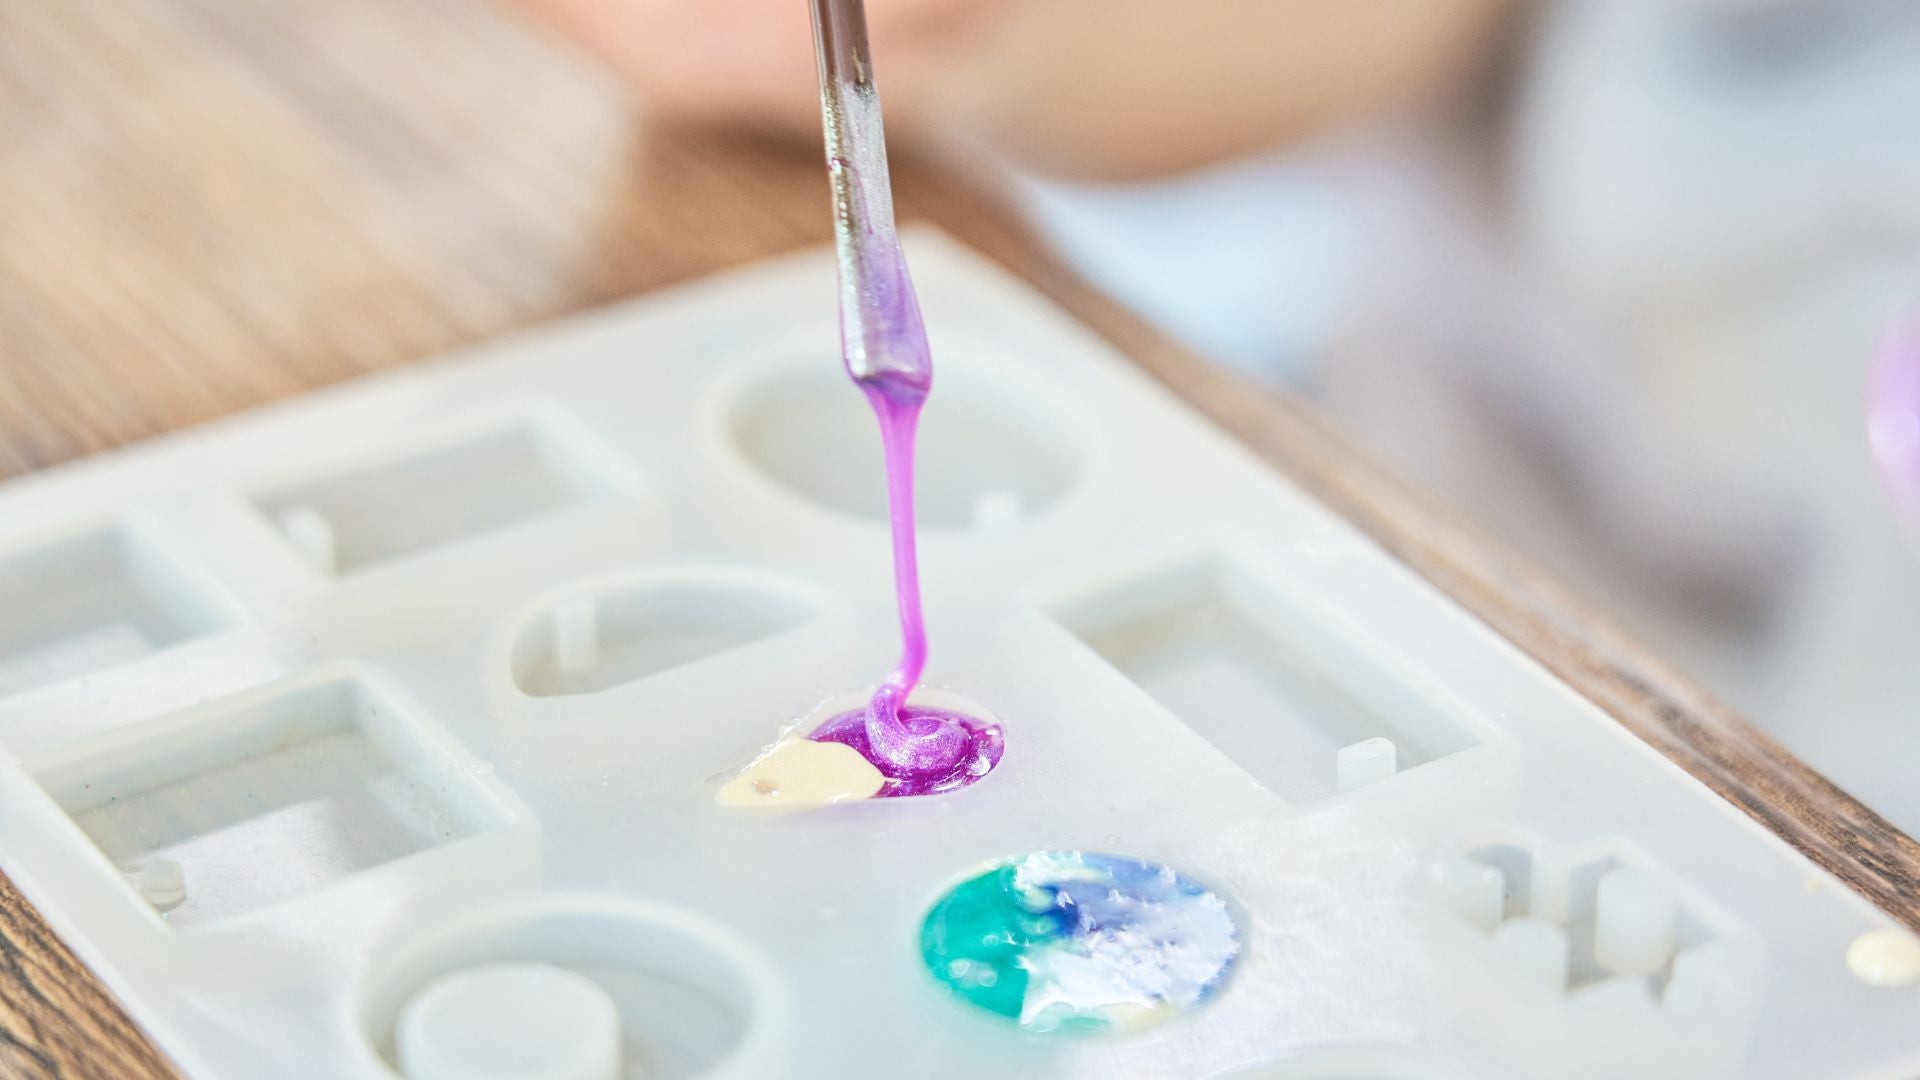
For colors, alcohol inks create beautiful flowing effects in your resin. Mica powders add shimmer, while glitter creates sparkle and dimension. You can find these in craft stores or in resin starter kits for beginners.
Safety comes first!
Always wear nitrile gloves to protect your skin from resin. A proper respirator mask (not just a dust mask) keeps harmful fumes away from your lungs.
Work in a well-ventilated area and wear an apron to protect your clothes.
Tools And Molds For Different Projects
Mixing tools are essential for proper resin preparation. Use plastic measuring cups with clear measurement lines. Wooden craft sticks work great for stirring. Silicone tools are best since resin won't stick to them.
Heat tools help remove bubbles from your resin. A small blow torch or heat gun passes quickly over the surface to pop bubbles. Be careful not to hold it too close!
Molds come in endless shapes and sizes. Silicone molds are perfect for beginners. For flat pieces, try pouring onto MDF boards or canvas. These make great bases for coasters, trays, and wall art.
Don't forget a level surface for curing and plastic sheets to protect your workspace. A bubble level tool ensures your piece cures evenly without resin pooling to one side.
Cool Resin Art Projects By Skill Level

Resin art offers something for everyone, whether you're just starting out or have been crafting for years. The right project can help you build confidence while creating something beautiful and useful.
Beginner-Friendly Coasters And Jewelry
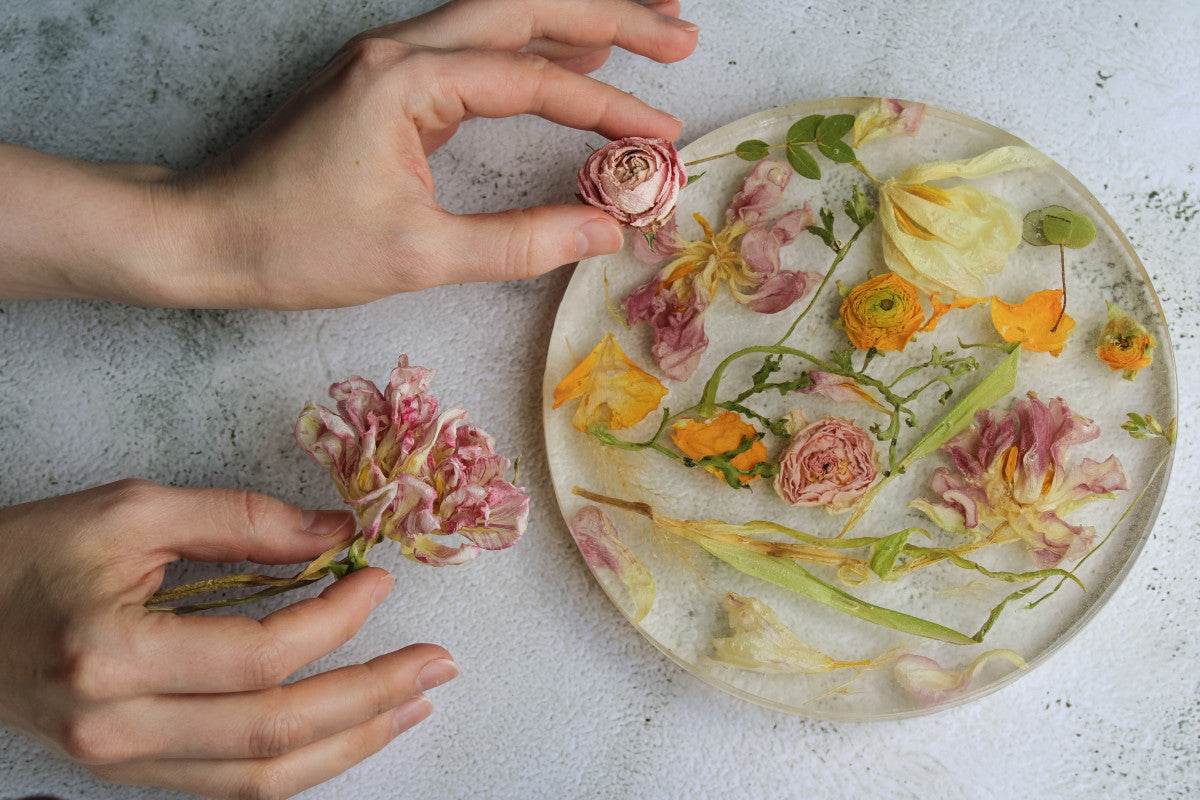
Coasters are perfect for first-time resin crafters! You can make them with simple circular molds that cost under $15. Add dried flowers, glitter, or alcohol ink for color. Many starter kits include everything you need to make 4-6 coasters.
Resin jewelry is another great beginner project. Small pendant molds use less material, which means less waste if you make mistakes. Try these easy ideas:
- Small pendants with pressed flowers
- Beads for bracelets with mica powder
- Simple ring designs with minimal bubbles
Resin keychains are super popular and sell well at craft fairs. Use silicone molds in fun shapes like hearts, stars, or circles. Add your recipient's initials for a personal touch!
Advanced Techniques For Stunning Results
Once you've mastered the basics, try creating resin river tables. These stunning furniture pieces combine wood and colored resin. They take patience but make amazing statement pieces.
Geode art uses multiple layers and colors to mimic real stones. You'll need:
- Heat gun for bubble removal
- Several resin colors
- Gold leaf or mica powder
- Silicone painting tools
3D flower paperweights show off your skills. Build translucent flowers layer by layer for depth. This technique requires working quickly between pours and understanding cure times.
Wall art with cells and lacing effects creates beautiful, unique pieces. Use a torch to bring up cells and create marble-like patterns. Mix different brands of resin for interesting reactions.
Cool Resin Art Techniques and Tutorials To Try

Making cool resin art is easier than you might think! With the right materials and techniques, you can create stunning pieces that showcase your creativity.
Creating Depth With Layers And Embedded Objects
Start by preparing your workspace with a level surface covered in plastic. Wear gloves to protect your hands!
Mix your deep pour resin according to package instructions—usually equal parts resin and hardener.
Pour a thin base layer and let it partially cure (about 4-6 hours). This creates your foundation.
For the second layer, try adding small objects like dried flowers, seashells, or even tiny figurines.
When adding objects, gently press them into the semi-cured resin. Don't push too hard! Pour another thin layer over them.
For awesome 3D effects, work in 3-5 thin layers rather than one thick pour. Each layer should be about 1/4 inch deep. Wait until each layer is tacky but not fully hardened before adding the next.
Pro Tip: Use a heat gun or torch briefly over each layer to remove bubbles. Keep the flame moving to avoid burning the resin!
Working With Specialty Effects (Cells, Marbling, Glow)
Creating cool effects in glossy resin is super fun!
For beautiful cells (those cool circular patterns), add a few drops of silicone oil to some of your colored resin. When you pour it, the silicone creates amazing circular patterns.
Try this marbling technique: Pour small amounts of different colored resin next to each other. Use a popsicle stick to gently swirl them together. Don't overmix or you'll lose the marble effect!
Glow-in-the-dark powder mixed into clear resin makes magical nighttime pieces. Add it to specific areas for the best effect.
For a gorgeous ocean look, layer dark blue on the bottom, teal in the middle, and white on top. Then drag a toothpick through to create realistic waves.
Quick supplies list:
- Epoxy resin (deep pour or regular)
- Colorants (mica powder, alcohol ink)
- Mixing cups & sticks
- Heat gun or torch
- Optional: silicone oil, glow powder
Troubleshooting Common Resin Art Problems
Resin art looks amazing when done right, but sometimes things don't go as planned. Let's look at how to fix the most frustrating problems you might face.
Fixing Bubbles, Colors, And Curing Issues
Bubbles can ruin your beautiful resin piece! To get rid of them, warm your resin bottles in water before mixing. Mix slowly to avoid trapping air.
Use a heat gun or torch to pop bubbles after pouring, but be careful not to burn the resin.
Having trouble with colors? Make sure you're using resin-friendly pigments. Regular acrylic paint can make your resin stay sticky.
Only add a small amount of colorant—too much can mess up the curing process.
Is your resin not hardening? This is usually because you didn't measure correctly or mix thoroughly enough.
Always measure in a 1:1 ratio (or whatever your brand requires) and mix for at least 3-5 minutes. The room must be warm too—around 70-75°F is perfect for curing.
Sticky spots mean you need to mix better next time. Unfortunately, if it's already poured, you'll need to add another well-mixed layer on top.
Displaying And Selling Your Cool Resin Art
After creating beautiful resin pieces, sharing them with the world is the next exciting step. You can turn your hobby into a nice side income with the right approach.
Photography, Pricing, And Marketplace Tips
Taking great photos of your resin art is super important! Use natural light when possible and try different backgrounds that make your colors pop.
Clean any dust off pieces before snapping pictures. A simple white or black backdrop works well for most items.
When pricing your work, don't undersell yourself. Calculate material costs (resin, pigments, molds) and add your time at a fair hourly rate. Beginning artists often charge too little! Start with smaller items to build confidence in pricing.
Where can you sell? Online platforms like Etsy or local craft fairs are great starting points.
Build a simple social media presence to showcase your work—Instagram works wonderfully for visual art. Try setting up at small local markets before investing in bigger events.
Be consistent with your style and posting schedule. Buyers often look for artists with a recognizable "look" to their work.
Make simple business cards with your social media handles to hand out when selling in person.
Inspiration For Your Next Cool Resin Art Project
Looking for fresh ideas to spark your creativity with resin? The world of resin art is always changing with new techniques and applications that can transform your crafting experience.
Trending Styles And Seasonal Ideas
Spring and summer are perfect for bright flower embeddings in your resin projects! Try pressing wildflowers into coasters or pendants for a natural touch.
Many crafters are now adding LED lights to their resin pieces to create glowing nightlights or table centerpieces. Chess sets and dominoes made from resin are becoming super popular.
You can customize them with different colors and add small trinkets inside for a unique game set that nobody else will have.
For your home, try making a statement mirror with a resin frame. Mix different colors or add metallic powders to create a one-of-a-kind piece that will wow your guests.
Beach-themed resin crafts using sand and tiny shells work great for summer projects. You could make beach-inspired jewelry or decorative trays that remind you of vacation all year long.
Don't forget seasonal themes! Autumn leaves in amber-tinted resin or winter-themed snowflake coasters can make thoughtful gifts or seasonal decorations for your home.
Conclusion
Creating cool resin art combines science with creativity, offering unmatched satisfaction as liquid transforms into glossy masterpieces. Each project—whether simple coasters or ambitious river tables—will be uniquely yours, showcasing your personal style through colors, textures, and embedded elements.
Don't be afraid to experiment as you develop your signature techniques. With practice and patience, you'll soon create pieces that amaze everyone who sees them.
Ready to begin your resin journey? Resiners offers everything you need, from silicon mats and epoxy resin to colorants, dried flowers, and curing machines. Visit their collection today and transform your creative visions into stunning reality!
Frequently Asked Questions
How do you get started with resin art if you're a beginner?
Starting with resin art is exciting but needs some planning. First, get the right supplies: epoxy resin, silicone molds, mixing cups, stir sticks, and colorants.
Safety matters a lot! Work in a well-ventilated area and wear gloves to protect your skin. Many crafters wonder if they need a respirator - while some resins are low-odor, having proper ventilation is always important.
Begin with simple projects like coasters or small jewelry pieces. This helps you learn how resin flows and cures without wasting materials. Read the instructions on your resin package carefully, as different brands have different mixing ratios.
Can you share some cool patterns or designs for resin art?
Ocean waves are popular and beautiful! Layer blue and white resin, then use a heat gun to create wave-like patterns that mimic the sea.
Geode designs look amazing in resin. Start with a clear base, add rings of different colored resin, and sprinkle in some glitter or metallic powders for that crystal look.
Petri dish effects create awesome "cells" in your art. Drop alcohol ink into clear resin and watch as it spreads into fascinating patterns. You can also try swirling different colors together for a marble effect.
What materials should you avoid embedding in resin?
Fresh flowers often turn brown in resin. Dry them completely first or use fake flowers instead. Paper items need to be sealed with Mod Podge or another sealer before embedding.
Avoid food items as they can rot inside resin over time. Things like coffee beans might look cool at first but can break down later.
Some organic materials like seeds, leaves, or wood might release air bubbles or moisture as resin cures. Seal these items first or dry them thoroughly to prevent issues.
Is crafting with resin considered a costly hobby to get into?
Starting with resin can be moderate in cost. Basic supplies including resin, molds, and tools might cost around $50-100 for beginners.
Silicone molds range from $5-20 depending on size and detail. Resin itself varies in price. A quality 16oz kit costs about $20-40, but cheaper options exist.
The good news is that molds and tools are reusable, making them a one-time investment. You can save money by starting small. Create tiny projects that use less resin while you learn. Many crafters also use household items as molds to reduce costs when first starting out.


Leave a comment
This site is protected by hCaptcha and the hCaptcha Privacy Policy and Terms of Service apply.