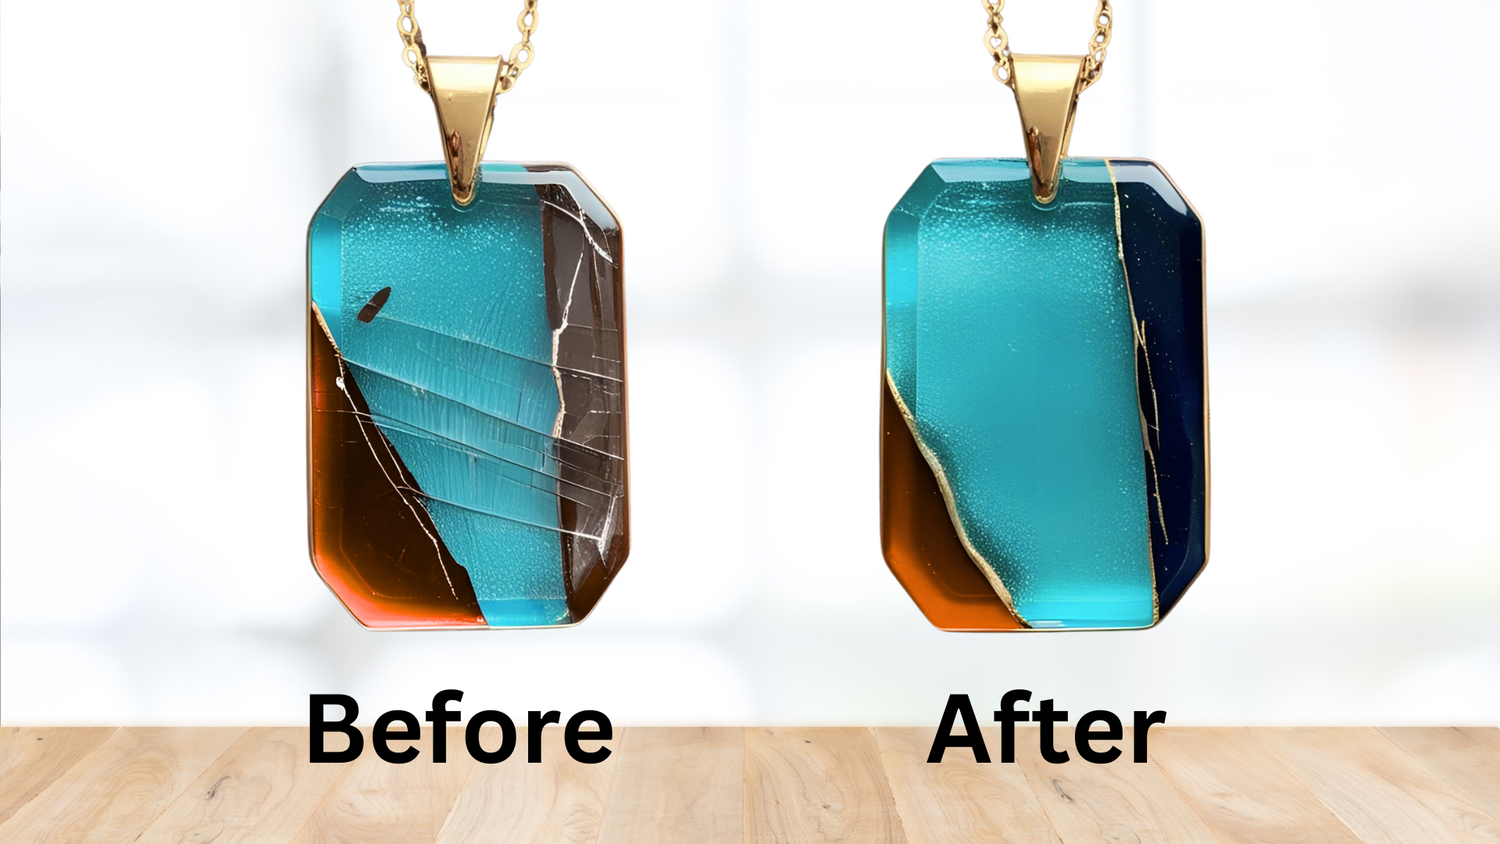
Epoxy resin surfaces look amazing when they’re shiny and clear, but scratches can dull their beauty fast.
If you’re wondering, “Can you really remove scratches from epoxy resin?” the answer is yes! With the right tools and steps, most scratches can be fixed at home, making your resin look glossy and new again.
Ready to learn how? This guide walks you through every step, from light marks to deep gouges.
Why Does Epoxy Resin Get Scratched?
Even though epoxy resin is tough, it can still get scratched from daily use. Understanding the causes helps you prevent future damage and choose the best repair method.
- Light surface scratches from keys, dishes, or shoes
- Deeper gouges from dropping heavy items
- Cloudy spots from improper cleaning or sanding
Knowing what caused your scratches helps you pick the right fix.
What You’ll Need to Remove Scratches from Epoxy Resin

Before you start fixing scratches, it’s important to gather the right tools and materials. Having everything ready will make the process smoother and easier.
- Microfiber cloths
- Clean water and mild soap
- Sandpaper (start at 1000–1500 grit for light scratches, and only drop to 600–800 grit for deeper scratches) for best results, working up to 3000 grit
- Polishing compound (made for plastics or resin)
- Buffing pad or soft cloth
- Masking tape (to protect areas you don’t want to sand)
- Optional: fresh epoxy resin for deep gouges
💡 Safety tip: Wear gloves and a mask when sanding or using chemicals. Work in a well-ventilated area.
📌Ready to polish like a pro? Don’t forget to check out this in-depth resin polishing guide for more tips and tricks.
Step-by-Step: How to Remove Scratches from Epoxy Resin

Removing scratches from epoxy resin is a process that takes a little time and patience, but it’s very doable at home. Follow these steps to restore your resin’s shine.
Clean the Surface First
Always start by cleaning your resin with mild soap and water. Dry it with a microfiber cloth. This removes dirt that could scratch the resin more during sanding.
Sand Out the Scratches
- Start with the right grit: For light scratches, use 1000–1500 grit sandpaper. For deeper scratches, start at 600–800 grit, but only if necessary to avoid unnecessary abrasion.
- Wet your sandpaper: Wet sanding keeps things smooth and dust-free. Dip your sandpaper in water and gently sand the scratched area in a circular motion.
- Work up to finer grits: After the scratch is mostly gone, move to 2000 and then 3000 grit sandpaper. Always sand in circles and keep the area wet.
- Wipe clean: Use a clean, damp cloth to wipe away sanding dust.
Polish for a Glossy Finish
- Apply resin polish or plastic polish: Put a small amount on a soft cloth or buffing pad.
- Buff the area: Rub in circles with gentle pressure until the shine returns.
- Check your work: If the scratch is still visible, repeat sanding and polishing steps with higher grit.
📌Want more info on the types of resin and the best uses for each? Browse this helpful resin types guide to learn more.
How to Fix Deep Scratches and Gouges in Epoxy Resin
When scratches are too deep for simple sanding, you’ll need to fill and repair them for a smooth finish. Here’s how to handle those tougher jobs.
- Clean and sand the area: Use 600 grit sandpaper to smooth the edges of the gouge.
- Mix a small batch of epoxy resin: Follow package instructions carefully.
- Fill the scratch: Use a toothpick or small brush to add resin just to the damaged area. Do not overfill.
- Let it cure: Wait at least 24 hours or as directed.
- Sand and polish: Once cured, sand the area with 1000-3000 grit sandpaper, then polish for a seamless finish.
Polishing and Buffing for a Mirror-Like Shine
Polishing is the final touch that brings back the crystal-clear shine to your epoxy resin. This step is important for making your surface look brand new.
- After sanding, use a resin polishing compound or a plastic polish.
- Apply with a soft cloth or a buffing pad, and work in small circles.
- For big projects, a power buffer on low speed can save time.
- Always finish with a clean microfiber cloth to wipe away any residue.

Resiners® Cordless Rotary Tool Kit for Resin Drilling and Polishing
Mistakes to Avoid When Removing Scratches from Epoxy Resin
Avoiding common mistakes will help you get the best results and protect your resin from further damage. Here are the main things to watch out for.
- Do not over-sand. Sand just enough to remove the scratch, not the whole surface.
- Do not skip grits. Moving from rough to fine sandpaper step by step prevents new scratches.
- Never use harsh chemicals. Alcohol, acetone, or strong cleaners can damage resin.
- Do not skip polishing. Sanding alone leaves the surface dull, so always polish last.
📌If you are curious about the differences between epoxy and UV resin, or want to explore more advanced repair techniques, discover this guide on epoxy resin vs. UV resin for more info.
How to Prevent Future Scratches on Epoxy Resin
Keeping your epoxy resin looking good is easier when you take a few extra steps. Simple habits can help prevent new scratches from forming.
- Use placemats, coasters, or rugs in high-traffic areas.
- Clean with soft cloths and gentle soap, not scouring pads.
- Add a clear protective topcoat or wax for extra scratch resistance.
- Avoid dragging heavy or sharp objects across resin surfaces.
When to Call a Pro for Epoxy Resin Scratch Repair
Sometimes, scratches are too deep or widespread for DIY repair. If you’re unsure or want a flawless finish, calling a professional is a smart choice.
If your epoxy resin surface has cracks, chips, or scratches too deep to fix with DIY methods, it might be time to call a professional. They can recoat or repair large areas and make your surface look brand new.
Conclusion
Scratches do not have to ruin the look of your epoxy resin. With the right steps, you can restore shine and clarity at home and keep your resin projects looking their best for years.
Whether you are fixing a small art piece or a large countertop, a little care goes a long way. If you are repairing a food-safe surface, make sure the repaired area is fully cured and sanded or polished smooth before use.
If you want more helpful resin guides and tips, visit Resiners for expert articles and advice.
Ready to upgrade your supplies or try something new? Browse and shop top resin products today! Give your next resin project the best start possible.
Frequently Asked Questions
Does resin polish remove scratches?
Resin polish is designed to remove fine surface scratches and bring back the gloss to your epoxy resin. It works best on shallow scratches and can also help with light scuffs. For deeper scratches, you should sand the area first before applying the polish for the best results.
Can you use nail polish remover on epoxy resin?
No, you should not use nail polish remover or acetone on epoxy resin surfaces. These chemicals can react with the resin, causing it to become cloudy, sticky, or even damaged. Instead, stick to mild soap and water or products specifically made for resin care.
What is the best scratch remover for resin?
The best scratch remover for resin is a polishing compound made specifically for plastics or resin surfaces. These products are gentle enough not to cause further damage but strong enough to remove fine scratches. Fine automotive scratch removers can also work if they are labeled safe for clear plastics.
Can toothpaste remove scratches from epoxy resin?
Toothpaste can sometimes help polish out very light surface scratches on epoxy resin because it acts as a mild abrasive. However, it is not as effective as proper resin polish or fine sandpaper for deeper or more noticeable scratches. For best results, use products made for resin to achieve a clear, glossy finish.
How do you fix cloudy spots after sanding epoxy?
Cloudy spots after sanding usually mean the surface was not polished enough to restore clarity. To fix this, use a resin polish and buff the area with a soft cloth in circular motions until the resin becomes clear again. If the cloudiness remains, repeat the polishing process with a bit more pressure or a finer polish.
Related articles:
What is Resin Paint? | Uses, Types & Application Guide


Commenta
Questo sito è protetto da hCaptcha e applica le Norme sulla privacy e i Termini di servizio di hCaptcha.