هل تتساءل ما إذا كان بإمكانك وضع الإيبوكسي على الخشب؟ نعم، يمكنك ذلك! يعمل راتنج الإيبوكسي على تحويل الخشب العادي إلى قطع مذهلة ومتينة تدوم لسنوات.
من طاولات الريزن إلى أسطح الطاولات، يخلق الإيبوكسي درعًا واقيًا ضد الرطوبة والتآكل اليومي مع تعزيز الجمال الطبيعي للخشب.
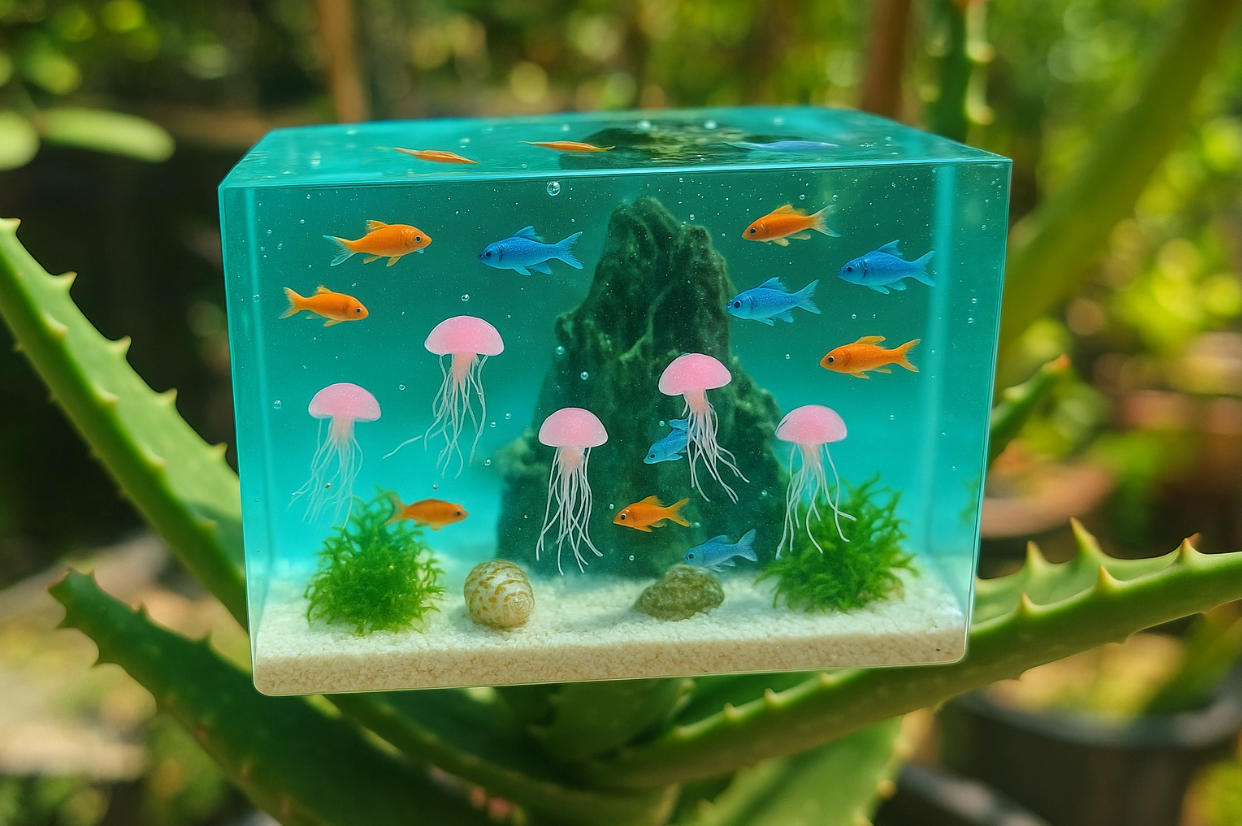
يتيح لك تعدد استخدامات الإيبوكسي إنشاء طبقات شفافة تعرض حبيبات الخشب أو إضافة ألوان لتصاميم مخصصة. إنه يعمل بشكل جميل لإصلاحات المشاريع الفنية والأثاث المتميز.
سواء كنت مبتدئًا أو عامل خشب متمرس، فإن فهم خصائص الإيبوكسي وتقنيات التطبيق الصحيحة سيساعدك على تحقيق نتائج احترافية.
استمر في القراءة لاكتشاف كل ما تحتاجه لنجاح الإيبوكسي!
لماذا يشكل الإيبوكسي والخشب ثنائيًا مثاليًا؟
يتكامل الخشب والإيبوكسي بشكل جميل لعدة أسباب:
✅ رباط طبيعي قوي
- يتغلغل الإيبوكسي في ألياف الخشب، مما يخلق رابطًا يصبح جزءًا من الخشب.
- توفر الطبيعة المسامية للخشب مرساة ممتازة لالتصاق الإيبوكسي.
- يخلق هذا الرابط الطبيعي تشطيبًا لا يتقشر أو ينفصل بسهولة.
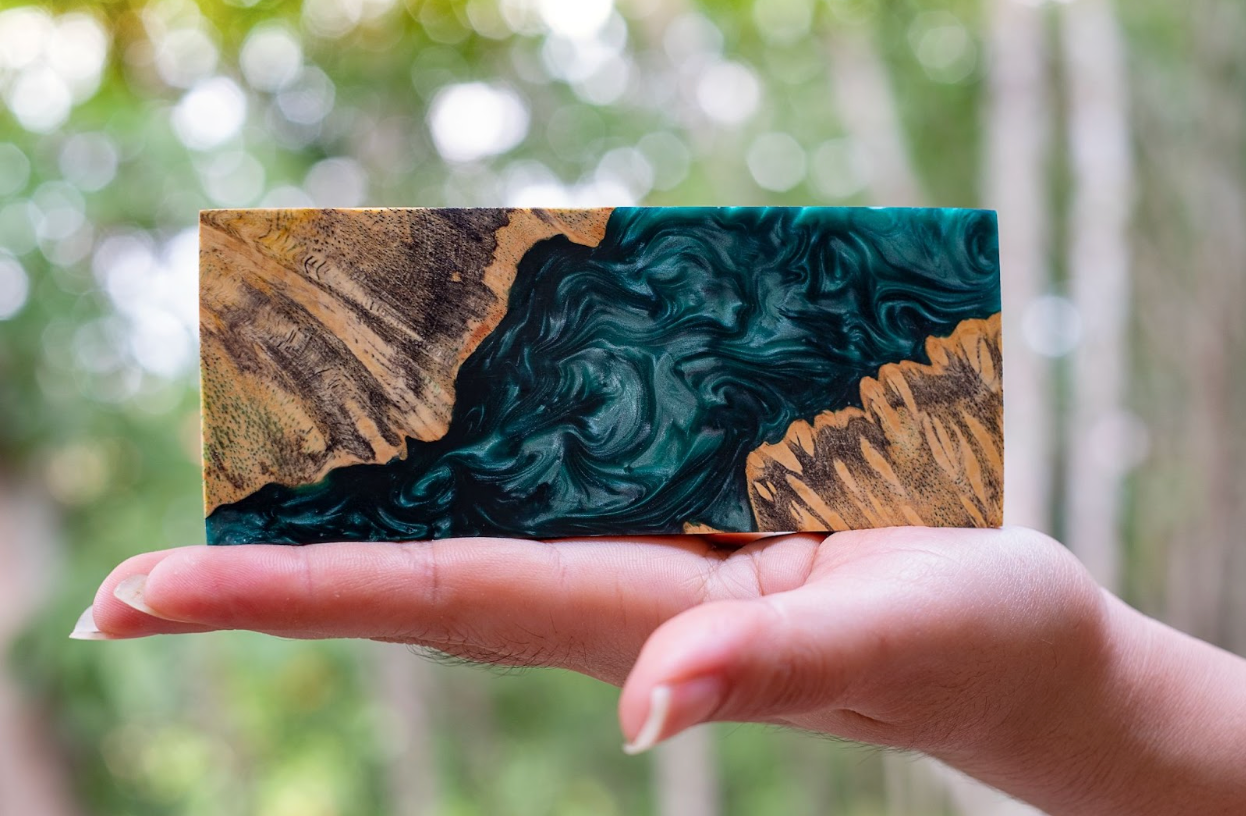
✅ جمال معزز
- يعمق الإيبوكسي ألوان حبيبات الخشب مثل العدسة المكبرة.
- يبرز التشطيب الشفاف التفاصيل الدقيقة التي قد لا تلاحظها بطريقة أخرى.
- يحافظ على الميزات المميزة مثل العقد والنتوءات ويعرضها.
✅ فوائد عملية
- يملأ العيوب بينما يجعلها ميزات بدلاً من عيوب.
- يخلق حاجزًا مقاومًا للماء يحمي الخشب من التلف.
- يمكن تلوينه أو تكسيره أو تركه شفافًا تمامًا حسب رؤيتك.
أنواع الإيبوكسي لمشاريع الخشب

إيبوكسي الطاولات/أسطح العمل
- تركيبات ذاتية التسوية لأسطح ناعمة ومستوية.
- بالنسبة للأسطح الملامسة للطعام، اختر بشكل خاص الإيبوكسي الآمن للطعام المتوافق مع إدارة الغذاء والدواء الأمريكية.
- تشطيب صلب ومتين يتحمل الاستخدام اليومي.
مواد حشو الإيبوكسي
- اتساق أكثر سمكًا لملء الشقوق والثقوب.
- يمكن صنفرته وتشكيله بعد المعالجة.
- متوفر بألوان مطابقة للخشب.
إيبوكسي الصب العميق
- تختلف أعماق الصب حسب المنتج، تتراوح من 1/8 بوصة إلى 4 بوصات في طبقة واحدة.
- تركيبة خاصة تمنع السخونة الزائدة أثناء تفاعلات المعالجة الطاردة للحرارة.
- مثالي لطاولات الريزن والتضمينات السميكة.
المواد اللاصقة الهيكلية
- يخلق روابط أقوى من الخشب نفسه.
- مثالي للبناء وربط قطع الخشب.
- مقاومة عالية لتغيرات درجة الحرارة والرطوبة.
دليل خطوة بخطوة لتطبيق الإيبوكسي على الخشب
التحضير السليم أمر بالغ الأهمية لنجاح الإيبوكسي:
✅ التنظيف
- إزالة جميع الغبار والزيوت والتشطيبات السابقة.
- مسح السطح بالكحول المنزلي لإزالة بقايا المواد.
- تأكد من أن السطح جاف تمامًا وخالي من الملوثات.
✅ عملية الصنفرة
- ابدأ بورق صنفرة 80 حبيبة لتسوية السطح.
- انتقل إلى حبيبة 150-180 للتحضير النهائي.
- لا تصنفر بدقة شديدة - يلتصق الإيبوكسي بشكل أفضل بالأسطح ذات الملمس الخشن قليلاً.
✅ اعتبارات الرطوبة
- يجب أن يكون محتوى الرطوبة في الخشب 7-12%.
- استخدم مقياس رطوبة إذا كان متاحًا.
- اسمح للخشب الأخضر بالجفاف تمامًا قبل تطبيق الإيبوكسي.
✅ إغلاق الأخشاب المسامية
- ضع طبقة رقيقة من مادة مانعة للتسرب على الأخشاب مثل البلوط والصنوبر.
- دع هذه الطبقة الأولية تتشرب وتجف.
- يمنع الختم تكون فقاعات الهواء في الصب النهائي.
دليل خطوة بخطوة لتطبيق الإيبوكسي على الخشب

اتبع هذا الدليل الشامل لتحقيق نتائج احترافية عند تطبيق الإيبوكسي على مشاريعك الخشبية.
✅ السلامة أولاً
- العمل في مناطق جيدة التهوية حيث تطلق بعض راتنجات الإيبوكسي مركبات عضوية متطايرة (VOCs) أثناء المعالجة.
- ضع في اعتبارك ارتداء جهاز تنفس، خاصة مع التركيبات غير منخفضة المركبات العضوية المتطايرة (VOCs).
- ارتدِ دائمًا قفازات لمنع ملامسة الجلد لراتنج الإيبوكسي غير المعالج.
✅ التحضير
- العمل في بيئة نظيفة بدرجة حرارة تتراوح بين 70-80 فهرنهايت (21-27 درجة مئوية)
- تغطية منطقة العمل بغطاء بلاستيكي
- استخدام ميزان للتأكد من أن سطح المشروع مستوٍ تمامًا
✅ عملية الخلط
- قياس الراتنج والمصلب بدقة وفقًا لنسبة الشركة المصنعة
- الخلط جيدًا لمدة 3-5 دقائق في وعاء نظيف
- الاختيار بين مصلب سريع أو بطيء بناءً على احتياجات وقت العمل

راتنج إيبوكسي شفاف كريستالي 1 جالون/2 جالون من Resiners® مع منفذ تحويل مخصص
✅ تقنيات التطبيق
- الصب في طبقة رقيقة ومتساوية لمشاريع التغطية
- استخدام موزع بلاستيكي للتوزيع بالتساوي
- العمل بشكل منهجي من طرف إلى آخر
✅ إزالة الفقاعات
- انتظر 5-10 دقائق بعد الصب لكي ترتفع الفقاعات
- استخدام مسدس حراري أو شعلة على بعد 6-8 بوصات من السطح
- المرور بسرعة فوق الفقاعات لفرقعتها
✅ العمل في طبقات
- للصبات السميكة، اعمل في طبقات رقيقة متعددة
- مراقبة درجة الحرارة حيث أن الصبات السميكة تولد حرارة كبيرة
- اتبع تعليمات المنتج للحد الأقصى لعمق الصب
📌اطلع على مجموعتنا من راتنجات الإيبوكسي عالية الجودة المصممة خصيصًا لتطبيقات الأعمال الخشبية!
استكشاف الأخطاء الشائعة في الإيبوكسي على الخشب وإصلاحها
حتى الحرفيين ذوي الخبرة يواجهون تحديات مع مشاريع الإيبوكسي، ولكن معرفة كيفية استكشاف المشكلات الشائعة وإصلاحها يمكن أن ينقذ عملك.
|
المشكلة |
السبب |
الوقاية |
الحل |
|
التعامل مع الفقاعات |
الهواء المحبوس في حبيبات الخشب أو عملية الخلط |
طبقة مانعة للتسرب، بيئة دافئة، خلط دقيق |
مسدس حراري أو شعلة بينما لا يزال الإيبوكسي سائلًا |
|
إصلاح الأسطح غير المستوية |
تسوية غير صحيحة أو كمية إيبوكسي غير كافية |
استخدام ميزان وحساب الكمية المناسبة من الإيبوكسي |
صنفرة خفيفة ووضع طبقة رقيقة أخرى |
|
عندما ينسحب الإيبوكسي عن الحواف |
الملوثات مثل الزيوت أو السيليكون على الخشب |
تنظيف وتطبيق طبقة مانعة للتسرب بشكل صحيح |
تنظيف شامل، صنفرة، وإعادة التطبيق |
|
تبطئ أو عدم اكتمال التصلب |
نسبة خلط خاطئة، درجة حرارة منخفضة، منتج منتهي الصلاحية |
ضمان درجة الحرارة المناسبة والمواد الطازجة |
لا تجبر التصلب بالحرارة العالية لأنها قد تسبب اصفرارًا أو هشاشة |
📌 تعرف على كل شيء عن أوقات معالجة الإيبوكسي لجميع أسئلتك!
إنهاء وصيانة مشاريع الإيبوكسي والخشب

تعتبر الخطوات النهائية للتشطيب والصيانة المناسبة ضرورية لضمان احتفاظ إبداعاتك من الإيبوكسي والخشب بجمالها ومتانتها.
الحصول على لمسة نهائية شبيهة بالزجاج
- اسمح بالمعالجة الكاملة وفقًا لمواصفات الشركة المصنعة (تتراوح من 72 ساعة إلى 7 أيام أو أكثر)
- صنفرة رطبة تدريجياً من حبيبات 320 إلى 2000+ للحصول على تشطيبات احترافية شبيهة بالمرآة
- ضع مركب التلميع للحصول على لمعان المرآة
الحماية من أضرار الأشعة فوق البنفسجية
- أضف طبقة شفافة مقاومة للأشعة فوق البنفسجية للقطع الخارجية
- ضع القطع الداخلية بعيدًا عن أشعة الشمس المباشرة
- فكر في تركيبات الإيبوكسي المستقرة للأشعة فوق البنفسجية التي تكلف أكثر ولكنها تقاوم الاصفرار
الصيانة اليومية
- نظف بالصابون المعتدل والماء فقط
- تجنب المواد الكيميائية القاسية والمنظفات الكاشطة
- ضع الشمع اللاصق كل 6-12 شهرًا للحماية الإضافية
متى لا تستخدم الإيبوكسي على الخشب
ضع في اعتبارك هذه القيود قبل اختيار الإيبوكسي:
✅ العوامل البيئية
- التعرض الكامل للشمس يسبب الاصفرار بمرور الوقت
- تختلف مقاومة الحرارة حسب المنتج (عادة 120-200 درجة فهرنهايت/49-93 درجة مئوية)
- البيئات شديدة البرودة يمكن أن تجعل الإيبوكسي هشًا
✅ مشاكل توافق الخشب
- قد تحتاج الأخشاب الغريبة الزيتية (الساج، خشب الورد) إلى إعداد خاص
- الخشب الأخضر ذو المحتوى العالي من الرطوبة يسبب مشاكل في المعالجة
- قد تحتاج الأخشاب اللينة جدًا إلى تثبيت قبل تطبيق الإيبوكسي
✅ الاعتبارات البيئية والعملية
- الدهانات التقليدية مثل زيت التونغ أو البولي يوريثان لها تأثير بيئي أقل
- الإيبوكسي ليس قابلاً لإعادة التدوير بسهولة مقارنة بخيارات التشطيب الأخرى
- أغلى من التشطيبات التقليدية
نصائح الخبراء لمشاريع الإيبوكسي والخشب الناجحة

تعلم التقنيات الاحترافية من الحرفيين ذوي الخبرة الذين أتقنوا فن دمج الإيبوكسي مع الخشب.
للحصول على نتائج خالية من الفقاعات
- سخن المكونات في حمام مائي قبل الخلط (80 درجة فهرنهايت/27 درجة مئوية). أغلق الأخشاب المسامية مسبقًا بطبقة رقيقة من الإيبوكسي. اعمل في بيئة دافئة قليلاً.

جهاز Resiners® AirLess لإزالة فقاعات الراتنج
تقنيات التلوين
- ابدأ بكمية قليلة من الصبغة - أضفها تدريجيًا. امزج الألوان في دفعات اختبار صغيرة أولاً. استخدم ألوانًا تعتمد على الكحول أو مخصصة للإيبوكسي للحصول على أفضل النتائج وطول العمر.
إتقان الحواف الطبيعية
- ثبت اللحاء بغراء CA إذا كنت ستبقيه. نظفه جيدًا إذا أزلت اللحاء. أنشئ سدودًا حول الحواف غير المنتظمة لاحتواء الإيبوكسي.
تشطيب الحواف
- أنشئ سدودًا مؤقتة باستخدام الميلامين وشريط التعبئة. أغلق الحواف بالغراء الساخن أو مانع التسرب السيليكوني. صنفر الحواف تدريجيًا للحصول على جوانب مثالية.
📌 استكشف مجموعتنا من أفضل راتنجات الإيبوكسي الشفافة للحصول على نتائج مذهلة!
الخاتمة
عند اختيار الدهانات لمشاريع الخشب، يقدم الإيبوكسي متانة وتأثيرًا بصريًا لا مثيل لهما لا يمكن للخيارات التقليدية توفيرهما. على الرغم من أنه يتطلب بعض التعلم وظروفًا محددة، إلا أن النتائج المذهلة تستحق الاستثمار في القطع الخاصة.
في ريزينرز، نقدم المعرفة والمواد التي تحتاجها لنجاح أعمال النجارة بالإيبوكسي. ترشدك أدلتنا الشاملة خلال كل خطوة، بينما تم تصميم منتجات الراتنج عالية الجودة خصيصًا لتطبيقات الخشب الجميلة وطويلة الأمد.
هل أنت مستعد لإنشاء شيء غير عادي؟ تصفح أدلتنا للإلهام أو تسوق من مجموعتنا المتميزة من الإيبوكسي لتجد التركيبة المثالية لتحفة النجارة القادمة. تحفتك الفنية الفريدة تبعد عنك بصبة واحدة فقط!
الأسئلة المتكررة حول الإيبوكسي على الخشب
هل يمكن استخدام الإيبوكسي العادي على الخشب؟
نعم، تعمل معظم راتنجات الإيبوكسي القياسية بشكل جيد على الخشب، ولكن ابحث عن المنتجات المصممة خصيصًا لتطبيقات الخشب التي توفر الاختراق والمرونة المناسبين. قد تتطلب بعض الأخشاب المتخصصة أنواعًا معينة من الإيبوكسي، وتحتاج الأسطح الملامسة للطعام إلى تركيبات متوافقة مع إدارة الغذاء والدواء. اختبر دائمًا التوافق على قطعة خردة قبل الالتزام بمشروعك بالكامل.
هل يلتصق الخشب بالإيبوكسي؟
يلتصق الإيبوكسي جيدًا بالخشب المُجهز بشكل صحيح حيث تسمح الطبيعة المسامية للإيبوكسي باختراق السطح، مما يخلق رابطة ميكانيكية قوية. التحضير المناسب أمر بالغ الأهمية - نظف جيدًا، وصنفر بشكل مناسب، وتأكد من الجفاف التام قبل التطبيق لتحقيق أقصى قدر من الالتصاق. قد تتطلب بعض الأخشاب الغريبة ذات المحتوى العالي من الزيت إجراءات إزالة الشحوم الخاصة قبل أن يلتصق الإيبوكسي بشكل صحيح.
ماذا تضع على الخشب قبل الإيبوكسي؟
للحصول على أفضل النتائج، قم بغلق الخشب بطبقة رقيقة من الإيبوكسي قبل الصب الرئيسي لاختراق المسام ومنع الفقاعات ووقف الامتصاص المفرط. يجب أن يُسمح لطبقة الغلق هذه بأن تصبح لزجة (ولكن ليست متصلبة تمامًا) لمعظم التطبيقات، مما يخلق أقوى رابطة كيميائية بين الطبقات. على الأخشاب المسامية للغاية، قد تحتاج إلى طبقتين غلق لغلق جميع الفراغات بشكل فعال قبل الصب النهائي.
متى يجب عدم استخدام الإيبوكسي؟
تجنب استخدام الإيبوكسي على الخشب ذي المحتوى العالي من الرطوبة، أو في البيئات الرطبة جدًا، أو على الأسطح المعرضة للحرارة الشديدة أو لأشعة الشمس المباشرة المستمرة دون حماية مناسبة من الأشعة فوق البنفسجية. فكر في التشطيبات التقليدية الأكثر صداقة للبيئة للمشاريع التي تكون فيها الاستدامة أولوية، أو عند العمل في أماكن سيئة التهوية، أو عندما تكون ميزانيتك محدودة. الإيبوكسي أيضًا غير مثالي للأسطح التي ستتعرض للحرارة المباشرة المتكررة أو التقطيع، حيث يمكن أن يؤدي ذلك إلى تلف السطح بمرور الوقت.
كم يدوم الإيبوكسي على الخشب؟
تدوم تطبيقات الإيبوكسي الداخلية عادةً من 10 إلى 30 عامًا مع العناية المناسبة، بينما قد تحتاج التطبيقات الخارجية إلى إعادة طلاء بعد 5 إلى 7 سنوات بسبب التعرض للأشعة فوق البنفسجية. يختلف العمر الافتراضي بناءً على جودة الإيبوكسي، وتقنية التطبيق، والظروف البيئية، وممارسات الصيانة. يمكن للإيبوكسي عالي الجودة والمثبت بالأشعة فوق البنفسجية مع الصيانة المناسبة أن يطيل عمر مشروعك النهائي بشكل كبير.
مقالات ذات صلة:
راتنج الإيبوكسي مقابل راتنج الأشعة فوق البنفسجية: ما الفرق؟


اترك تعليقًا
This site is protected by hCaptcha and the hCaptcha Privacy Policy and Terms of Service apply.