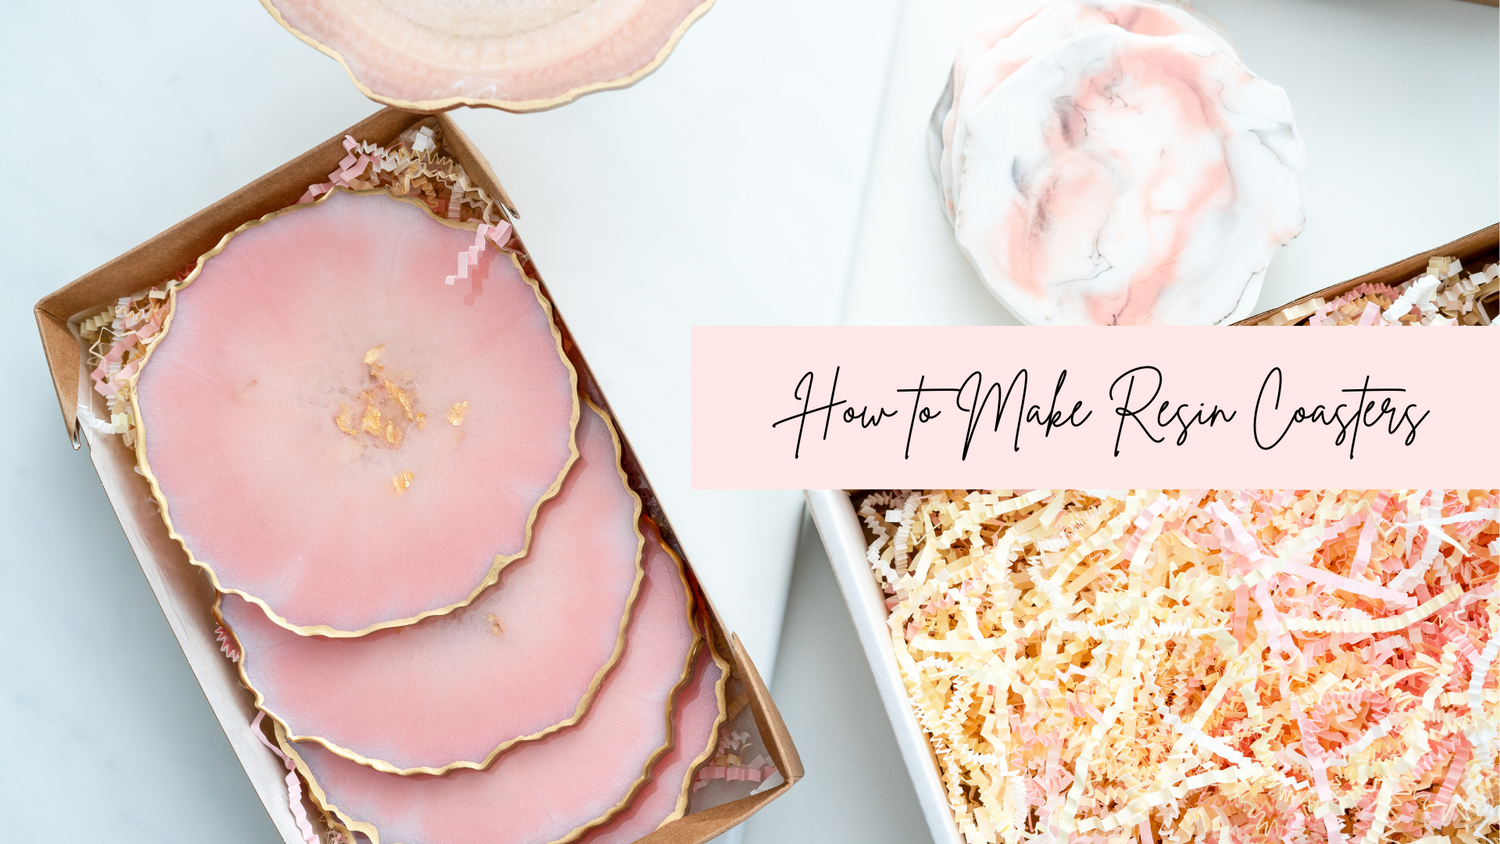
هل تتطلع إلى إنشاء ديكور منزلي جميل وعملي يمثل هدية يدوية مثالية؟
حاملات الأكواب المصنوعة من الراتنج هي الحل!
لا تحمي حاملات المشروبات القابلة للتخصيص أثاثك فحسب، بل تعرض إبداعك من خلال الألوان والأنماط والعناصر المضمنة مثلالزهور المجففة أو الصور.
لا تحتاج إلى موهبة فنية - فقط المواد والتقنيات الصحيحة. سواء كنت مبتدئًا تمامًا أو تتطلع إلى صقل مهاراتك، سيرشدك هذا الدليل خلال عملية إنشاء حاملات أكواب راتنجية مذهلة من البداية إلى النهاية.
استمر في القراءة لاكتشاف مدى سهولة ومكافأة هذه الحرفة!
المواد التي ستحتاجها لصنع قواعد الأكواب من الراتنج
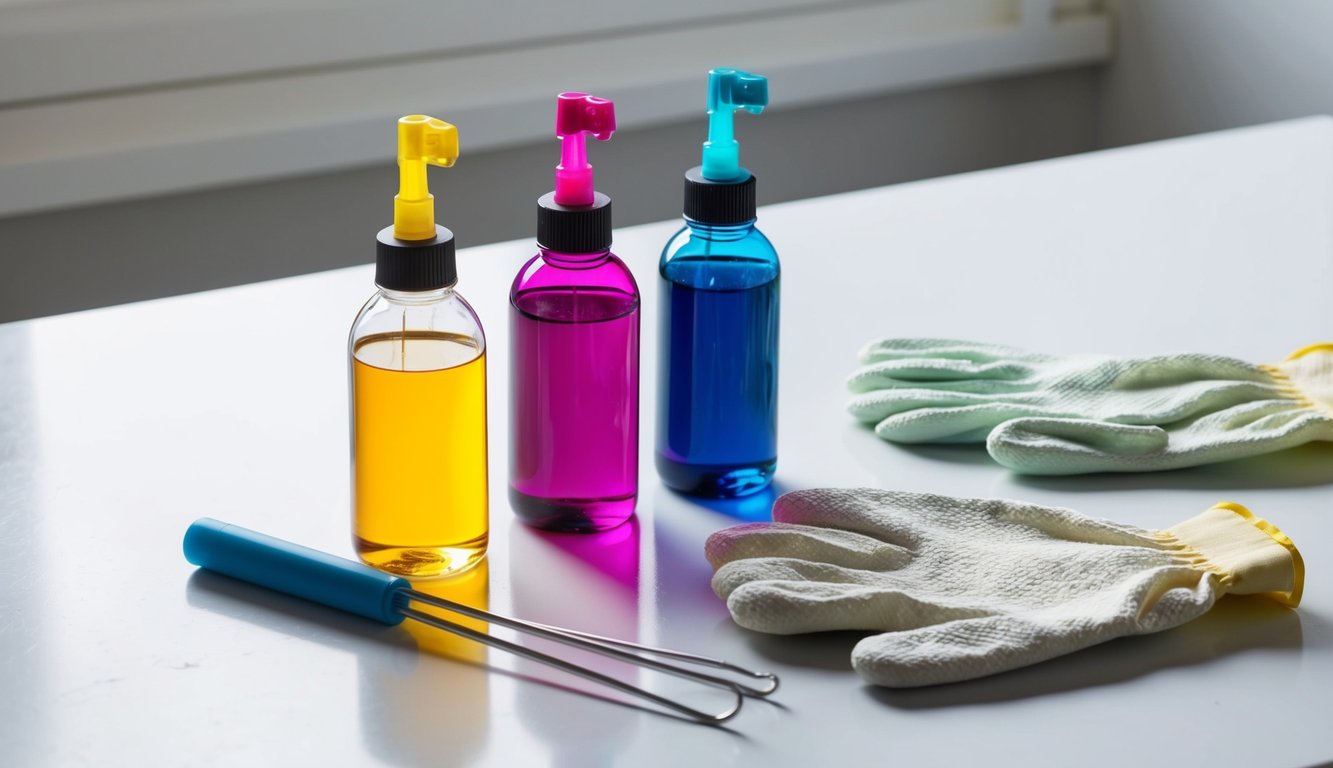
قبل البدء في مشروع قواعد الأكواب الراتنجية، قم بجمع هذه المستلزمات الأساسية:
- راتنج الإيبوكسي والمصلب (مصمم خصيصًا للحرف اليدوية)
- قوالب قواعد أكواب سيليكون (الأشكال الدائرية أو المربعة أو السداسية تعمل بشكل رائع)
- أكواب قياس وعصي تقليب
- قفازات النتريل لحماية يديك
- قناع تنفس للتهوية الجيدة
- عناصر زخرفية (زهور مجففة، جليتر، أحبار كحولية، إلخ)
- مسدس حراري أو شعلة لإزالة الفقاعات
- سطح عمل مستوي
- غطاء بلاستيكي لحماية مساحة عملك
- ميزان حرارة (لضمان درجة حرارة الغرفة المثلى)
- مصباح معالجة راتنج الأشعة فوق البنفسجية (فقط إذا كنت تستخدمراتنج الأشعة فوق البنفسجية بدلاً من الإيبوكسي)

مصباح Resiners® 3 في 1 للأشعة فوق البنفسجية لمعالجة الراتنج
📌 هل تتطلع إلى البدء في صناعة الراتنج؟ اطلع علىمجموعات الراتنج الكاملة الخاصة بنا التي تتضمن كل ما تحتاجه لمشروع قواعد الأكواب الأول الخاص بك!
السلامة أولاً: التعامل مع الراتنج بشكل صحيح
يتطلب العمل بالراتنج حذرًا. اعمل دائمًا في منطقة جيدة التهوية مع نوافذ مفتوحة أو مراوح. يطلق راتنج الإيبوكسي أبخرة لا يجب استنشاقها، لذا ارتدِ قناع تنفس مناسبًا.
نصائح للحماية
- ارتدِ قفازات النتريل (وليس اللاتكس، لأن الراتنج يمكن أن يتسرب من خلالها)
- غطِ سطح عملك بورقة بلاستيكية
- ارتدِ ملابس لا تمانع في اتساخها
- أبعد الحيوانات الأليفة والأطفال عن منطقة عملك
- اجعل المناشف الورقية جاهزة للانسكابات
- نظف الانسكابات بالكحول المحمر قبل أن تتصلب
برنامج تعليمي أساسي خطوة بخطوة لقواعد الأكواب المصنوعة من الراتنج

1. جهز مساحة عملك وموادك
✅ قم بالإعداد في منطقة نظيفة خالية من الغبار وجيدة التهوية.
✅ غطِ سطح عملك وتأكد من أنه مستوي تمامًا - هذا أمر بالغ الأهمية للحصول على قواعد أكواب متساوية.
✅ اجمع كل المواد قبل خلط الراتنج، حيث ستحتاج إلى العمل بسرعة بمجرد خلطها.
✅ تأكد من أن درجة حرارة مساحة عملك تتراوح بين 70-75 درجة فهرنهايت (21-24 درجة مئوية) للحصول على أفضل معالجة للراتنج - استخدم مقياس حرارة للتحقق.
2. قم بقياس وخلط الراتنج الخاص بك
✅ اقرأ تعليمات الراتنج الخاص بك بعناية - بينما تتطلب بعض الأنواع أجزاء متساوية من الراتنج والمصلب، فإن العديد من راتنجات الحرف اليدوية عالية الجودة تستخدم نسبًا مختلفة (مثل 2:1 أو 3:1).
✅ اتبع دائمًا تعليمات الشركة المصنعة الخاصة بك.
✅ استخدم أكوابًا منفصلة لقياس كل مكون بدقة، ثم ادمجها في كوب ثالث.
✅ قلب ببطء لمدة 3-5 دقائق، مع كشط الجوانب وقاع الكوب. الخلط غير الصحيح هو السبب الأكثر شيوعًا لعدم معالجة الراتنج بشكل صحيح.
3. أضف الألوان والعناصر الزخرفية
✅ بمجرد خلط الراتنج الخاص بك، قسّمه إلى أكواب أصغر إذا كنت تستخدم ألوانًا متعددة.
✅ أضف الألوان (أحبار الكحول، أصباغ الراتنج، أو مساحيق الميكا) باعتدال - القليل منها يكفي!✅ لقواعد الأكواب الشفافة ذات العناصر المضمنة، اسكب طبقة أساسية رقيقة من الراتنج أولاً، واتركها لتصبح لزجة (حوالي 30 دقيقة)
✅ ثم رتب عناصرك قبل سكب الراتنج المتبقي.
4. صب في القوالب وأزل الفقاعات
✅ اسكب الراتنج الملون في القوالب ببطء لتقليل الفقاعات.
✅ للتصاميم متعددة الألوان، اسكب ألوانًا مختلفة جنبًا إلى جنب واستخدم عود أسنان لإنشاء دوامات.
✅ بعد الصب، استخدم مسدسًا حراريًا أو شعلة بتمريره بسرعة فوق السطح - الحرارة تخرج الفقاعات.
✅ اجعل مصدر الحرارة على بعد 6-8 بوصات على الأقل من سطح الراتنج وحافظ على تحريكه لمنع ارتفاع درجة حرارة الراتنج أو احتراقه.
5. تغطية وتركها لتتصلب
✅ قم بتغطية قوالبك بصندوق أو وعاء لمنع الغبار من الاستقرار على السطح أثناء التصلب. تحتاج معظم راتنجات الإيبوكسي من 24 إلى 48 ساعة للوصول إلى الصلابة الكافية للتعامل (عندما يمكنك إزالتها من القوالب)، ولكن الصلابة الكاملة يمكن أن تستغرق ما يصل إلى 7 أيام.
✅ راجع التعليمات الخاصة بمنتجك.
✅ تجنب تحريك أو لمس الأكواب خلال فترة التصلب الأولية.
هذا فيديو تعليمي من Summer Girl Designs على YouTube.
📌 لأوقات تصلب أسرع، توفر آلات تصلب الراتنج لدينا البيئة المثلى للحصول على نتائج مثالية في كل مرة.
أفكار تصميم إبداعية لأكواب الراتنج الخاصة بك

أكواب مستوحاة من الجيود
- ابتكر تأثيرات جيود مذهلة باستخدام اللون الأبيض كقاعدة، ثم أضف الألوان الزرقاء أو الأرجوانية أو الوردية بنمط دائري.
- أضف أصباغًا معدنية مثل الذهب أو الفضة لمحاكاة عروق المعادن.
- بعد الصب، استخدم عود أسنان لرسم خطوط من المركز إلى الخارج.

Resiners® 26 Colors Mica Powder Set - 0.175oz(5g)/Bottle
أكواب الزهور المضغوطة
- تخلق الزهور المجففة أكوابًا طبيعية أنيقة. صب طبقة رقيقة من الراتنج الشفاف واتركه حتى يصبح لزجًا.
- رتب الزهور المضغوطة، ثم غطها بطبقة أخرى من الراتنج.
- للحصول على أفضل النتائج، تأكد من أن الزهور جافة تمامًا قبل الاستخدام.
أكواب الصور
- اطبع صورك على ورق صور خاص متوافق مع الراتنج للحصول على أفضل النتائج.
- إذا كنت تستخدم ورقًا عاديًا، اغلق الصورة جيدًا باستخدام Mod Podge أو مادة مانعة للتسرب شفافة.
- اسكب طبقة رقيقة من الراتنج في القالب واتركها حتى تصبح لزجة، ثم ضع صورتك المختومة وجهًا لأسفل على هذه الطبقة.
- اخلط واسكب طبقة أخرى من الراتنج لتغطية الصورة بالكامل، ثم أزل الفقاعات بمسدس حراري واتركه ليتصلب تمامًا.
📌 هل تريد إضافة بعض البريق إلى أكوابك؟ لا تنسَ مراجعة نصائحنا للحفاظ على البريق يطفو في مشاريع راتنج الإيبوكسي الخاصة بك!
أكواب الشاطئ المستوحاة من المحيط
- ابتكر أمواجًا عن طريق وضع طبقات من الراتنج الأبيض والأزرق.
- ابدأ بقاعدة بيضاء، ثم أضف الأزرق الشفاف فوقها.
- استخدم مسدسًا حراريًا لإنشاء "أمواج" بينما تختلط الألوان.
- أضف بريقًا أبيض ناعمًا لرغوة البحر وحتى أصدافًا صغيرة لتأثير شاطئ واقعي.
استكشاف الأخطاء الشائعة في أكواب الراتنج وإصلاحها
✅ السطح اللزج
إذا بقيت أكوابك لزجة بعد وقت التصلب، فقد لا يكون الراتنج قد خُلط بشكل صحيح أو قد تكون درجة حرارة الغرفة منخفضة جدًا أثناء التصلب.
لإصلاح ذلك، امزج كمية صغيرة من الراتنج الشفاف واسكب طبقة علوية رقيقة فوق السطح اللزج. تأكد من القياس بدقة والخلط جيدًا.
✅ فقاعات محاصرة
لمنع الفقاعات:
- سخّن زجاجات الراتنج في ماء دافئ (غير مفتوحة) قبل الخلط
- حرّك ببطء واسكب في تيار رفيع
- استخدم مسدس حراري أو شعلة لإزالة الفقاعات بعد الصب
- للفقاعات العنيدة، امزج الراتنج واتركه لمدة 5 دقائق قبل الصب

Resiners® آلة إزالة فقاعات الراتنج AirLess Pro
✅ الأسطح غير المستوية
إذا تصلبت أكوابك بانخفاضات أو أسطح غير مستوية، فمن المرجح أنك لم تستخدم ما يكفي من الراتنج أو أن سطح عملك لم يكن مستويًا.
لإصلاح ذلك، أضف طبقة رقيقة أخرى من الراتنج لإنشاء سطح مستوٍ. تأكد دائمًا من أن مساحة عملك مستوية قبل الصب.
📌 يزيل جهاز إزالة الفقاعات بالموجات فوق الصوتية الخاص بنا حتى الفقاعات المجهرية للحصول على راتنج شفاف تمامًا في كل مرة. تحقق من أدوات إزالة الفقاعات للحصول على نتائج بجودة احترافية.
اللمسات النهائية لأكواب ذات مظهر احترافي

إضافة طبقة علوية واقية
لزيادة المتانة، أضف طبقة علوية نهائية من الراتنج الشفاف بعد أن يجفّ كوبك. هذا يخلق سطحًا أملسًا تمامًا ويضيف حماية ضد الخدوش والرطوبة. ما عليك سوى خلط كمية صغيرة من الراتنج الشفاف وصب طبقة رقيقة فوق الكوب النهائي.
📌 اكتشف أفضل راتنجات الإيبوكسي الشفافة للطبقة العلوية التي توفر حماية من الأشعة فوق البنفسجية ونتائج شفافة تمامًا!
صنع قواعد غير قابلة للانزلاق
اجعل أكوابك وظيفية عن طريق إضافة دعامة غير قابلة للانزلاق. ضع نقاطًا صغيرة من السيليكون أو ألصق دوائر من الفلين أو اللباد في الأسفل. هذا يمنع الانزلاق ويحمي أثاثك من أي حواف خشنة.
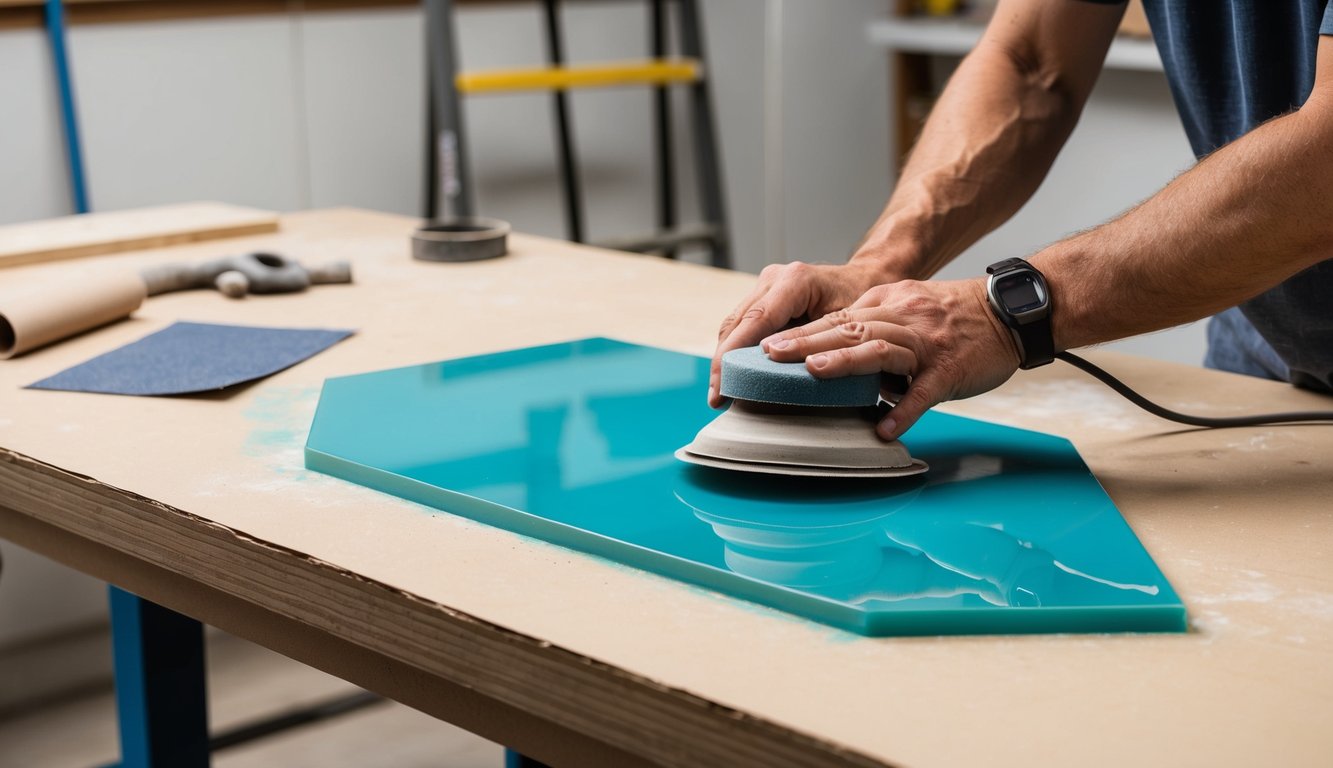
الصنفرة والتلميع
إذا كانت حواف كوبك بها تدفق زائد أو أجزاء حادة، فقم بصنفرتها برفق باستخدام ورق صنفرة ناعم (ابدأ بـ 400، ثم انتقل إلى 600 و 800 حصى). اعمل تحت الماء الجاري لمنع الغبار. انتهِ بالتلميع باستخدام ملمع راتنج أو ملمع سيارات للحصول على حافة لامعة.
تطوير مهاراتك في صنع قواعد أكواب الراتنج
عندما تصبح أكثر راحة في صنع قواعد أكواب الراتنج الأساسية، جرب تقنيات أكثر تقدمًا مثل:
- إنشاء مجموعات متطابقة بألوان متناسقة
- إضافة ورق معدني (ذهبي أو فضي أو نحاسي)
- صنع قواعد أكواب مركبة من الخشب والراتنج
- تضمين حلي صغيرة أو تذكارات
- صنع حوامل أكواب مخصصة من نفس ألوان الراتنج
📌 هل تتطلع إلى ترقية قوالبك؟ استكشف دليلنا حول أفضل قوالب الراتنج التي ستأخذ مشاريع قواعد الأكواب إلى المستوى التالي!
الخلاصة
تهانينا! لديك الآن جميع المهارات اللازمة لإنشاء قواعد أكواب راتنج جميلة وذات جودة احترافية. من التقنيات الأساسية إلى نصائح استكشاف الأخطاء وإصلاحها، أنت مستعد لصب إبداعك في هذه القطع الفنية العملية.
تذكر أن الممارسة تجعل الكمال - كل قاعدة أكواب تصنعها ستكون أفضل من السابقة!
هل أنت مستعد لمزيد من الإلهام في مجال الراتنج؟ تصفح أدلة Resiners ودروسها التعليمية للحصول على أفكار مشاريع لا نهاية لها، أو تسوق لوازم الراتنج الممتازة لدينا لرفع مستوى إبداعك التالي.
صناعة ممتعة، ولا تنسَ مشاركة قواعد أكوابك المذهلة مع الأصدقاء والعائلة!
أسئلة متكررة حول صنع قواعد أكواب الراتنج
ما هو المطلوب لصنع قواعد أكواب الراتنج؟
ستحتاج إلى راتنج إيبوكسي ومصلب، قوالب أكواب سيليكون، أكواب قياس، أعواد تقليب، ومعدات واقية مثل القفازات والقناع. لا تنسَ العناصر الزخرفية مثل الأصباغ، اللمعان، أو الزهور المجففة، بالإضافة إلى مسدس حراري لإزالة الفقاعات. كما أن السطح المستوي والبيئة الخالية من الغبار ضروريان للحصول على نتائج احترافية.
هل صنع قواعد أكواب الراتنج صعب؟
صنع قواعد أكواب الراتنج سهل للمبتدئين بشكل مدهش، حتى لو لم تقم بأي حرفة من قبل. تتضمن العملية الأساسية ببساطة القياس والخلط والصب، على الرغم من أن الصبر هو المفتاح أثناء انتظار قواعد أكوابك حتى تجف. يمكن تجنب معظم الأخطاء الشائعة بسهولة باتباع التعليمات بعناية والتأكد من الخلط الصحيح لمكونات الراتنج.
كيف تصنع قواعد أكواب راتنج الصور للمبتدئين؟
اطبع صورك على ورق صور خاص متوافق مع الراتنج للحصول على أفضل النتائج، أو استخدم ورقًا عاديًا واختمه جيدًا باستخدام Mod Podge أو مادة مانعة للتسرب شفافة. صب طبقة رقيقة من الراتنج في القالب واتركه حتى يصبح لزجًا، ثم ضع صورتك المختومة وجهها لأسفل على هذه الطبقة. اخلط وصب طبقة أخرى من الراتنج لتغطية الصورة بالكامل، ثم أزل الفقاعات بمسدس حراري واتركه ليجف تمامًا.
ما هو أفضل راتنج لقواعد الأكواب؟
راتنج الإيبوكسي (نظام من جزئين) مثالي لقواعد الأكواب لأنه متين ومقاوم للماء ويخلق تشطيبًا صلبًا ولامعًا يحمي الأسطح. راتنج الأشعة فوق البنفسجية هو خيار آخر ولكنه يتطلب مصباح الأشعة فوق البنفسجية ليتصلب وعادة ما يكون أغلى للمشاريع الكبيرة. ابحث عن إيبوكسي بدرجة حرفية مع مقاومة للأشعة فوق البنفسجية لمنع الاصفرار بمرور الوقت. بالنسبة للمبتدئين، اختيار راتنج بوقت عمل أطول (30-45 دقيقة) يمنحك مرونة أكبر لإتقان تصميمك قبل أن يبدأ في التصلب.
هل يجب أن تضع طبقة علوية على قواعد أكواب الراتنج؟
على الرغم من أنها ليست ضرورية بالضرورة، إلا أن إضافة طبقة علوية لقواعد أكواب الراتنج توفر حماية إضافية وتخلق سطحًا أملسًا واحترافيًا تمامًا. الطبقة العلوية مفيدة بشكل خاص إذا كانت قواعد أكوابك بها أسطح غير مستوية أو عناصر مضمنة غير مغطاة بالكامل. يعمل نفس راتنج الإيبوكسي الذي استخدمته للمشروع الرئيسي بشكل مثالي كطبقة علوية - ما عليك سوى صب طبقة نهائية رقيقة بعد أن يجف كوبك.
مقالات ذات صلة:
فن الراتنج الرائع للتجربة: أفكار وتقنيات إبداعية
أفكار فن الراتنج الفريدة: مشاريع إبداعية لكل مبدع
15+ فكرة فن راتنج مذهلة (للمبتدئين إلى الخبراء)


اترك تعليقًا
This site is protected by hCaptcha and the hCaptcha Privacy Policy and Terms of Service apply.