Easy Christmas crafts for adults let you make personalized holiday décor and gifts that look handmade yet polished.
You can create beautiful ornaments, coasters, and small decorations with simple resin techniques that add sparkle and charm to your home.
It’s an enjoyable way to bring creativity into the season without needing advanced crafting skills. You’ll learn how to get started with resin, tips for making your own festive designs, and ideas for unique gifts that capture the holiday spirit.
Every project brings a personal touch that makes your Christmas décor feel special and memorable.
To begin with high-quality materials, discover the epoxy resin and hardener collection, perfect for refined and long-lasting Christmas projects.
Getting Started With Resin Christmas Crafts

Before you start your holiday crafting, make sure you have the right tools, molds, and safety habits.
Resin art takes a bit of setup, but with a few basic materials and some care, you can create ornaments, coasters, and jewelry that look polished and festive.
Planning your workspace and choosing the right supplies will help your Christmas crafts for adults come out clean, clear, and bright.
Essential Resin Tools and Safety Tips
Resin crafting needs a clean, open area with good airflow. Work on a flat surface covered with wax paper or silicone mats to protect it from spills.
Always wear nitrile gloves, eye protection, and a respirator mask if you’re using epoxy or UV resin indoors. Resin fumes and skin contact can cause irritation, so proper gear matters.
You’ll need a few simple tools for adult crafting projects like this:
|
Tool |
Purpose |
|
Mixing cups & sticks |
Combine resin and hardener evenly |
|
Silicone mats |
Catch drips for easy cleanup |
|
Heat gun or torch |
Remove bubbles |
|
Measuring scale or marked cups |
Keep ratios accurate |
Keep pets and dust away while working. Give your pieces a full cure time—usually 24 to 48 hours—before handling.
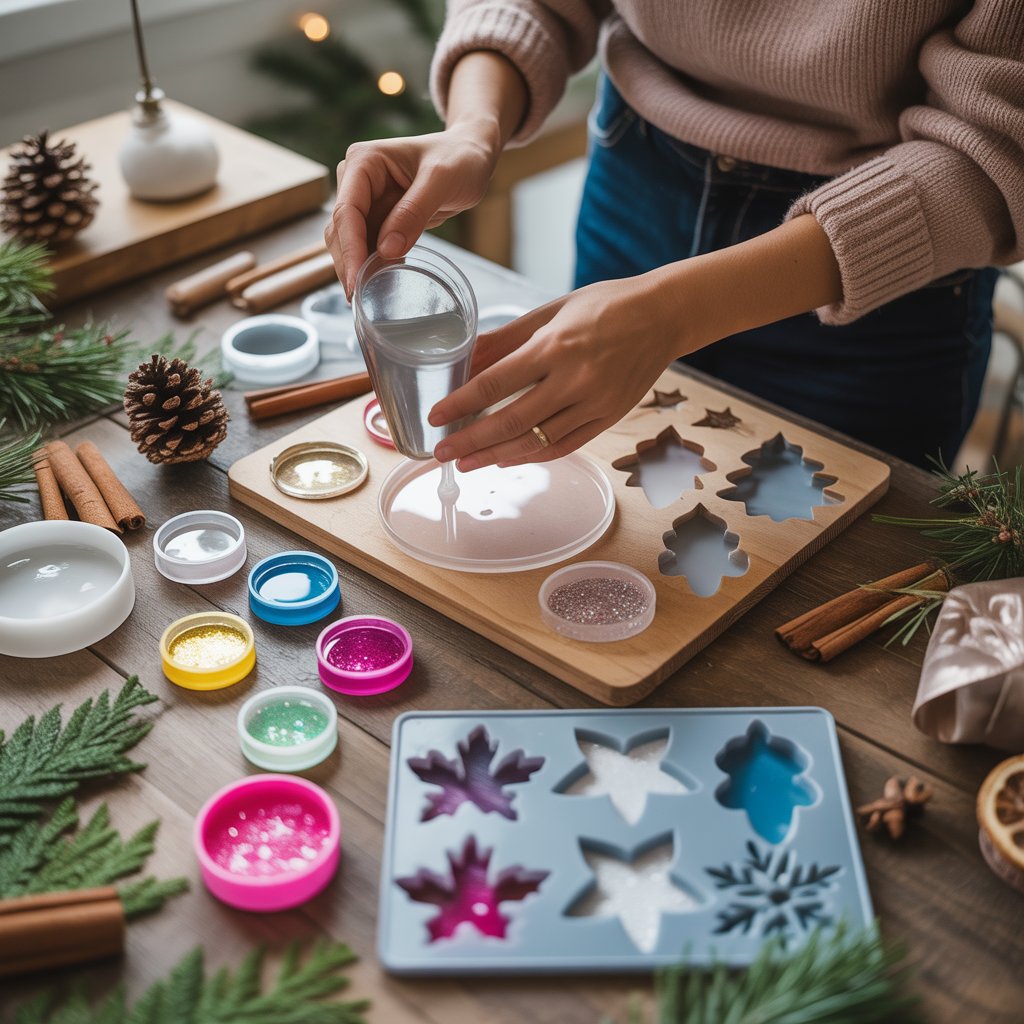
Choosing Festive Molds and Embellishments
Christmas resin crafts for adults can be simple or detailed depending on your molds and fillings. Silicone molds are easy to release and come in shapes like stars, snowflakes, trees, and ornaments.
Larger molds work well for coasters and trays, while small ones suit jewelry or keychains. Decorate with mica powder, glitter, sequins, or tiny charm inserts. Metallic flakes or dried flowers add a cozy, handmade look.
Keep your layers thin to avoid warping and let each color set slightly before adding the next. For a unified color palette, pick three to four tones that match your holiday theme—like gold, deep red, evergreen, and white.
This gives your finished resin art a coordinated, elegant touch that fits easily into your seasonal décor.
Tips for Achieving Crystal Clear Resin Results

Resiners® 1 gallon Crystal Clear Epoxy Resin Kit
Clear resin looks professional and makes any embedded item stand out. To prevent cloudiness, measure your resin and hardener accurately using the ratio listed on the package.
Mix slowly in a circular motion for at least two minutes, scraping the sides and bottom of your cup. Fast mixing traps bubbles, which leads to hazy surfaces.
If bubbles appear, warm the surface slightly with a heat gun or small torch held a few inches above.

Resiners® Mini Heat Gun for Crafts
Avoid overheating; it can scorch the resin or distort molds. Keep the curing area dust‑free by covering your piece with a box or container.
Store both resin and hardener in a room around 70–75°F (21–24°C) for the best consistency. Cooler temperatures slow curing and can cause uneven finishes.
With steady patience and these techniques, your projects will cure smooth, shiny, and glass‑clear—perfect for gifting or decorating your home.
For advanced inspiration, read our article, Unique resin art ideas: Creative projects for every creator and refresh your holiday craft ideas.
Easy Resin Christmas Ornaments for Adults

You can create resin ornaments that highlight your creativity while adding personal touches to your holiday décor.
Using clear resin, pigments, glitter, and simple molds, you can craft ornaments that look polished yet still feel handmade.
Each idea blends seasonal charm with practical steps so you can enjoy the process as much as the finished piece.
Resin Baubles With Embedded Holiday Scenes
Resin baubles make great DIY Christmas ornaments because you can embed almost anything inside them.
- Start with clear, round molds or reusable plastic ornament halves.
- Add small festive items such as mini pine branches, tiny bells, or glitter snowflakes.
- Mix your resin carefully and pour in layers to suspend the decorations evenly.
- To prevent bubbles, pour slowly and gently tap the mold.
- Once cured, pop the ornament from the mold and attach a silver or red ribbon for hanging.
- Try mixing a few drops of metallic resin pigment for extra color depth. These ornaments catch light beautifully and pair well with white LED tree lights.
Supplies You’ll Need:
|
Item |
Purpose |
|
Clear epoxy resin |
Main body of the ornament |
|
Round silicone mold |
Holds shape |
|
Small décor pieces |
Decorative inserts |
|
Ribbon or wire hook |
For hanging |
DIY Mason Jar Snow Globes and Resin Accents
Mason jar snow globes offer an easy Christmas craft for adults who like working with familiar materials.
You can use small jars, resin bases, and glitter to build a classic snow scene.
Attach figurines such as snowmen, trees, or holiday houses to a resin-coated base, then fill the jar with water and a bit of glycerin to slow the falling glitter.
Resin helps hold the figures in place and keeps them stable over time. Seal the lid tightly and decorate it with a strip of fabric or twine for a cozy, rustic finish.
For extra sparkle, add a thin layer of resin over the lid top and sprinkle glitter before it cures. Adjust the size of your jar to suit your display shelf or mantle.
Personalized Resin Ornament Ideas
You can make personalized resin ornaments that feature names, dates, or short holiday messages.
Use alphabet beads, printed labels, or small charms set into the resin before it hardens. Try a mixture of gold flakes or clear glitter for a balanced background that doesn’t overpower your design.
If you prefer photograph ornaments, embed a laminated photo inside a flat resin mold. Make sure to seal any printed paper to prevent resin damage.
A thin top coat of resin gives a glass-like finish that lasts for years. Add a personal touch by choosing ribbon colors that match the person’s favorite hues. These make thoughtful, easy-to-customize Christmas DIY gifts that combine sentiment and craftsmanship.
Simple Resin Paper Snowflake Inserts
Paper snowflakes work beautifully inside resin shapes and add texture to your ornament collection. Cut small snowflakes using thin, smooth paper. Press them between two layers of clear resin to capture their delicate look without wrinkles or air pockets.
Use cookie cutter–style molds, such as circles, hearts, or stars. Glitter or metallic flakes around the edges frame the snowflake and make it stand out.
Once cured, pop each piece out and sand the edges lightly if needed. These inserts can hang alone or layer with other resin ornaments.
They’re quick to make, use minimal materials, and look crisp against holiday lights, making them one of the simplest easy Christmas crafts for adults to try during the season.
A clean and comfortable workspace makes a big difference, so take a look at our air purifier for resin collection for healthier crafting sessions.
Creative Holiday Décor Ideas With Resin

You can create festive, practical, and sustainable Christmas décor with resin using simple materials and molds. These projects let you personalize your holiday crafts, make your tableware sparkle, and design one-of-a-kind accessories for the season.
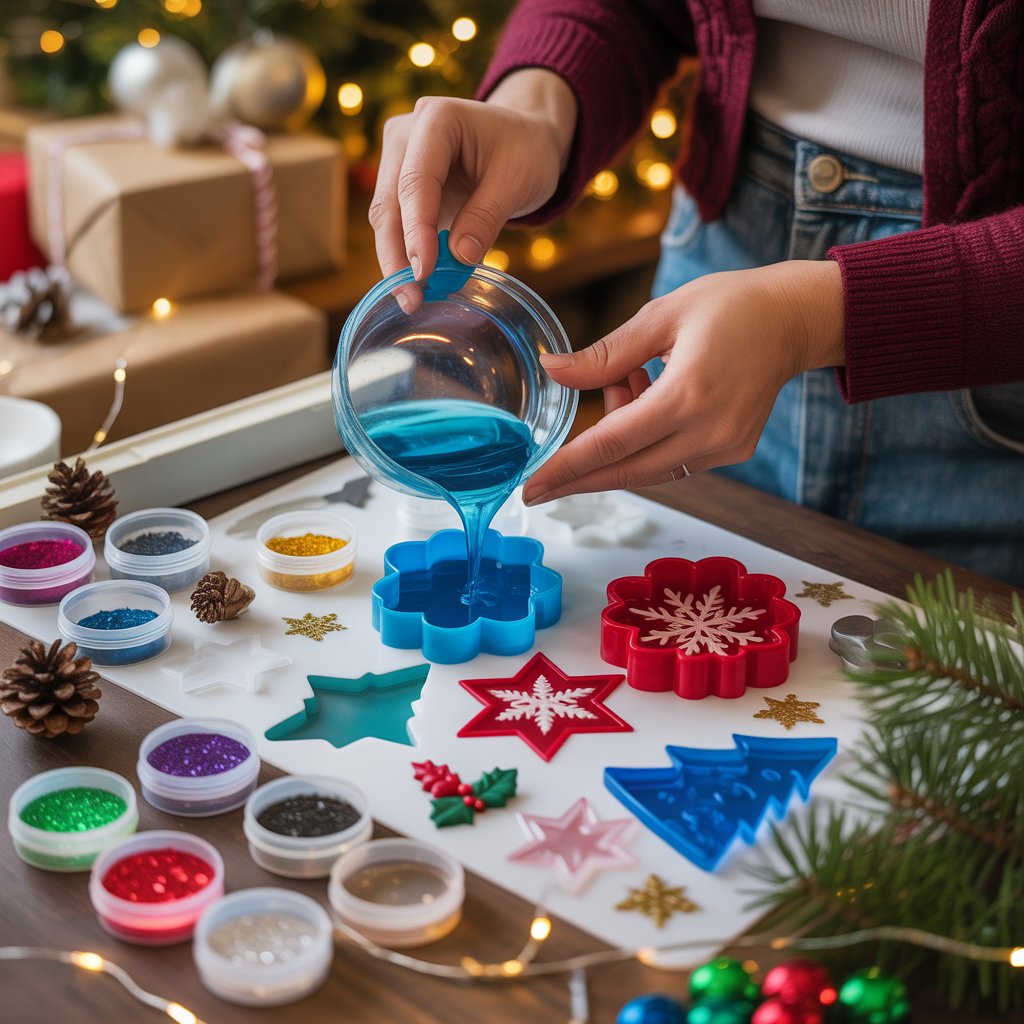
Festive Resin Coasters and Tableware
Resin coasters and tableware add color and shine to your Christmas decor while protecting surfaces from heat and spills.
You can pour clear or tinted resin into silicone molds, then embed glitter, metallic flakes, or mini decorations like snowflakes and stars.
Try layering colors to create a frosted or swirl effect. For added texture, combine resin with mica powder or fine pigment for an elegant shimmer.
|
Material |
Use |
Tip |
|
Silicone mold |
Shape for coasters or trays |
Choose flexible molds for easy removal |
|
Epoxy resin |
Main base |
Mix slowly to avoid bubbles |
|
Christmas glitter |
Decoration |
Add after first pour sets slightly |
|
Heat gun |
Bubble removal |
Gently pass over surface |
Once cured, these items make perfect gifts or functional pieces for your dining table.
You can seal them with a clear coat for added durability and use self-adhesive cork dots on the back to prevent slipping.
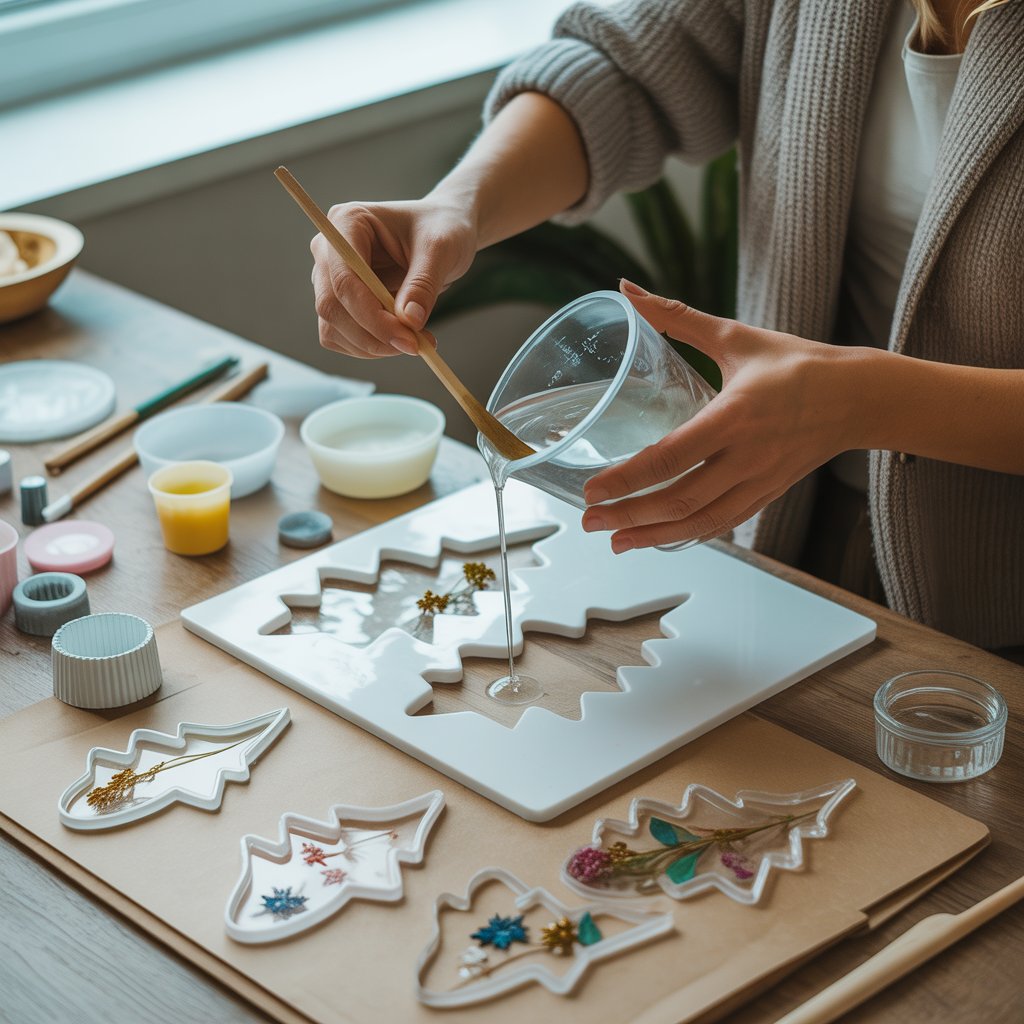
Sustainable Holiday Decor With Resin and Natural Elements
If you want more sustainable holiday décor, mix resin with natural elements such as pressed leaves, dried flowers, or pine branches. These materials add organic texture and seasonal colors while reducing waste from synthetic decorations.
Start by placing your chosen materials into shallow molds, then pour a thin layer of resin on top. This locks them in place while keeping their natural look visible.
Design ideas:
- Clear ornaments filled with acorns or pine needles
- Resin candle holders using dried orange slices
- Coasters with embedded cinnamon sticks
Use eco-friendly resin brands labeled bio-based or low-VOC when possible. This approach blends creativity with environmental care and gives your easy Christmas crafts a rustic charm.
Holiday-Themed Resin Jewelry and Accessories
You can make holiday-themed resin jewelry like pendants, earrings, and keychains using small molds shaped like trees, snowflakes, or bells.
Add tiny charms, gold foil, or bits of colored resin for a unique finish. Mix opaque colors for bold designs or use translucent tones for lighter pieces. A drop of metallic paint in the resin before pouring can add sparkle without glitter shedding.
For easy crafting, try starter kits that include resin, molds, and mixing tools. After curing, attach the pieces to metal findings using jewelry glue. These handmade accessories also make thoughtful gifts or festive accents to your outfit during the holiday season.
Unique Resin Christmas Gift and Craft Ideas

You can make small handmade gifts and home decorations with resin that feel personal and festive. These crafts work well for adding custom color, shimmer, and design while keeping the process simple enough for any adult crafter.
Custom Resin Keychains and Bookmarks
Creating resin keychains and bookmarks lets you design items that are both practical and personal. You can pour clear or tinted resin into silicone molds in shapes like stars, snowflakes, or Christmas trees.
Add glitter, dried flowers, or festive charms for texture and color. For a gift-ready look, attach a metal ring, tassel, or ribbon. Name tags or initials made with letter beads give each item a personalized touch.
You can also use mica powder, gold flakes, or small holiday stickers to add detail. If you want to turn this into an easy group craft, prepare molds and pigments ahead of time.
Resin pieces cure within hours, so you can finish several in one afternoon. These projects fit well as stocking stuffers or handmade Christmas decorations.
Quick supply list:
- Epoxy resin and hardener
- Silicone molds
- Pigments or glitter
- Key rings or ribbons
Resin Holiday Trays and Candle Holders
Resin trays and candle holders make simple Christmas crafts that feel polished and modern. You can pour layers of colored resin to create marbled or snowy effects, then finish with metallic paint or gold leaf for a holiday accent.
Round or rectangular molds work best for trays, especially for serving cookies or cocoa during the season. Candle holders should use heat-resistant resin or glass inserts for safety.
Try mixing red, green, and white pigments for traditional colors, or use clear resin with silver sparkles for a frosty style. Making a resin tray involves slow, even pouring to avoid bubbles.
Once cured, add small rubber feet or felt pads underneath to protect surfaces. These pieces also pair well with homemade candles or baked goods as gifts.
Upcycled Christmas Craft Ideas for Adults
You can reuse old ornaments, coasters, or small decor items by coating them with a layer of clear or tinted resin. This method gives older pieces a glossy, refreshed look and turns simple Christmas crafts into something new.
If you have cracked wood slices or faded decorations, resin coating can seal and strengthen them. Add pressed pine needles, tiny bells, or ribbon fragments to capture the holiday theme.
A creative idea is to embed parts of old Christmas cards inside a resin ornament mold. This keeps memories while reducing waste. You can also use leftover resin from other projects to fill mini molds for small accents.
Upcycling tips:
- Clean and dry all surfaces before applying resin.
- Add a sealing layer first for porous materials.
- Cure resin fully before touching or storing finished decor.
To incorporate floral elements, explore our article, Resin flowers: How to create beautiful craft decorations for timeless seasonal accents.
Frequently Asked Questions
What are some simple resin crafts I can make for Christmas gifts?
You can make ornaments, coasters, keychains, or small trinket dishes. Fill them with glitter, dried flowers, or tiny charms for a festive touch. Flat silicone molds work best for beginners because they release resin easily.
How do I ensure my resin ornaments come out perfectly clear and bubble-free?
Measure the resin and hardener carefully and stir slowly to avoid adding air. Warm the resin slightly before mixing, and use a heat gun or small torch to pop surface bubbles. Pour in thin layers if you plan to add decorations or colors.
Can you give tips for adding festive colors or glitter to resin for holiday projects?
Mix mica powder or liquid resin dye for solid colors. Add glitter in small amounts so it spreads evenly without sinking. Metallic flakes, snowflake confetti, or fine shimmer powders give your pieces a cheerful holiday sparkle.
What safety precautions should I take when working with resin for my Christmas crafts?
Work in a well-ventilated space and wear disposable gloves. Protect your table with a silicone mat, and keep pets and food away from your crafting area. Avoid touching uncured resin, and wash your hands when done.
What's the best way to preserve holiday mementos in resin?
You can embed small keepsakes like miniature pinecones, ribbon, or photos printed on waterproof paper. Make sure each item is clean and dry before sealing it in resin. Pour a base layer, place your memento, and cover it with another layer to protect it.
How long does it take for resin crafts to cure before I can hang them on my Christmas tree?
Most resin takes 24 to 72 hours to fully harden depending on the brand and room temperature. Check the resin’s instructions for details. Handle your ornaments only after they feel smooth and firm to the touch.


Leave a comment
This site is protected by hCaptcha and the hCaptcha Privacy Policy and Terms of Service apply.