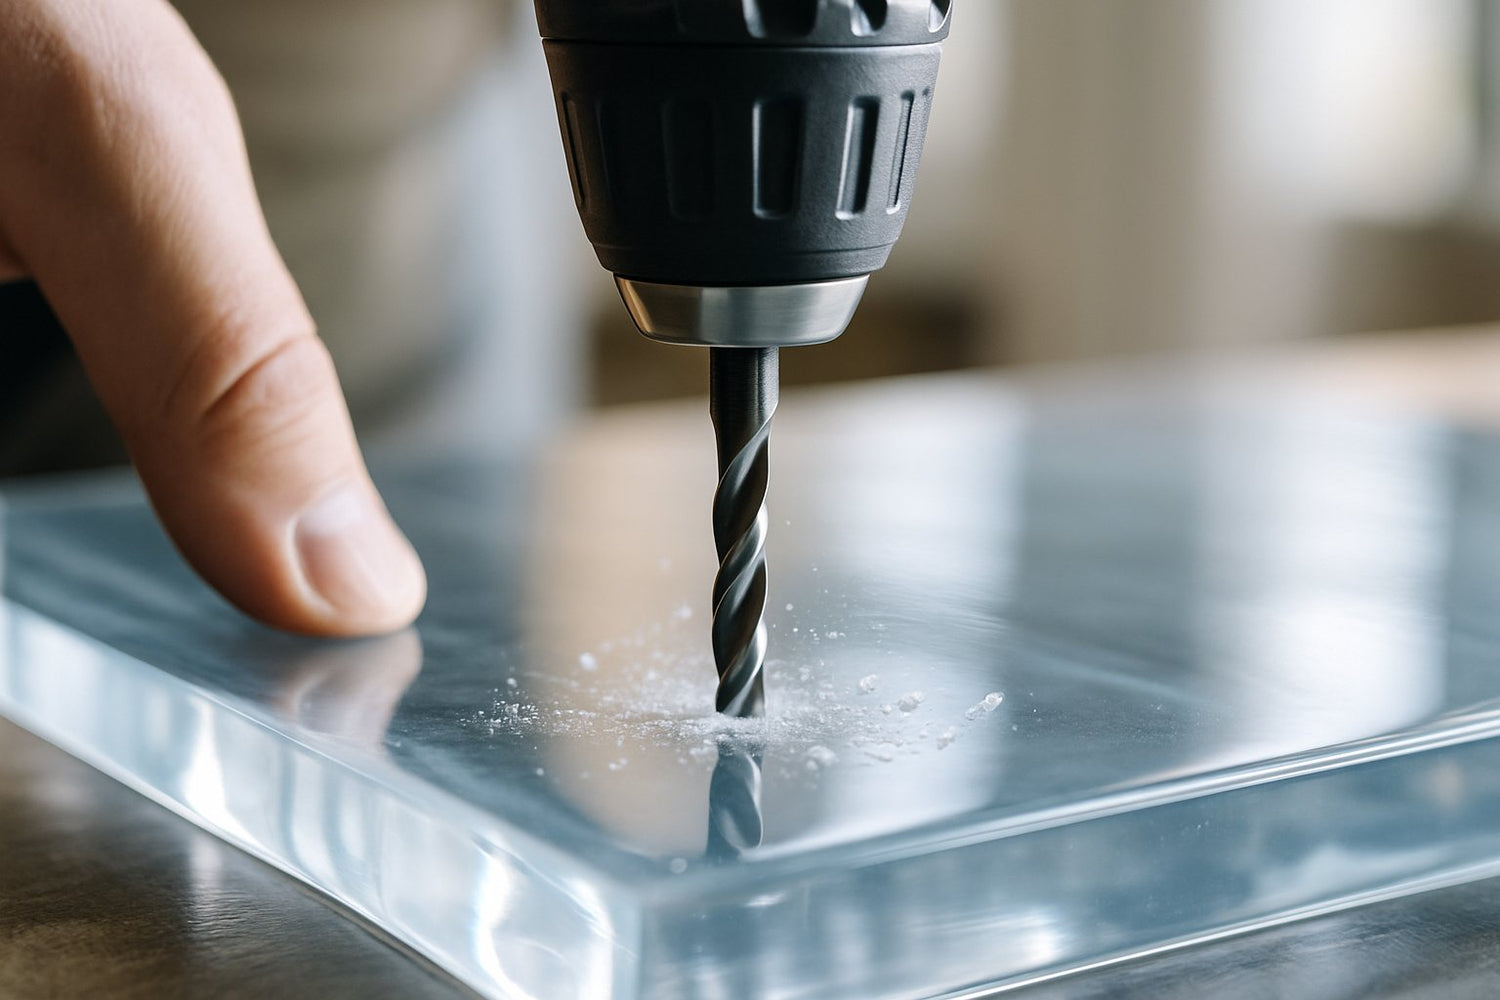
If you’ve ever wondered, can you drill into epoxy resin? Yes, drilling into epoxy resin is possible, and it’s a common method used in both crafts and larger projects.
Because resin cures into a hard, durable surface, it can be shaped with a drill to create holes or openings. The important part is using the right tools and techniques—otherwise, you risk cracking or chipping the resin.
With a steady hand, sharp drill bits, and a slow, careful approach, you can safely drill into cured epoxy and achieve smooth, professional-looking results.
Properties of Epoxy Resin Relevant to Drilling

Epoxy resin cures into a hard, thermosetting plastic. Once it sets, it’s rigid and strong—great for crafts, coatings, and repairs.
This hardness means you’ll need sharp tools and steady hands. Epoxy’s high strength and stiffness help it resist cracking, but push too hard or use a dull bit and you’ll risk chips or small fractures.
Epoxy has low thermal conductivity. That means heat from drilling builds up fast at the tip. If you don’t control speed, the resin might soften or even discolor.
When you reinforce epoxy with fibers like glass or carbon, drilling gets trickier. Problems like delamination and fiber pull-out can happen, as seen in glass/epoxy laminates. So, tool choice and feed rate matter more.
The right tools make every project better. Browse our resin craft supplies collection and stock up on essentials for your next creation.
Preparing Epoxy Resin for Drilling

Make sure your epoxy resin is fully cured before drilling. Most resins need at least 24–72 hours to harden, but thick pours can take even longer.
If you drill too soon, the bit gums up and the hole turns messy. Mark your spot with a fine-tip marker or a bit of painter’s tape—the tape helps keep the drill bit from slipping and cuts down on surface chipping.
Use a sharp drill bit made for plastics or composites. Standard twist bits can work, but carbide or diamond-coated bits last longer and usually give smoother edges.
Keep your drill speed low and steady. High speeds cause heat, which can soften or discolor the resin. Light pressure is best; let the bit do the work.
Here’s a quick reference table:
|
Step |
Tip |
|
Cure |
Wait 24–72 hrs or longer for thick resin |
|
Mark |
Use tape or marker for accuracy |
|
Bit |
Carbide or diamond-coated preferred |
|
Speed |
Low RPM, steady pressure |
For thick resin, pause while drilling or dip the bit in water to keep it cool. That’ll help avoid melting or rough edges.
If you’re drilling several holes, practice on a scrap piece first. It’s worth it for the peace of mind before working on your final piece.
Perfect projects start with proper curing. Read Why Your Resin Won’t Cure: Common Issues with UV and Epoxy Resin to learn how to avoid mistakes.
Selecting the Right Tools for Drilling Epoxy Resin

The drill bit you choose makes a big difference. The wrong bit can leave cracks or rough edges, but a sharp, steady tool gives you clean holes and keeps your project intact.
Best drill bits for epoxy resin:
- Carbide-tipped bits – stay sharp longer and cut smoothly.
- Diamond-coated bits – ideal for harder resin or thick castings.
- High-speed steel (HSS) bits – affordable and good for small projects.
A twist drill is common, but you should control speed and pressure. Sharp tools and the right feed rate reduce cracking and delamination, even in composites, so it’s worth sticking to those principles.
Here’s a quick comparison:
|
Drill Bit Type |
Best Use Case |
Notes |
|
Carbide-Tipped |
General resin drilling |
Durable, resists wear |
|
Diamond-Coated |
Thick or hard resin casts |
Smooth finish, higher cost |
|
High-Speed Steel |
Small resin projects |
Budget-friendly, dulls faster |
Keep the bit cool. Pause between passes or dip the bit in water to avoid heat buildup, since too much heat can soften or discolor the resin. Start with a small pilot hole before moving to larger sizes. It puts less stress on the resin and helps you guide the drill more accurately.
👉 For the best results, we recommend the Resiners® Cordless Rotary Tool Kit (Hand Drill).

It’s lightweight, cordless, and designed for precision, making it perfect for resin drilling and polishing. With low noise, multiple speed settings, and 53 practical accessories, it gives you total control while preventing cracks or damage.
Crafting can be safer and eco-friendly. Discover our VOC free epoxy resin collection and enjoy low-tox options for your projects.
Drilling Techniques for Epoxy Resin

Your setup really matters when drilling epoxy resin. The right drill bit, speed, and cooling can mean the difference between a clean hole and an annoying crack.
Marking Your Drill Points
Always mark your drill points before starting. Resin surfaces are slippery, and if you skip this, the bit can wander and scratch your work.
A fine-tip marker works, but a center punch or even a small nail makes a tiny dent that helps keep the drill bit centered. For projects with multiple holes, measure carefully and use a ruler or caliper for even spacing.
Masking tape over the spot helps with visibility and stops surface chipping.
Securing the Epoxy Resin Piece
Keep your resin piece steady. If it shifts, the drill can grab and crack it—nobody wants that.
Set your resin on a flat, stable surface. Use clamps or a small vise, but wrap the resin in a soft cloth or rubber pad so you don’t leave marks.
For tiny pieces like jewelry, you can hold them in a block of scrap wood with a pilot hole. That keeps things stable without too much pressure.
Choosing Drill Bit Types
Not all drill bits are equal. Standard wood or metal bits can make too much heat and cause the resin to melt or chip.
Carbide-tipped or diamond-coated bits stay sharp and cut cleanly. For small holes, grab a micro drill bit set—those are made for delicate work and reduce cracking.
If you need a larger hole, start with a small pilot hole and work your way up. Step drilling puts less stress on the resin and keeps the hole edges smooth.
Controlling Drill Speed
Drill speed matters—a lot. High speeds create heat, which softens resin and makes a mess. Too slow, and the bit can catch and chip the surface.
Start with a low to medium speed—under 2,000 RPM for most handheld drills. Apply steady, light pressure. Let the drill do its thing.
If you smell burning or see smoke, stop and let things cool off before continuing.
Cooling and Lubrication
Heat is your enemy here. Keep the drill bit cool by dipping it in water between passes.
For deeper holes, spray a little water right on the drilling spot. Some folks use a drop of light oil, but water usually does the trick for resin.
If you’re drilling lots of holes, pause after each one to let the bit and resin cool down. That’ll help prevent stress cracks and extend your drill bit’s life.
Even in industrial resin drilling, cooling methods reduce delamination in composites like carbon/epoxy laminates. Your craft projects might not need fancy setups, but keeping things cool just makes sense.
A tidy workspace makes crafting easier. Explore How To Organize Art Supplies: Easy Storage Tips and keep your tools neat and ready to use.
Safety Precautions When Drilling Epoxy Resin
Drilling into epoxy resin creates fine dust. That dust can irritate your lungs and skin, so it's best to suit up before you start.
Wear safety glasses to keep chips out of your eyes. Even tiny resin bits can sting if they hit you just right.
Put on a dust mask or respirator to keep those particles out of your lungs. There's research showing that drilling or sanding epoxy resin can cause health problems if you breathe in the dust for too long.
Gloves and long sleeves help keep the dust off your skin. This makes a difference if you're sensitive or just don't want to itch all day.
Ventilate your workspace well. If you can, use a vacuum or dust collector while you drill to grab airborne particles before they settle.
Here’s a quick checklist you might find handy:
|
Protective Gear |
Purpose |
|
Safety glasses |
Protect eyes from chips and dust |
|
Dust mask/respirator |
Prevent inhalation of resin particles |
|
Gloves |
Reduce skin contact and irritation |
|
Long sleeves |
Keep dust off arms |
Drill slowly and use steady pressure. Rushing overheats the resin and makes extra dust, which is just more mess to deal with. Sharp tools give you cleaner holes and less debris.
In factories, workers sometimes get respiratory issues from epoxy resin dust if they skip protectio. Even at home, a few precautions go a long way.
Choosing the right resin matters. To understand the differences, read Epoxy Resin vs UV Resin: What's the Difference? and pick the perfect one for your project.
Common Mistakes to Avoid

Drilling epoxy resin isn't rocket science, but skipping steps almost guarantees cracks, chips, or ugly holes. Paying attention to speed, tools, and support makes a world of difference.
Wrong drill bit? That's a classic mistake. Standard twist bits tend to grab and chip the resin. Go for sharp carbide or brad-point bits, especially with resin mixed with fibers like carbon or glass. Tool geometry really matters here—there's research on carbon/epoxy composites showing it can prevent a lot of damage.
Drilling too fast is another easy way to mess things up. High feed rates create more force, which often leads to delamination if your resin has layers. Slower drilling helps keep everything cooler and reduces cracking.
Don't forget support underneath. Skipping a scrap board or backup plate means you'll probably get blowout on the exit side. Machinists always back up composite pieces for this reason.
Smooth finishes make all the difference. Discover tips by reading Why Are There Air Bubbles In My Resin Project? and keep your creations flawless.
Finishing and Cleaning Up After Drilling

Once you've drilled your holes, you'll probably notice some rough edges. Grab a small file or fine-grit sandpaper to smooth things out. This step helps prevent cracks from getting worse.
Wipe away dust with a soft cloth or use a vacuum with a brush. Don't scrub hard—epoxy scratches more easily than you might expect. If you want a shinier look, buff lightly with a polishing compound.
If hole quality matters for your project, like with fiber-reinforced epoxy, a smoother finish actually makes the piece stronger and better looking.
Want to seal the hole? A thin coat of clear epoxy or resin sealer protects against moisture and keeps the shine. Apply with a small brush and let it cure before handling.
Quick cleanup tips:
- Wipe tools with isopropyl alcohol before the resin sets up.
- Pick up resin dust with a damp cloth so it doesn't float everywhere.
- Store drill bits clean and dry so they last longer.
|
Task |
Best Tool/Material |
Purpose |
|
Edge smoothing |
Fine-grit sandpaper/file |
Prevent cracks, smooth finish |
|
Dust removal |
Soft cloth/vacuum brush |
Clean surface, avoid scratches |
|
Hole sealing |
Clear epoxy or resin coat |
Protect and polish drilled area |
Troubleshooting Drilling Issues
Drilling epoxy resin doesn't always go perfectly. You might see cracks, chips, or melted spots—usually from drilling too fast or using a dull bit. Slow down and keep your bit sharp to avoid most problems.
If you spot delamination in fiber-reinforced resin, that's often because of the wrong drill bit or poor technique. Special bits can really help here (carbon/epoxy composites).
Dull bits heat up fast, softening the resin and making a mess. Sharpen your bits and, if things get hot, cool the area with a little water or light oil. That'll keep the hole cleaner.
Planning to tap threads? Drill the pilot hole just a bit smaller than your tap size. Go slow, back the tap out often, and clear away dust so you don’t crack the resin.
Quick guide for common issues:
|
Problem |
Likely Cause |
Fix |
|
Cracking |
High speed, too much force |
Slow speed, light pressure |
|
Chipping |
Wrong drill bit |
Use brad-point or carbide |
|
Overheating |
Dull bit, no cooling |
Sharpen bit, add coolant |
|
Weak threads |
Wrong hole size for tapping |
Drill proper pilot hole |
Creative Applications for Drilled Epoxy Resin
Drilling epoxy resin opens up a bunch of possibilities. Clean holes let you add hardware, fasteners, or decorations that make your project unique.
You can turn resin art into jewelry—just drill for jump rings, hooks, or chains. Pendants, charms, earrings… resin stays tough if you cure it right.
For home projects, drilled resin can hold screws or bolts for attaching to wood, metal, or more resin. In aerospace and automotive, drilled carbon/epoxy composites create lightweight, strong connections.
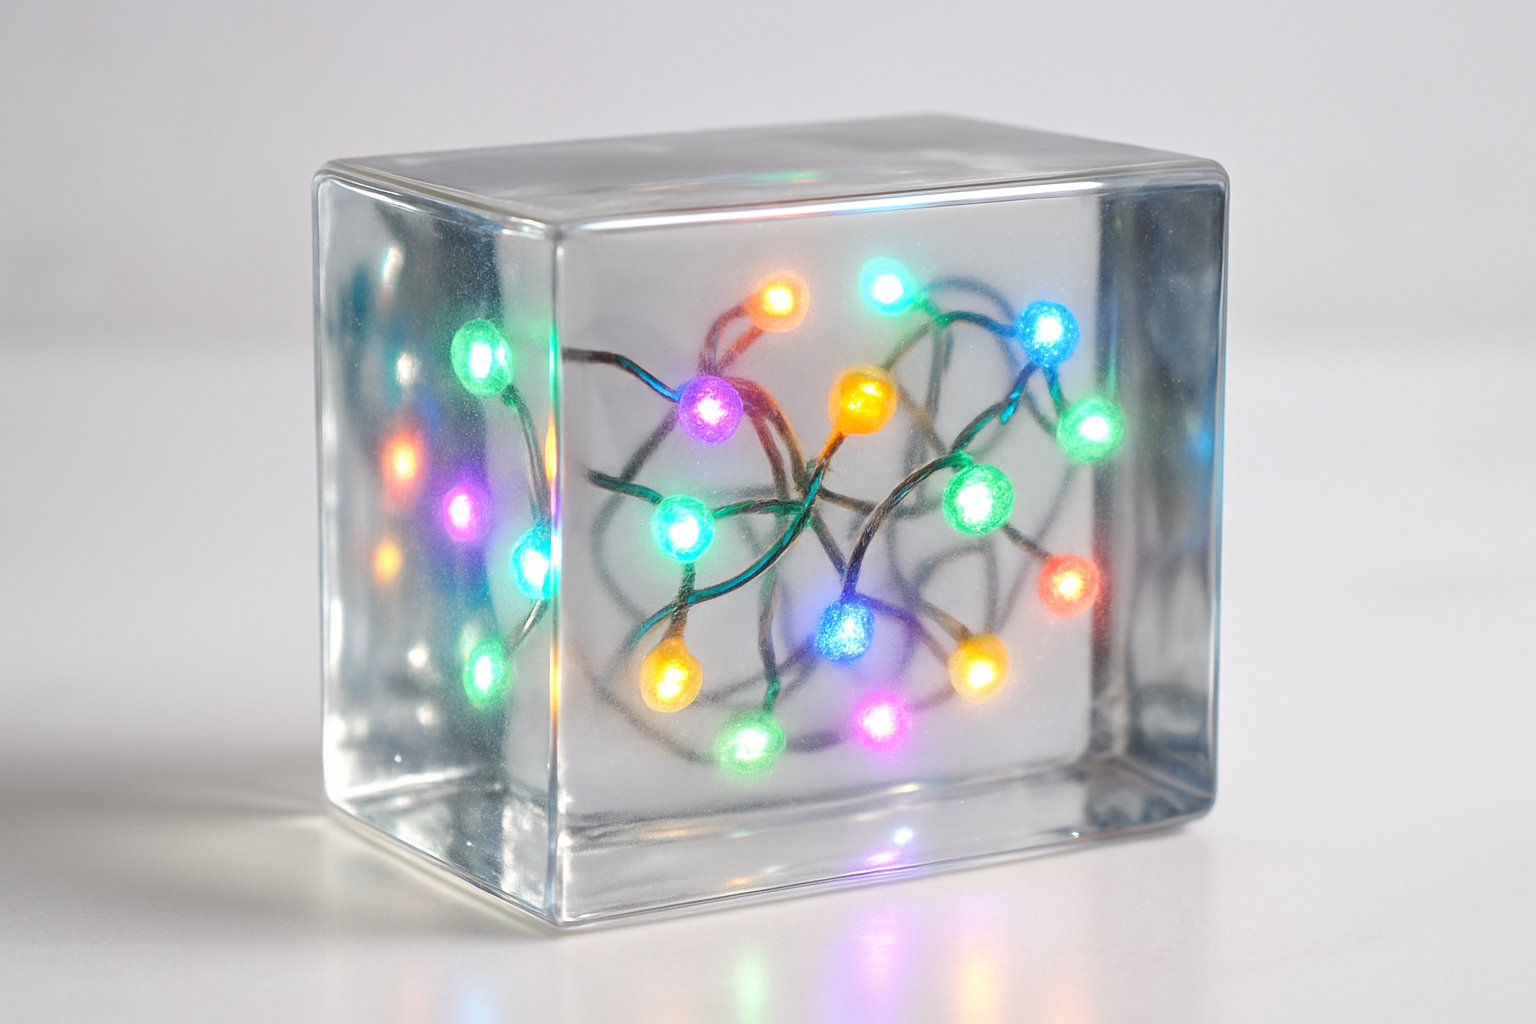
Want to add lights? Drill holes for thin LEDs and suddenly you’ve got glowing coasters or wall art. Kind of fun, honestly.
Here are a few ideas:
- Keychains: Drill a hole for a split ring.
- Wall art: Hang with fishing line through drilled holes.
- Resin tables: Make holes for cables or embedded fixtures.
|
Project Type |
Drilled Use |
Benefit |
|
Jewelry |
Holes for findings |
Adds wearability |
|
Art panels |
Hanging holes |
Easy display |
|
Furniture |
Utility holes |
Cable or fixture integration |
Want to add beauty to your crafts? Check out Resin Flowers: How to Create Beautiful Craft Decorations and learn how to make stunning floral pieces.
Final Thoughts
So, can you drill into epoxy resin? Absolutely! Once you know the basics, it opens up endless creative options—from pendants and coasters to custom furniture.
Use sharp drill bits, go slow, and keep the resin cool to avoid cracks. With the right approach, your projects will stay smooth, strong, and flawless.
Ready to take your resin crafts to the next level? Grab your drill, start experimenting, and don’t forget to check out our collection of resin equipment and resin accessories today!
Looking for quick seasonal inspiration? Read our article, Easter Resin Magic: Make Stunning Crafts in Just 1 Hour.
Frequently Asked Questions
Can you drill and screw into epoxy resin?
Yes, you can drill and screw into fully cured epoxy resin. Wait at least 24–72 hours for it to harden.
Pre-drill a pilot hole to avoid splitting. Stainless steel or brass screws are less likely to cause stress cracks.
Can you drill a hole in resin without cracking it?
You can drill a clean hole if you use a slow speed and light pressure. Keep the drill bit cool and support the resin to prevent chipping. It's a bit of a balancing act, honestly.
Is it safe to drill resin?
Drilling resin is safe if you take precautions. The process releases fine dust that can irritate your lungs and skin. Wear a dust mask, goggles, and gloves to protect yourself.
What drill bit for epoxy resin?
Carbide or diamond-coated bits work best since they stay sharp and cut cleanly. Standard twist bits can work too if you go slow and keep things cool.
Brad-point bits help keep holes precise and reduce chipping at the edges. Sometimes you just have to try what you have on hand.
Is it possible to hand-carve details into resin without using a drill?
You can carve resin by hand with small rotary tools, files, or sharp blades. The resin has to be fully cured and solid first.
Hand-carving takes more time than drilling, but it gives you more control over details and shapes. If you're patient, it's definitely doable.
Does resin crack when drilled?
Resin might crack if you drill too fast or press down too hard. The wrong drill bit can cause problems too.
Bad drilling methods often cause subsurface damage. If you use steady pressure and a sharp bit, you’re a lot less likely to see cracks.


Commenta
Questo sito è protetto da hCaptcha e applica le Norme sulla privacy e i Termini di servizio di hCaptcha.