تُعد أثقال الورق المصنوعة من الراتنج طريقة ممتعة لمزج الإبداع مع شيء عملي. يمكنك تحويل الزهور أو الأصداف أو حتى اللمعان إلى تصميم شفاف يبدو رائعًا على أي مكتب.
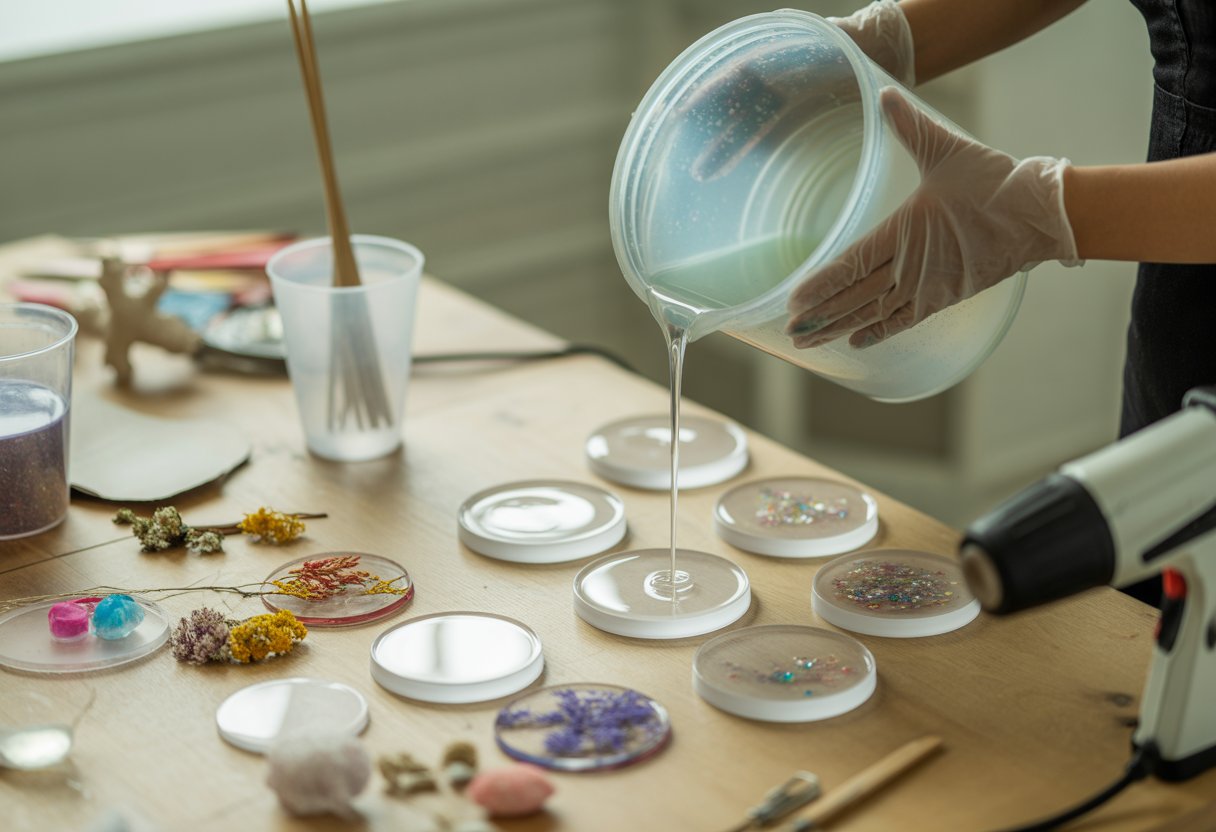
لإنشاء ثقل ورقي من الراتنج، ابدأ بخلط الراتنج الشفاف مع مصلبه حسب التوجيهات. اسكب طبقة أساسية رقيقة في القالب، ثم ضع الزهور المجففة أو غيرها من العناصر في الراتنج الذي بدأ بالتماسك جزئياً.
بمجرد تثبيت الأشياء، أضف باقي الراتنج ببطء لتغطيتها بالكامل، باستخدام مسدس حراري أو شعلة لإزالة فقاعات الهواء. اترك الراتنج يتصلب تمامًا - يستغرق هذا عادة من 12 إلى 48 ساعة.
بعد التصلب، أخرج ثقل الورق من القالب وقم بتنعيم أي حواف خشنة بالصنفرة للحصول على لمسة نهائية مصقولة واحترافية.
أثناء عملك، ستكتشف ما هي المستلزمات الأفضل وكيف تتجنب الأخطاء الشائعة. ستلتقط أيضًا بعض الحيل الإبداعية لجعل أثقال الورق الخاصة بك مميزة.
المواد الأساسية لأثقال الورق المصنوعة من الراتنج

استخدام المستلزمات الصحيحة يجعل ثقل الورق المصنوع من الراتنج ناعمًا وشفافًا. تؤثر جودة الراتنج والقوالب والأدوات على النتيجة النهائية.
أنواع الراتنج للصب

راتنج الإيبوكسي الشفاف المقاوم للماء من ريزينرز® بسعة 1 غالون/2 غالون مع منفذ تحويل مصمم خصيصًا
يستخدم معظم الناس راتنج الصب الشفاف لأثقال الورق. يتصلب ببطء، لذلك تتاح للفقاعات الوقت للارتفاع والاختفاء، تاركًا القطعة شفافة تمامًا.
هذا الراتنج مثالي إذا كنت ترغب في وضع الزهور أو الأصداف أو التذكارات الصغيرة بداخله. راتنج الإيبوكسي هو خيار جيد آخر، خاصة للمبتدئين، لأنه سهل الخلط ويعطي لمسة نهائية جميلة.
يمكن أن يتحول الإيبوكسي إلى اللون الأصفر في ضوء الشمس بمرور الوقت، ومع ذلك. راتنج البوليستر للصب يتصلب بشكل أسرع ويشعر بأنه أكثر صلابة، ولكنه ذو رائحة قوية، لذلك ستحتاج إلى تهوية جيدة.
اختر الراتنج الخاص بك بناءً على ما تريد وضعه بالداخل ومقدار الوقت الذي تحتاجه للعمل. بالنسبة لمعظم مشاريع الهوايات، فإن راتنج الإيبوكسي الشفاف أو راتنج الصب يؤدي المهمة.
اختيار القالب المناسب لثقل الورق
يشكل القالب مظهر ونهائي ثقل الورق الخاص بك. قوالب السيليكون هي الأكثر شيوعًا لأنها مرنة وتجعل إخراج القطعة النهائية سهلاً.
ستجد قوالب بأشكال قبة، كرة، مكعب، أو هرم. القباب والكريات كلاسيكية، بينما المكعبات والأهرامات رائعة للتصاميم الطبقية.
إذا لم يكن لديك قالب خاص، جرب قوالب الصابون أو أي قالب سيليكون قوي. فقط تأكد من أنه عميق بما يكفي للراتنج الخاص بك والأشياء التي تريد تضمينها.
ابحث عن قوالب ذات أسطح ناعمة لتجنب العلامات الغريبة. إذا اعتنيت بقالبك، يمكنك إعادة استخدامه عدة مرات.
أكواب الخلط وعصي التحريك
خلط الراتنج بشكل صحيح أمر بالغ الأهمية للحصول على لمسة نهائية واضحة. استخدم أكواب خلط متدرجة مع قياسات للحصول على نسبة الراتنج والمصلب الصحيحة.
أكواب البلاستيك أو السيليكون التي تستخدم لمرة واحدة تعمل بشكل رائع للكميات الصغيرة. للتحريك، استخدم عصي التحريك الخشبية أو ملاعق السيليكون.
حرك ببطء واكشط الجوانب والأسفل. إذا خلطت بسرعة كبيرة، ستحبس الفقاعات، لذا تعامل مع الأمر برفق.
احتفظ بأكواب إضافية إذا كنت ترغب في تجربة ألوان أو طبقات مختلفة. استخدم هذه الأدوات للراتنج فقط، حيث يصعب تنظيف الراتنج الجاف.
محلول إزالة القالب ومعدات السلامة
رشة سريعة من محلول إزالة القالب تساعد على إخراج ثقل الورق بسهولة وتحافظ على قوالبك في حالة جيدة. رش دائمًا قبل سكب الراتنج.
السلامة مهمة. ارتدِ قفازات النتريل لإبعاد الراتنج عن بشرتك. إذا كنت تستخدم راتنجات ذات رائحة قوية مثل البوليستر، ارتدِ قناع تنفس وافتح نافذة.
راتنج الصب الشفاف والإيبوكسي أكثر أمانًا، ولكن مع ذلك، تأكد من وجود تهوية جيدة. احتفظ بالمناشف الورقية والكحول المحمر في متناول اليد لتنظيف الفوضى اللزجة.
استخدام محلول إزالة القالب ومعدات السلامة يحميك أنت ومساحة عملك أثناء الصناعة.
تبدأ النتائج المثالية بقياسات دقيقة. أتقن العملية بقراءة: كيف تحصل على نسبة خلط راتنج الإيبوكسي الصحيحة تمامًا.
تحضير مساحة العمل والسلامة

جهز مساحة نظيفة ومنظمة قبل البدء. غطِ طاولتك بالبلاستيك أو ورق الشمع أو الجرائد لالتقاط القطرات.
اجعل المناشف الورقية جاهزة للتنظيف السريع. تدفق الهواء الجيد أمر أساسي، لذا اعمل بالقرب من نافذة أو استخدم مروحة لتحريك الهواء.
ارتدِ دائمًا معدات الحماية. على الأقل، احصل على:
- قفازات النتريل ليديك
- نظارات السلامة لعينيك
- قناع تنفس إذا كنت تستخدم راتنجات قوية
لا تأكل أو تشرب بالقرب من مساحة عملك. أبخرة الراتنج ليست شيئًا تريده في وجباتك الخفيفة.
حافظ على أدواتك مرتبة. استخدم أكوابًا منفصلة للخلط، وعصي للتحريك، وقوالب سيليكون للصب.
إليك جدول سريع لمساعدتك على تذكر الأساسيات:
|
العنصر |
الغرض |
|
القفازات |
حماية يديك |
|
قناع التنفس |
تقليل التعرض للأبخرة |
|
الغطاء البلاستيكي |
حماية سطح العمل |
|
أكواب الخلط |
تحتوي على الراتنج والمصلب |
الحفاظ على قوالبك في أفضل حالة يجعل الحرف اليدوية أسهل. تعلم كيف من خلال قراءة دليلنا، أفضل طريقة لتنظيف قوالب السيليكون بسرعة وسهولة.
العملية خطوة بخطوة: كيفية صنع أثقال الورق المصنوعة من الراتنج
جهز أدواتك، اخلط الراتنج بعناية، وابنِ الطبقات بصبر. القالب الصحيح، والتعامل الآمن، ووقت التصلب الكافي ستمنحك ثقل ورقيًا شفافًا وناعمًا.
تحضير القالب

طقم الحرف اليدوية قالب سيليكون لغز القلب من ريزينرز®
اختر قالب سيليكون لثقل الورق لأنه مرن ويجعل إزالة القطعة سهلة. اغسل وجفف القالب حتى لا يفسد الغبار أو الماء اللمسة النهائية.
رش طبقة رقيقة من محلول إزالة القالب في الداخل لمنع الالتصاق. إذا تخطيت هذه الخطوة، فقد تواجه صعوبة في إخراج ثقل الورق الخاص بك.
فكر في الحجم والشكل الذي تريده. اختبر القالب بالماء أولاً، ثم قم بالقياس لتعرف كمية الراتنج التي تحتاجها للخلط.
خلط وتلوين الراتنج
استخدم راتنج الصب الشفاف للحصول على أفضل مظهر. قم بقياس أجزاء متساوية من الراتنج والمصلب في أكواب خلط منفصلة قبل الدمج.
اتبع تعليمات المنتج، حيث يمكن أن تتغير النسب حسب العلامة التجارية. اسكب كلا الجزأين في كوب نظيف وحرك ببطء لمدة ثلاث دقائق تقريبًا.
لا تتسرع - الخلط السريع يحبس الفقاعات. اكشط الجوانب والأسفل أثناء التحريك لخلط كل شيء جيدًا.
إذا كنت تريد لونًا، أضف مسحوق الميكا، أو حبر الكحول، أو صبغة الراتنج. ابدأ بكمية صغيرة واخلط جيدًا. تسمح لك الصبغات الشفافة برؤية ما بالداخل، بينما تخلق الألوان غير الشفافة خلفية صلبة.
الطبقات وتضمين الأشياء
اسكب طبقة رقيقة من الراتنج في القالب أولاً. تساعد هذه القاعدة في تثبيت تصميمك في مكانه.
اتركه لبضع دقائق حتى تطفو الفقاعات. أضف عناصر صغيرة مثل الزهور المجففة، أو الأصداف، أو الصور - تأكد من أنها جافة وغير مسامية، وإلا قد لا يتصلب الراتنج بشكل صحيح.
اضغط عليها برفق في الراتنج حتى لا تطفو. اسكب المزيد من الراتنج فوق الأشياء حتى يمتلئ القالب تقريبًا.
إذا كنت تريد عمقًا، ابنِ عدة طبقات رقيقة بدلاً من طبقة سميكة واحدة. هذا يمنع الراتنج من السخونة الزائدة والتشقق.
التصلب والإزالة من القالب
ضع القالب المملوء على سطح مستوٍ. غطه بصندوق أو حاوية لإبعاد الغبار أثناء تصلبه.
تحتاج معظم الراتنجات من 24 إلى 48 ساعة لتتصلب، ولكن تحقق من تعليمات علامتك التجارية. لا تحرك القالب خلال هذا الوقت - فالصدمات أو الاهتزازات يمكن أن تفسد ثقل الورق الخاص بك.
إذا ظهرت فقاعات، استخدم مسدس حراري أو ولاعة على بعد بضع بوصات فوق الراتنج لإزالتها. بمجرد أن يتصلب الراتنج، انزع القالب برفق.
إذا كان عالقًا، قم بثني جوانب القالب بدلاً من السحب بقوة. بعد إخراجه، قم بصقل الحواف أو تلميع السطح لجعله يلمع.
هل تريد تقليل وقت الانتظار؟ اكتشف حيلًا ذكية في كيف تجعل الراتنج يجف بشكل أسرع: 10 نصائح مجربة.
أفكار إبداعية لثقالات الورق الراتنجية
امنح ثقالات الورق الخاصة بك شخصية عن طريق إضافة أشياء صغيرة، أو اللعب بالألوان، أو تحويلها إلى تذكارات. كل خيار يغير الشكل والمظهر بشكل كبير.
استخدام الإضافات والأغراض المدمجة
إن وضع الأشياء داخل الراتنج يجعل ثقالات الورق الخاصة بك فريدة من نوعها. يمكنك استخدام الزهور المجففة، أو الأصداف البحرية، أو العملات المعدنية، أو التعويذات الصغيرة.
تبقى هذه الأشياء محفوظة وتبدو رائعة داخل الراتنج الشفاف. للحصول على طابع طبيعي، استخدم أوراقًا مضغوطة أو أحجارًا صغيرة.
إذا كنت تحب التصميمات الممتعة، أضف بريقًا أو خرزًا أو ألعابًا صغيرة. فقط تأكد من أن كل شيء نظيف وجاف أولاً.
اسكب الراتنج في طبقات للحصول على أفضل النتائج. ضع غرضك في الطبقة الأولى، واتركه يتصلب قليلاً، ثم اسكب المزيد من الراتنج فوقه. هذا يمنع الأشياء من الطفو.
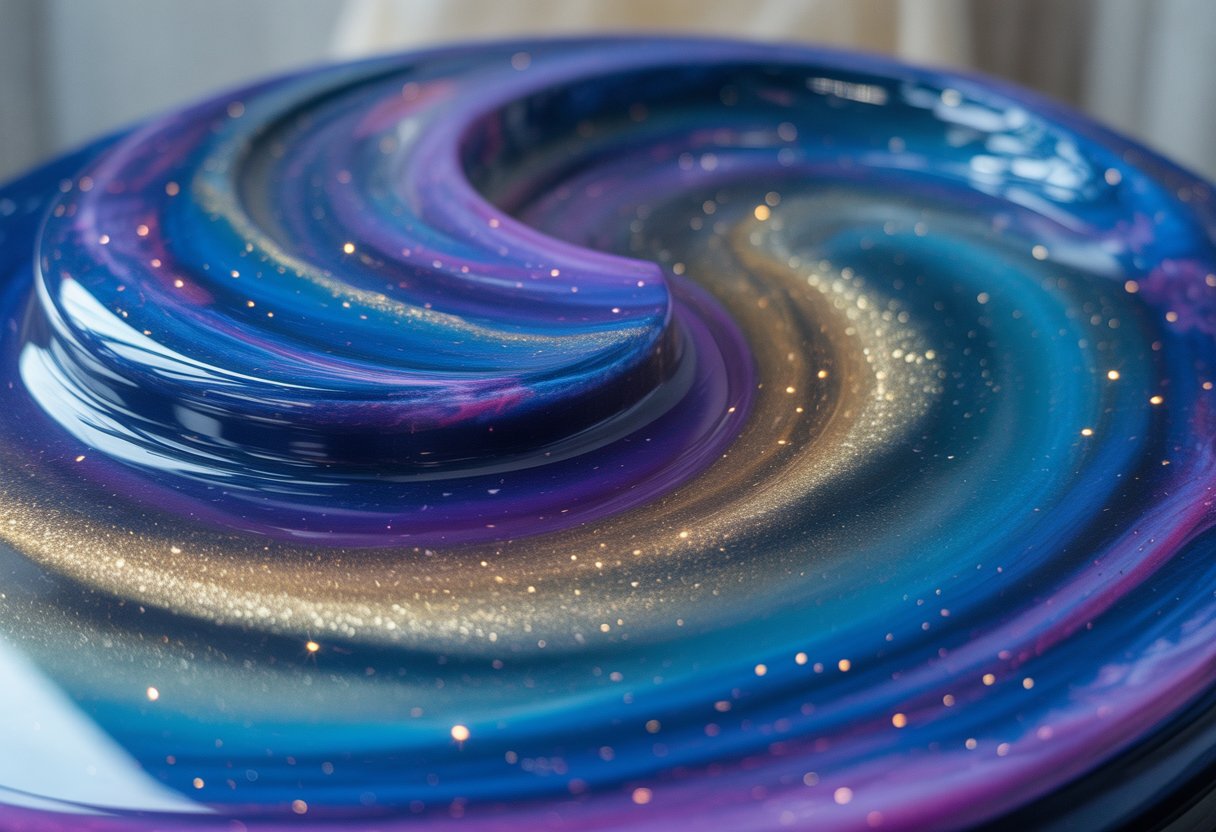
تقنيات وتأثيرات الألوان
يمكن للون أن يحول ثقالة الورق العادية إلى شيء جذاب. جرب مسحوق الميكا أو حبر الكحول أو صبغة الراتنج للحصول على تأثيرات مختلفة.
امزج لونين أو ثلاثة للحصول على مظهر رخامي. هل تريد ألوانًا جريئة؟ ضع طبقات من الألوان الصلبة واترك كل واحدة تتصلب قبل إضافة التالية.
للحصول على نمط أكثر نعومة، امزج قليلاً من الصبغة البيضاء للحصول على شعور غائم أو مجري. يضيف البريق والرقائق المعدنية لمعانًا أيضًا - يمكنك مزجها في الراتنج أو رشها بين الطبقات.
اختبر كميات صغيرة أولاً لترى كيف تتجانس الألوان قبل صنع قطعة كاملة.
أفكار هدايا مخصصة
تعتبر ثقالات الورق الراتنجية هدايا رائعة. أضف صورة صغيرة أو ملاحظة أو حتى رسم طفل مختوم بالراتنج لتذكار.
للحظات الخاصة، قم بتضمين أشياء مثل قصاصات الزفاف أو تذكارات السفر أو تعويذة صغيرة. هذه التفاصيل تحول مشروعًا بسيطًا إلى ذكرى دائمة.
يمكنك أيضًا استخدام خرز الحروف أو قصاصات الفينيل أو الكلمات المطبوعة لتخصيص ثقالة الورق الخاصة بك. إنها طريقة ممتعة لتقديم الهدايا لأعياد الميلاد أو العطلات أو لمجرد ذلك.
يمكن أن ترفع الألوان الجريئة مشاريعك إلى مستوى آخر. للحصول على أفكار إبداعية، تحقق من مقالنا: تلوين الراتنج: تقنيات للحرف اليدوية النابضة بالحياة.
تشطيب وتلميع ثقالة الورق الخاصة بك
بعد أن تتصلب ثقالة الورق الراتنجية الخاصة بك، قم بتنظيف الحواف، وتنعيم السطح، وتلميعها للحصول على لمعان شفاف. هذه اللمسات النهائية تجعل قطعتك تبدو جاهزة للإهداء أو للاستخدام على مكتبك الخاص.
تقليم وصنفرة الحواف
عندما تسحب ثقالة الورق الراتنجية من القالب، سترى على الأرجح حوافًا رفيعة أو حادة. تسمى هذه خطوط الوميض، وتظهر حيث يتسرب الراتنج إلى الفجوات الصغيرة.
أمسك سكينًا حرفيًا أو شفرة أدوات صغيرة وقم بتقليم الأجزاء الزائدة بعناية. اذهب ببطء وقم بقطع ما يبرز فقط.
للحصول على حواف أكثر نعومة، استخدم ورق صنفرة رطب/جاف. ابدأ بحبيبات متوسطة مثل 400، ثم انتقل إلى حبيبات أدق - ربما 800 أو حتى 1000.
الصنفرة الرطبة تقلل من الغبار وتمنع الخدوش العميقة من التفاقم. إذا كنت تريد حوافًا مستديرة، قم بالصنفرة في دوائر صغيرة وحافظ على المنطقة رطبة.
اشطف القطعة بين الحبيبات حتى لا تسحب جزيئات خشنة عبر ورق صنفرة أنعم. إنها تفاصيل صغيرة، لكنها تجعل الراتنج الشفاف يبدو أكثر تلميعًا في النهاية.
التلميع للحصول على لمسة نهائية واضحة تمامًا
بعد الصنفرة، غالبًا ما يبدو الراتنج غائمًا. لإعادة اللمعان، قم بتلميع السطح باستخدام ملمع بلاستيكي أو مركب راتنج.
ضع نقطة على قطعة قماش ناعمة من الألياف الدقيقة وقم بالتلميع في دوائر صغيرة. إذا توقفت عن الصنفرة عند حبيبات 1000، يمكنك الانتقال إلى حبيبات 2000 أو 3000 أولاً للحصول على لمسة نهائية أكثر نعومة.
كلما كان السطح أكثر نعومة، كان من الأسهل الحصول على هذا المظهر الزجاجي. لثقالات الورق الأكبر أو ذات القبة، جرب أداة دوارة مع وسادة تلميع.
حافظ على السرعة منخفضة - فالحرارة الزائدة يمكن أن تفسد الراتنج. امسح بقطعة قماش نظيفة بعد التلميع وتحقق من أي بقع فاتتك.
إضافة وسادات أو قواعد من اللباد
يمكن لثقالات الورق الراتنجية أن تخدش المكاتب أو تنزلق إذا تركت مكشوفة. إضافة قاعدة تحمي الأسطح وتمنح قطعتك لمسة نهائية.
اقطع وسادات صغيرة من اللباد أو دوائر فلين لاصقة وألصقها بالأسفل. لثقالات الورق الثقيلة، استخدم ورقة كاملة من اللباد مقطوعة لتناسب.
اختر ألوانًا محايدة مثل الأسود أو الرمادي أو البيج للحصول على مظهر بسيط، أو طابق اللباد مع الألوان داخل الراتنج الخاص بك. هذه الخطوة تجعل ثقالة الورق الخاصة بك أكثر عملية للاستخدام اليومي.
استكشاف المشكلات الشائعة وإصلاحها
العمل بالراتنج ممتع، لكنه ليس سهلاً دائمًا. يمكن أن تفسد المشكلات مثل الفقاعات أو الأسطح اللاصقة أو القوالب التي لا تنفك ثقالة الورق الخاصة بك.
إذا تعلمت كيفية تحديد هذه المشكلات وإصلاحها، فستنقذ مشروعك - وصحتك العقلية.
منع وإزالة الفقاعات
تظهر الفقاعات إذا قمت بخلط الراتنج والمصلب بسرعة كبيرة. اخلط ببطء واكشط جوانب الكوب أثناء الخلط.
اترك الخليط لمدة بضع دقائق قبل الصب حتى يرتفع الهواء ويخرج. اسكب الراتنج في القالب في تيار رفيع لدفع الهواء بدلاً من حبسه.
إذا كنت تضيف أشياء، قم بطلاءها بطبقة رقيقة من الراتنج أولاً. هذا يساعد على منع جيوب الهواء من الالتصاق بها.
يمكنك استخدام مسدس حراري أو شعلة صغيرة لإزالة الفقاعات على السطح. إذا كنت تريد أن تكون في الجانب الآمن، استخدم عود أسنان أو دبوسًا لوخز الفقاعات الصغيرة بالقرب من الحواف.
التعامل مع الراتنج اللاصق أو غير المعالج
يعني الراتنج اللاصق عادةً أنك لم تقيس أو تخلط بشكل صحيح. استخدم دائمًا النسبة التي توصي بها الشركة المصنعة، واخلط لمدة 3 إلى 5 دقائق على الأقل، مع كشط القاع والجوانب.
إذا كان الراتنج الخاص بك لاصقًا قليلاً فقط، فإن صنفرة الطبقة العلوية وإضافة طبقة رقيقة جديدة يمكن أن يحل المشكلة. تأكد من خلط الطبقة الجديدة جيدًا قبل الصب.
إذا ظل الراتنج ناعمًا أو لزجًا، فمن المحتمل أنك ستحتاج إلى كشطه والبدء من جديد. استخدم منشفة ورقية مع كحول الأيزوبروبيل لتنظيف القالب، ثم حاول مرة أخرى بقياسات دقيقة.
إصلاح مشاكل إزالة القالب
أحيانًا يلتصق الراتنج بالقالب ولا يخرج. يحدث هذا عادةً إذا تخطيت رش عامل فك القالب أو استخدمت قالبًا تالفًا.
رش دائمًا طبقة رقيقة ومتساوية من عامل فك القالب قبل صب الراتنج، خاصة مع القوالب الصلبة. إذا علقت قطعتك، ضع القالب في الفريزر لمدة 10 إلى 15 دقيقة.
يساعد البرد الراتنج على الانكماش قليلاً ليخرج بسهولة أكبر. لا تسحب بقوة - فقد تتمزق قوالب السيليكون وقد تتشقق قطعتك.
افحص قوالبك بحثًا عن الخدوش أو بقايا الراتنج قبل استخدامها مرة أخرى. اغسلها بالماء والصابون الخفيف، ثم جففها تمامًا.
الحفاظ على قوالبك في أفضل حالة يجعل الحرف أسهل. تعلم كيف بقراءة دليلنا: أفضل طريقة لتنظيف قوالب السيليكون بسرعة وسهولة.
أفكار أخيرة
صنع ثقالات الورق الراتنجية هو حرفة ممتعة تجمع بين الإبداع والعملية. من خلال وضع طبقات من الراتنج وتضمين عناصر مثل الزهور أو الأصداف أو البريق، يمكنك تصميم قطعة تبدو شخصية وفريدة من نوعها.
تتطلب عملية المعالجة صبرًا، لكن النتيجة النهائية تستحق الانتظار - ناعمة، لامعة، وجاهزة لتزيين أي مكتب أو رف. سواء كنت تصنع هدية أو تصنع شيئًا لنفسك، فإن ثقالات الورق الراتنجية هي طريقة بسيطة لتحويل الأشياء اليومية إلى تذكارات دائمة.
لذا احصل على مجموعة الراتنج الخاصة بك، واختر قالبًا، وابدأ في صنع ثقالة الورق المخصصة الخاصة بك اليوم!
إذا كنت بدأت للتو، فإن الأساسيات هي الأهم. احصل على الأساسيات في أساسيات صب الراتنج: كل ما يحتاجه المبتدئون لمعرفته.
الأسئلة المتداولة
ما هي المواد التي أحتاجها لبدء صناعة ثقالات الورق الراتنجية الخاصة بي؟
ستحتاج إلى راتنج ومصلب، قالب سيليكون، أكواب خلط، وعصي تحريك. القفازات، جهاز التنفس، ومساحة عمل مسطحة للحفاظ على السلامة.
زين بالبريق، الزهور المجففة، الصور، أو الحلي الصغيرة إذا أردت.
هل يمكنك إرشادي خلال عملية ختم الورق لإدراجه في ثقالة ورق راتنجية؟
قم بختم الورق بغراء يجف شفافًا أو وسط ديكوباج قبل إضافته إلى الراتنج. هذا يمنع الورق من امتصاص الراتنج ويتحول إلى شفاف.
اترك الورق يجف تمامًا قبل وضعه في القالب.
ما هي بعض الأفكار الإبداعية لتصميم ثقالات ورق راتنجية فريدة؟
جرب الضغط على الزهور أو الأصداف أو الأحجار في الراتنج للحصول على طابع طبيعي. يمكن للرقائق المعدنية أو البريق أو الأصباغ الملونة أن تجعل الأشياء تتألق.
الحلي الصغيرة مثل التعويذات أو المفاتيح أو العملات المعدنية ممتعة للتضمين أيضًا.
هل يمكنك شرح الفرق بين راتنج الإيبوكسي وراتنج الصب البوليستر الشفاف لثقالات الورق؟
راتنج الإيبوكسي أسهل في الاستخدام، ورائحته أقل، ويعمل جيدًا للمبتدئين. راتنج الصب البوليستر الشفاف يتصلب أكثر ويمكن أن يبدو شفافًا للغاية، لكن أبخرته أقوى.
كلاهما يعمل بشكل جيد، لذا اختر ما تشعر بالراحة معه وما يناسب مشروعك.
كيف أستخدم القوالب بأمان عند صنع ثقالات الورق الراتنجية؟
تأكد من أن القالب نظيف وجاف قبل صب الراتنج فيه. ضعه على سطح مستوٍ حتى يتساوى الراتنج.
عندما يتصلب، قم بثني القالب برفق لإخراج ثقالة الورق الخاصة بك. لا تتعجل - الصبر يؤتي ثماره هنا.
ما هي العناصر الشائعة التي يجب تجنب تضمينها في الراتنج لثقالات الورق؟
لا تستخدم الزهور أو النباتات الطازجة. سوف تتعفن داخل الراتنج، ولا أحد يريد ذلك.
تجنب الأشياء التي تحتوي على رطوبة، مثل الطعام أو الفاكهة. هذه ببساطة لا تعمل.
المواد المسامية، مثل الورق غير المعالج أو الأقمشة، يمكن أن تسبب فقاعات أو بقع غريبة. من الأفضل تجنبها أيضًا.


اترك تعليقًا
This site is protected by hCaptcha and the hCaptcha Privacy Policy and Terms of Service apply.