هل لديك فضول حول كيفية استخدام راتنج الأشعة فوق البنفسجية لمشروعك الإبداعي التالي؟ أنت في المكان الصحيح!
راتنج الأشعة فوق البنفسجية سهل وسريع ومثالي لصنع المجوهرات والتعليقات والمزيد. سواء كنت مبتدئًا أو تريد فقط حرفة سريعة، سيرشدك هذا الدليل إلى كل ما تحتاجه.
هل أنت مستعد للبدء؟ تابع القراءة لتعرف كل النصائح والحيل والأساسيات لنجاح راتنج الأشعة فوق البنفسجية!
ما تحتاجه للبدء في استخدام راتنج الأشعة فوق البنفسجية
قبل أن تبدأ، دعنا نتأكد من أن لديك كل المستلزمات الصحيحة.
فيما يلي قائمة تحقق سريعة لمشروع راتنج الأشعة فوق البنفسجية الأول الخاص بك:
✅ راتنج الأشعة فوق البنفسجية (اختر الشفاف أو الملون)
✅ مصباح الأشعة فوق البنفسجية أو مصباح يدوي بالأشعة فوق البنفسجية (ضروري للمعالجة السريعة)
✅ قوالب سيليكون أو سطح المشروع
✅ أدوات الخلط (أعواد أسنان، عصي تقليب، أو ملاعق سيليكون)
✅ ديكورات (لمعان، زهور مجففة، تعليقات، مساحيق صبغية)
✅ قفازات وقناع (للسلامة)
✅ سطح واقٍ (مثل حصيرة سيليكون أو ورق زبدة)
📌هل تريد التأكد من أنك تستخدم أفضل المواد؟ تحقق من مجموعات راتنج الأشعة فوق البنفسجية المفضلة لدينا هنا.
كيفية إعداد مساحة عملك لراتنج الأشعة فوق البنفسجية
تحدث المساحة النظيفة والآمنة فرقًا كبيرًا عند العمل براتنج الأشعة فوق البنفسجية.
- اختر طاولة بالقرب من نافذة أو ذات تهوية جيدة.
- ضع حصيرة سيليكون أو ورق شمع لحماية سطحك من الانسكابات اللزجة.
- احتفظ بالمناشف الورقية ومناديل الأطفال في متناول اليد للتنظيف السريع.
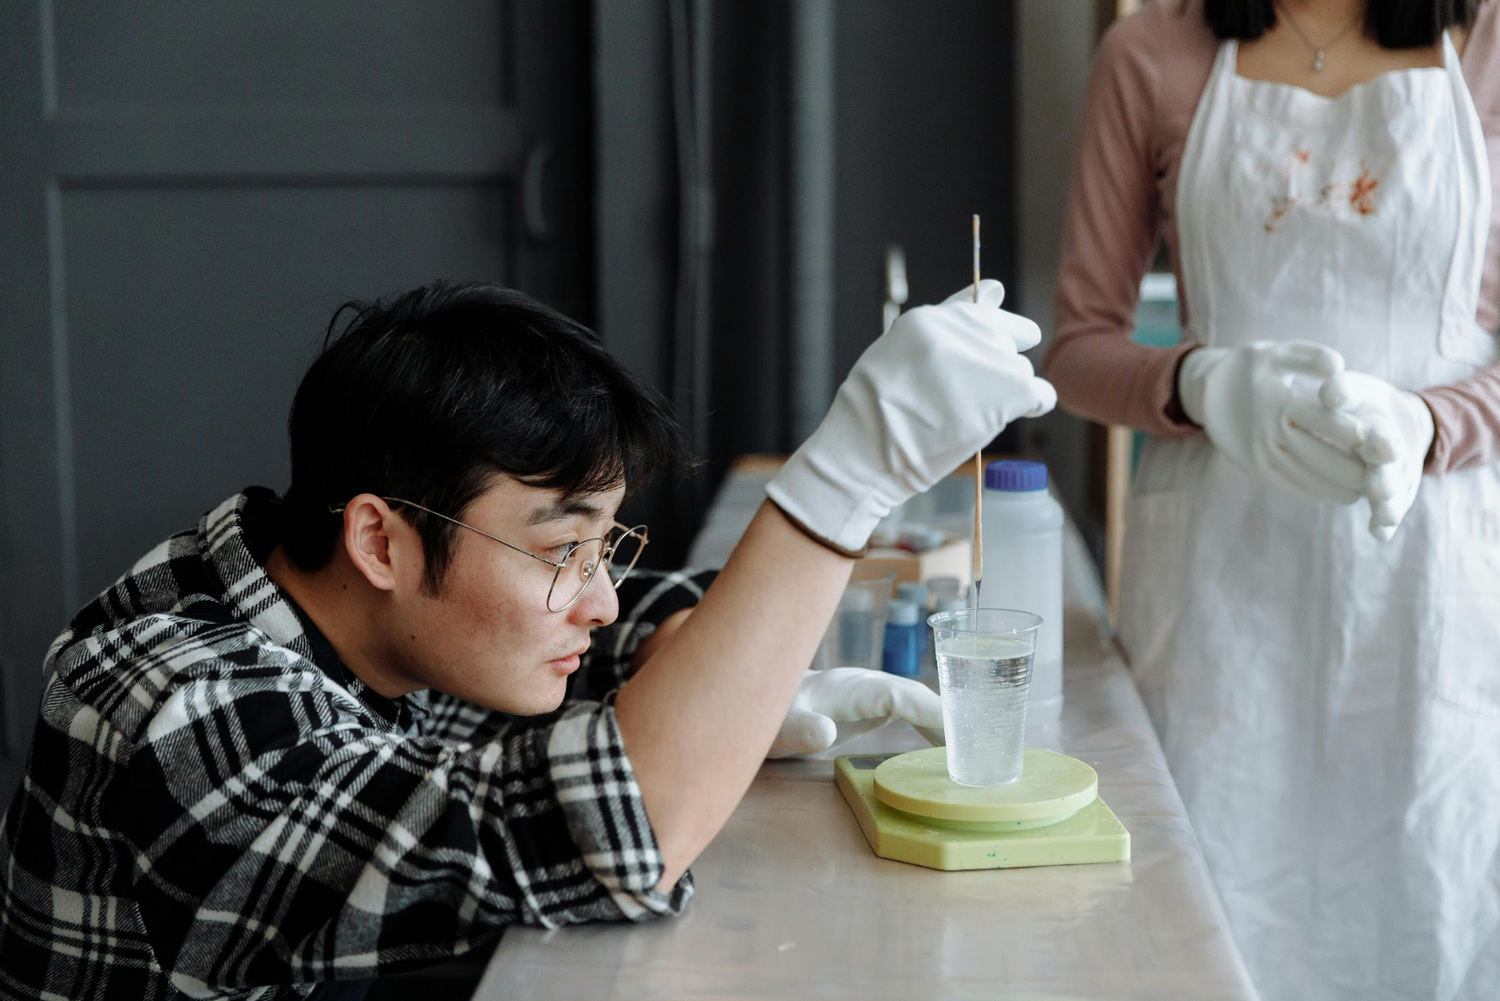
- ارتدِ قفازات، وإذا كنت حساسًا للروائح، قناعًا.
⚠️ يمكن أن يكون لراتنج الأشعة فوق البنفسجية رائحة خفيفة قبل المعالجة. تأكد من أن الحيوانات الأليفة والأطفال لا يمكنهم الوصول إلى مشروعك أثناء المعالجة.
دليل خطوة بخطوة: كيفية استخدام راتنج الأشعة فوق البنفسجية

هل أنت مستعد لصنع أول إبداعاتك من راتنج الأشعة فوق البنفسجية؟ إليك عملية بسيطة خطوة بخطوة:
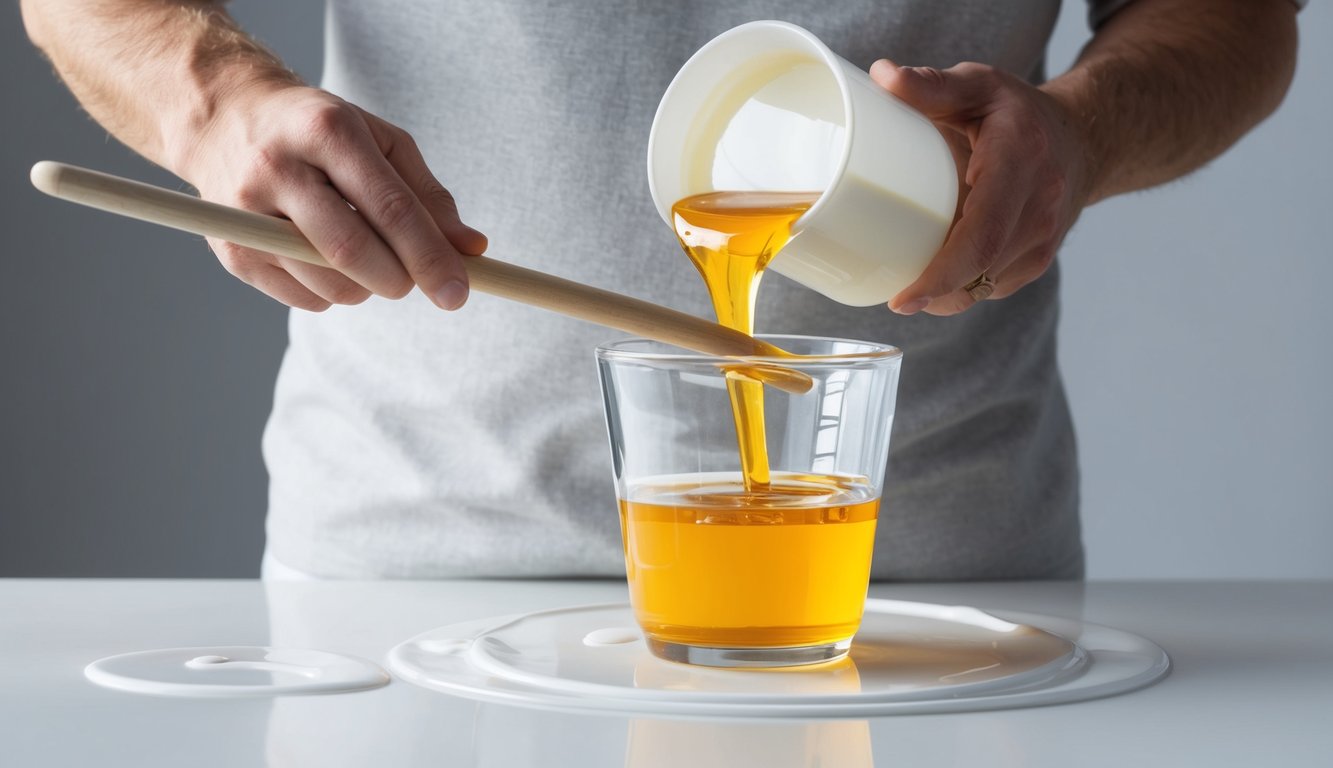
1. اسكب راتنج الأشعة فوق البنفسجية
اعصر الراتنج مباشرة في القالب الخاص بك أو على سطح مشروعك. لا تملأه بالكامل. اترك مساحة صغيرة للديكورات أو الطبقات الإضافية.
2. أضف اللون والديكورات
الآن الجزء الممتع! رش اللمعان أو الزهور المجففة أو التعليقات الصغيرة. للون، استخدم قطرة من صبغة الراتنج أو قليلًا من مسحوق الميكا. قلب بلطف بعود أسنان للخلط. إذا كنت تريد طبقات أو تأثيرات متعددة، اسكب قليلًا من الراتنج، عالج، ثم أضف المزيد.
3. أزل الفقاعات
استخدم عود أسنان لإزالة أي فقاعات تراها. يمكنك أيضًا النفخ بلطف على السطح أو استخدام مسدس حراري صغير على درجة حرارة منخفضة لمدة ثانية أو ثانيتين.

آلة Resiners® AirLess لإزالة فقاعات الراتنج
4. عالج تحت ضوء الأشعة فوق البنفسجية
ضع مشروعك تحت مصباح الأشعة فوق البنفسجية. تُعالج معظم القطع الصغيرة في 1-3 دقائق، ولكن الطبقات السميكة قد تستغرق ما يصل إلى 5 دقائق. إذا لم يكن لديك مصباح، فإن ضوء الشمس يعمل أيضًا—ولكنه يستغرق وقتًا أطول (حوالي 10-15 دقيقة).
5. أزل من القالب وانهِ
بمجرد أن يصبح الراتنج صلبًا وباردًا، أخرجه بلطف من القالب. إذا كان السطح لزجًا قليلًا، عالجه لمدة دقيقة أو دقيقتين إضافيتين. قطعتك جاهزة للاستخدام!
📌هل تريد معرفة أي مصباح UV يعمل بشكل أفضل؟ تصفح دليلنا لأفضل مصابيح UV لمعالجة الراتنج.
كيفية معالجة راتنج الأشعة فوق البنفسجية بالطريقة الصحيحة
المعالجة هي ما يحول الراتنج السائل إلى قطعة صلبة لامعة.
- استخدم دائمًا مصباح UV بقوة كافية (على الأقل 6 واط للقطع الصغيرة، و 36 واط للقطع الكبيرة).
- احتفظ بالمصباح قريبًا — حوالي 1-2 بوصة من مشروعك.
- قم بتدوير القطعة إذا لزم الأمر للتأكد من معالجة جميع الجوانب بالتساوي.
💡إذا كنت تعمل في يوم مشمس، يمكنك معالجة راتنج الأشعة فوق البنفسجية في الهواء الطلق. ولكن كن صبورًا—ضوء الشمس أبطأ وقد لا يعالج الطبقات السميكة بالكامل.
تحقق دائمًا مما إذا كان الراتنج صلبًا وغير لزج قبل إزالته من القالب.
استكشاف الأخطاء وإصلاحها: لماذا راتنج الأشعة فوق البنفسجية الخاص بي لزج أو لا يعالج؟

أحيانًا لا يعالج راتنج الأشعة فوق البنفسجية بشكل مثالي. إليك ما قد يكون خطأ:
- المصباح ليس قويًا بما يكفي: استخدم مصباحًا بقوة كهربائية أعلى أو عالج لفترة أطول.
- الطبقة سميكة جدًا: عالج في طبقات رقيقة، حوالي 1/8 بوصة في كل مرة.
- الديكورات تحجب الضوء: حاول إبقاء الزهور أو التعليقات بعيدًا عن السطح.
- الراتنج قديم: الراتنج الطازج يعالج بشكل أفضل.

مصباح Resiners® 3 في 1 للأشعة فوق البنفسجية لمعالجة الراتنج
📌إذا كانت قطعتك لا تزال لزجة، امسح السطح بقليل من كحول الأيزوبروبيل وعالج مرة أخرى. لمزيد من النصائح، تحقق من دليلنا لأفضل راتنج الأشعة فوق البنفسجية.
نصائح سلامة راتنج الأشعة فوق البنفسجية
على الرغم من سهولة استخدام راتنج الأشعة فوق البنفسجية، من المهم البقاء بأمان:
✔️ ارتدِ دائمًا قفازات لحماية بشرتك.
✔️ اعمل في منطقة جيدة التهوية.
✔️ لا تلمس وجهك أو عينيك أثناء استخدام الراتنج.
✔️ عالج الراتنج بالكامل قبل التعامل معه أو ارتدائه.
✔️ تخلص من الراتنج المتبقي وفقًا للقواعد المحلية.
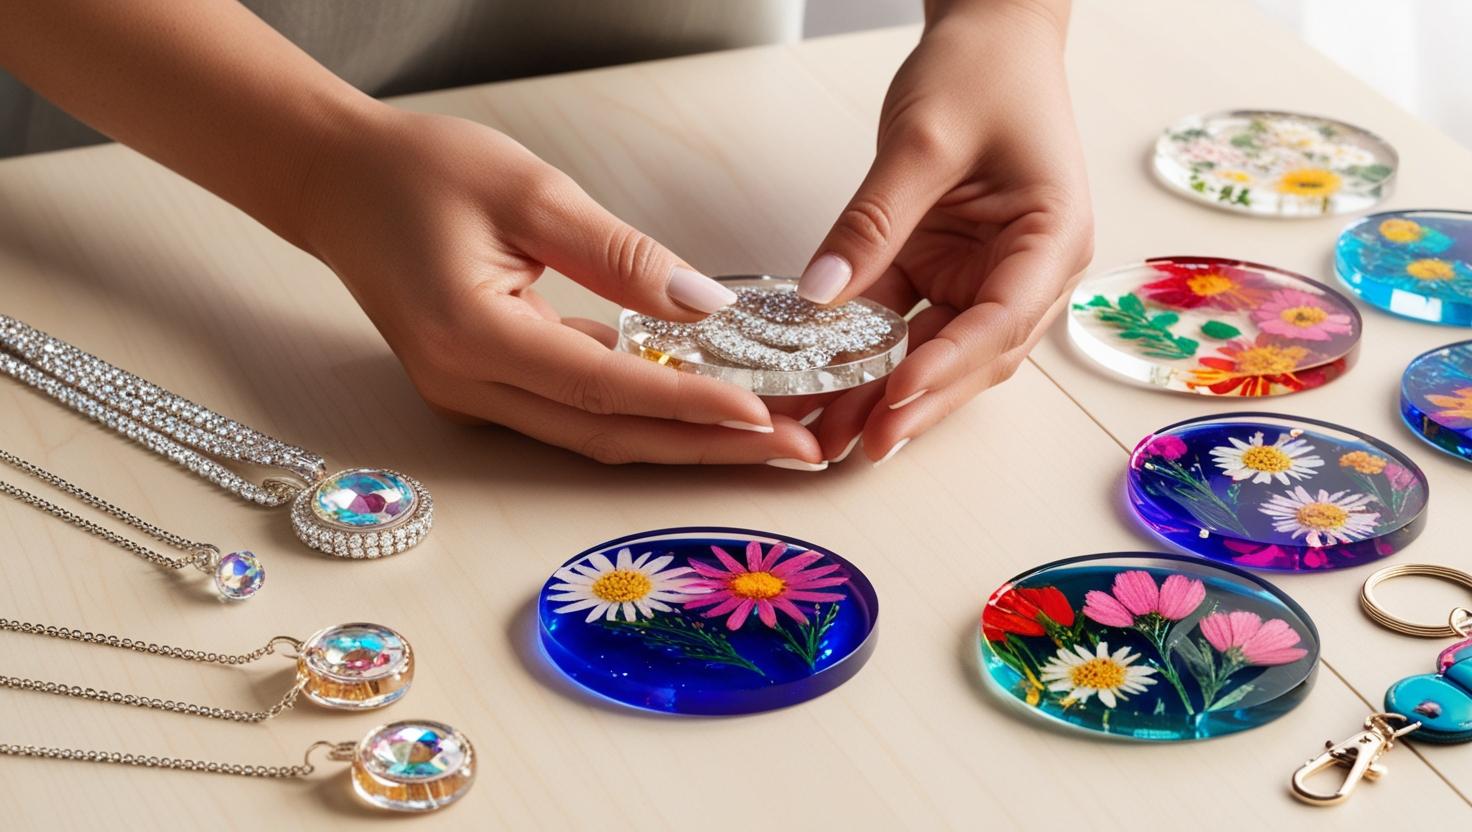
أفكار مشاريع ممتعة للمبتدئين باستخدام راتنج الأشعة فوق البنفسجية
هل تبحث عن الإلهام؟ إليك بعض الحرف اليدوية السهلة التي يمكنك تجربتها باستخدام راتنج الأشعة فوق البنفسجية:
✨ مجوهرات الراتنج: اصنع قلادات، أقراط، أو خواتم باللمعان أو الخرز الصغير.
✨ سلاسل المفاتيح: اسكب الراتنج في قوالب ذات أشكال ممتعة وأضف حلقة مفاتيح.
✨ تعليقات الصور: اطبع صورًا صغيرة، اغلقها بشريط لاصق، واغمسها في الراتنج.
✨ الأعمال الفنية المطلية: ضع طبقة رقيقة من راتنج الأشعة فوق البنفسجية فوق الصخور المطلية أو اللوحات الصغيرة للحصول على لمسة نهائية زجاجية.
راتنج الأشعة فوق البنفسجية مقابل راتنج الإيبوكسي: أيهما يجب أن تستخدم؟

إذا لم تكن متأكدًا مما إذا كنت ستستخدم راتنج الأشعة فوق البنفسجية أو راتنج الإيبوكسي، فإليك مقارنة سريعة:
- راتنج الأشعة فوق البنفسجية يعالج في دقائق تحت ضوء الأشعة فوق البنفسجية، وهو رائع للمشاريع الصغيرة، ولا يحتاج إلى خلط.
- راتنج الإيبوكسي يعالج ببطء (ساعات إلى أيام)، وهو أفضل للقطع الكبيرة، ويحتاج إلى خلط جزئين.
راتنج الأشعة فوق البنفسجية مثالي للمجوهرات والتعليقات والإصلاحات السريعة. راتنج الإيبوكسي هو الأفضل للمشاريع الكبيرة مثل الصواني أو أسطح الطاولات.
📌هل ما زلت غير متأكد؟ اكتشف أنواع الراتنج المختلفة واستخداماتها في دليلنا الكامل.
نصائح للحصول على نتائج رائعة باستخدام راتنج الأشعة فوق البنفسجية
✔️ اعمل في طبقات رقيقة للحصول على أفضل معالجة.
✔️ خزن الراتنج الخاص بك في مكان بارد ومظلم للحفاظ عليه طازجًا.
✔️ نظف قوالبك بالماء والصابون بعد كل استخدام.
✔️ جرب ديكورات مختلفة—لمعان، ورق معدني، أو حتى ملصقات صغيرة.
✔️ تدرب على قطع صغيرة قبل الانتقال إلى مشاريع أكبر.
الخلاصة
الآن تعرف كيفية استخدام راتنج الأشعة فوق البنفسجية لصنع حرف جميلة بثقة! مع هذه النصائح، يمكنك إنشاء مجوهرات، تعليقات، والمزيد، كل ذلك في دقائق معدودة.
تذكر أن تبدأ بمشاريع بسيطة، وتعمل بأمان، واستمتع بتجربة الألوان والديكورات.
لمزيد من الأدلة المفيدة، والإلهام الإبداعي، ومنتجات راتنج الأشعة فوق البنفسجية عالية الجودة، تأكد من زيارة Resiners واستمر في رحلتك الحرفية بقوة!
الأسئلة الشائعة
هل راتنج الأشعة فوق البنفسجية جيد للمبتدئين؟
نعم، راتنج الأشعة فوق البنفسجية رائع للمبتدئين! سهل الاستخدام، يعالج بسرعة، ولا يحتاج إلى أي خلط. يمكنك رؤية النتائج فورًا وإصلاح الأخطاء أثناء العمل.
كيف تستخدم راتنج الأشعة فوق البنفسجية بدون ضوء الأشعة فوق البنفسجية؟
يمكنك معالجة راتنج الأشعة فوق البنفسجية في ضوء الشمس المباشر إذا لم يكن لديك مصباح UV. ما عليك سوى وضع مشروعك في الخارج لمدة تتراوح بين 10 و 15 دقيقة. قد يستغرق الأمر وقتًا أطول قليلاً وقد لا يعالج بشكل متساوٍ كما هو الحال مع المصباح.
كم من الوقت تترك راتنج الأشعة فوق البنفسجية تحت ضوء الأشعة فوق البنفسجية؟
تُعالج معظم مشاريع راتنج الأشعة فوق البنفسجية في 1-3 دقائق تحت مصباح UV قوي. قد تحتاج الطبقات السميكة أو القطع الكبيرة ما يصل إلى 5 دقائق. تحقق دائمًا من أن الراتنج صلب تمامًا وغير لزج قبل إزالته من القالب.
هل يمكنك الإفراط في معالجة راتنج الأشعة فوق البنفسجية؟
من الممكن الإفراط في معالجة راتنج الأشعة فوق البنفسجية، مما قد يجعله يتحول إلى اللون الأصفر أو يصبح هشًا. التزم بأوقات المعالجة الموصى بها وتحقق من مشروعك بانتظام. إذا بدا أن الراتنج قد انتهى، فلا داعي لمواصلة المعالجة.
مقالات ذات صلة:
راتنج الإيبوكسي مقابل راتنج الأشعة فوق البنفسجية: ما الفرق؟


اترك تعليقًا
This site is protected by hCaptcha and the hCaptcha Privacy Policy and Terms of Service apply.