
樹脂に色を付けることで、ありふれた工芸品が特別な宝物へと生まれ変わります!ジュエリー、コースター、アート作品など、どんな作品を作る場合でも、透明な樹脂に鮮やかな色を加えることで、あなたのイメージが現実のものとなります。
特殊な樹脂染料やアルコールインクから雲母粉末、厳選された工芸用品まで、適切な着色剤を使用することで、鮮やかで長持ちする仕上がりが保証されます。
多くのクラフト愛好家は、樹脂の着色に最適なアイテムを既に持っていることに気づいて驚きますが、すべてが使えるわけではありません(食用色素のような水性製品は避けてください!)。
透明なレジンを、無限の可能性を秘めた虹色の世界へと変身させる準備はできていますか?きらめくメタリックカラーから、夢のような透明感まで、このガイドでは必要な情報をすべて網羅しています。読み進めて、完璧なカラーレジン作品の秘密を解き明かしましょう!
樹脂着色入門

レジンに色を加えることで、クラフト作品の創造性が飛躍的に向上します。適切な材料とレジンの種類を選ぶことで、透明にも不透明にもできる、美しいカラー作品を作り出すことができます。
着色に適した樹脂の選び方
樹脂の種類によって、着色剤の吸収の仕方は異なります。エポキシ樹脂は硬化時間が長いため、初心者にも扱いやすく、色を混ぜ合わせたり、注ぎ方を完璧に仕上げたりするのに十分な時間があります。
ジュエリー制作者にとって、ポリウレタン樹脂は硬化時間が短いにもかかわらず耐久性に優れている一方、ポリエステル樹脂は大型の作品に適しているものの、強い臭いがする。
着色剤を加える際は、必ず透明な樹脂をベースに選びましょう。一部のクラフト用樹脂は、着色剤をより効果的に吸収するように設計されており、価格は高めですが、より優れた仕上がりを実現できる可能性があります。
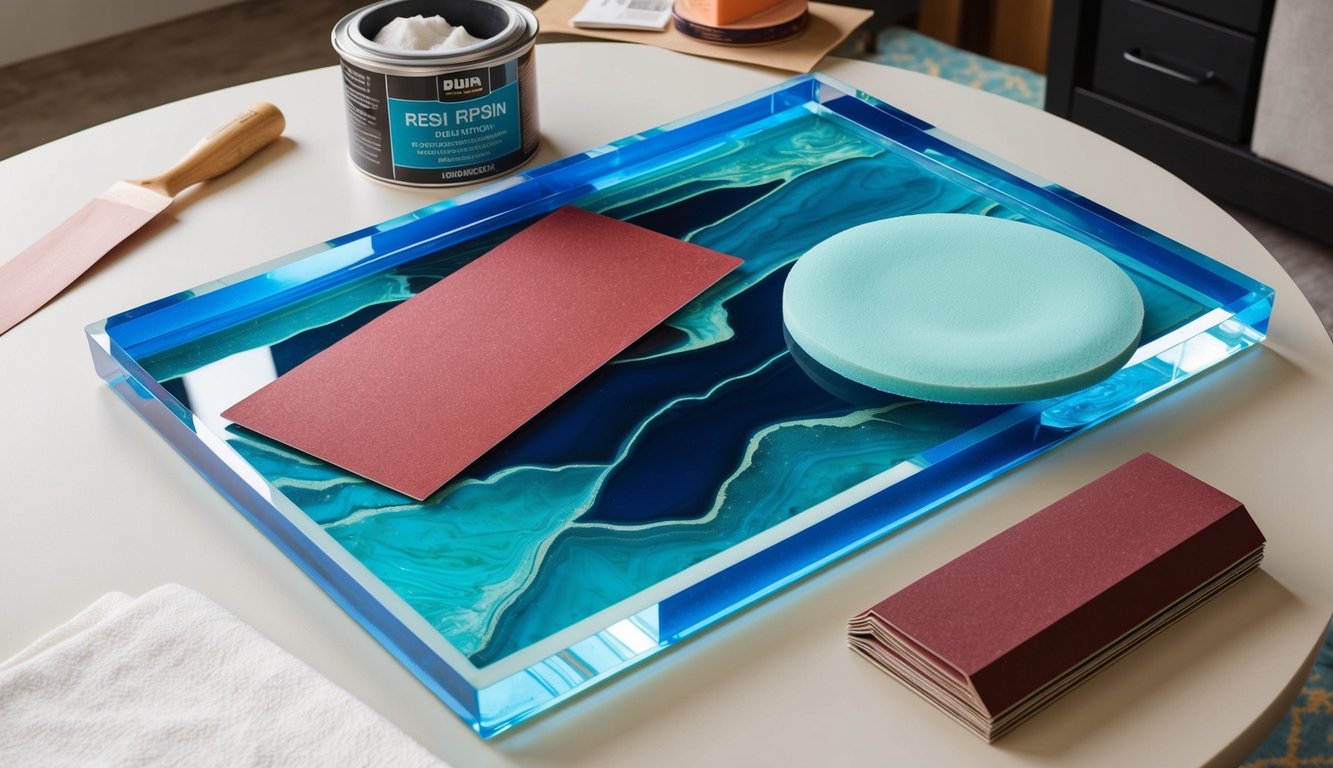
カラーレジンを使った作品作りに必要な材料
レジンをうまく着色するには、以下の基本材料を揃える必要があります。
着色料:
- 透明効果のための樹脂染料
- 不透明仕上げ用顔料粉末
- 鮮やかで透き通った色合いを実現するアルコールインク
- 雲母粉末きらめきと輝きのために
ツール:
- 小さい ミキシングカップ
- プラスチックのスプーンまたは工作用スティック
- 使い捨て手袋
- 保護表面カバー
- 正確な計量カップ
着色料は少量から始めましょう。濃すぎる混合液を薄めるよりも、後から追加する方が簡単です。着色料の種類によって必要な量は異なります。例えば、マイカパウダーは、鮮やかな発色を得るために、濃縮液状染料よりも多くの量が必要となるのが一般的です。
不要な気泡が入らないように、しっかりと、しかし優しく混ぜ合わせ、ムラや塊のない均一な色になるようにしてください。
また、 気泡除去機完璧でプロフェッショナルな仕上がりを実現します。
樹脂に最適な着色剤

適切な着色剤を選ぶことは、レジン作品の成否を左右します。最適な着色剤は、硬化時間や最終的な硬度に影響を与えることなく、鮮やかな発色を実現します。
樹脂特有の染料および顔料
特別に調合された樹脂着色剤は、驚くほど美しい仕上がりを実現する秘密兵器です。これらの高濃度で強力な着色剤は、ほんの数滴、またはひとつまみで十分な効果を発揮します。最高の仕上がりを得るには、全体の10%以下に抑えてください。
液体顔料の使い方は非常に簡単です。混合した樹脂に混ぜるだけで、変化が起こります。
粉末顔料を使う場合、小さな作品にはつまようじでよく混ぜるか、プロのコツを試してみてください。まず少量の樹脂と粉末を混ぜ合わせ、それからメインの樹脂に混ぜ込むと、均一に混ざります。
顔料が樹脂と相性が良いかどうかを必ず確認してください。水分を含む美術用顔料は、硬化を妨げる可能性があります!
メタリック効果のためのマイカパウダー
キラキラ感をプラスしたいですか? 雲母粉末 光を捉えて人目を引く、ゴージャスなメタリックとシマー効果で、華やかさを演出します。上品なゴールドやシルバーから、目を引くブルーやパープルまで、これらのパウダーはあなたの作品に魔法のような奥行きを与えます。
まずは少量から始めましょう。樹脂1オンスあたり小さじ1/4程度を目安に、好みの濃さになるまで徐々に増やしてください。マイカはジュエリー、コースター、装飾品などに使うと、文字通り輝きを放ちます。
こんな裏技を試してみてはいかがでしょう。型に流し込む前に雲母粉を直接振りかけると、驚くほど美しいエッジ効果が得られます。また、異なる色を重ねることで、まるで別世界のような銀河模様を作り出すことができ、誰もが「どうやって作ったの?」と尋ねてくるでしょう。
透明色用アルコールインク
夢のような、幻想的な効果をお探しですか?アルコールインクは、まるで水中バレエのように樹脂の中を流れ、踊る、魅惑的な透明感のある色彩を生み出します。この強力な小さなインクは、驚くほど少量で広範囲に効果を発揮します。ほんの一滴で、数オンスの樹脂に豊かで鮮やかな色彩を吹き込むことができるのです。
混合した樹脂に直接インクを加えたり、部分的に硬化した層にインクを垂らして立体感を出すなど、創造性を発揮してみましょう。自由に組み合わせて、他にはないあなただけのオリジナルカラーパレットを作り上げてください!
ペーパーウェイトやサンキャッチャーなど、透明度の高い作品に最適なアルコールインクは、美しい透明感を保ちながら鮮やかな色彩を添えます。ただし、全体の5%以下に抑えるようにしてください。適切な乾燥のためには、適量が重要です。
レジンにクラフトペイントを使用する
すでにクラフト用絵具をお持ちですか?朗報です!クラフト用品の引き出しに眠っているアクリル絵具や油性絵具は、樹脂の着色剤として活用できます。油性絵具の方がエポキシ樹脂との混ざりやすい傾向がありますが、どちらも使い方次第で素晴らしい効果を発揮します。
鉄則は?少ないほど良いということです。樹脂を良好な状態に保ち、適切に硬化させるためには、混合物全体の10%以下に抑えることが重要です。
完成品に多少の気泡が入ったり、若干柔軟性が増したりするかもしれませんが、手軽さと豊富な選択肢のおかげで、クラフト用絵の具は初心者や実験的なプロジェクトに最適です。
お手頃価格の塗り絵オプション

美しいカラーレジン作品を作るのに、大金を使う必要はありません。ご自宅にあるもので、レジン作品に彩りを加えるのに最適な、手頃な価格の素材がたくさんあります。
美しいレジンアートを作るのに、高価な特殊製品は必ずしも必要ありません!ここでは、予算を抑えながらも素晴らしい仕上がりを実現できる賢い代替品をご紹介します。
樹脂を着色する家庭用品
ご自宅には、樹脂の着色に使えるものがたくさんあります。少量の食用色素(ただし、硬化不良を防ぐため、少量ずつ使用してください)やアクリル絵の具(混合物の10%未満に抑えてください)を試してみてください。
砕いたチョークは美しいパステルカラーを生み出し、コーヒーかすやターメリックなどのキッチンにあるスパイスは、自然な茶色や黄色に面白い質感を与えてくれる。
古いアイシャドウを軽視してはいけません。その色素と輝きは、普通の樹脂を、追加費用なしで素晴らしいものに変えることができます。
樹脂着色剤としての化粧品
忘れ去られた化粧品に、あなたのクラフトで新たな命を吹き込みましょう!メイクアップグレードのマイカパウダーは、高級化粧品と同等の輝きを、はるかにリーズナブルな価格で実現します。
100円ショップのアイシャドウパレットは無限のカラーバリエーションを提供し、粘度の高いネイルポリッシュはほんの一滴で小さな作品に鮮やかな色を添えてくれます。
これらの代替品を使用する際は、創作過程における有害なガスの発生を抑えるため、換気の良い場所で作業してください。
グリッターや装飾を追加する
ホログラフィックグリッターResinersの製品は、樹脂を使ったプロジェクトの質を瞬時に向上させます。 彼らは入ってくる 大丈夫繊細な輝きのための粒子または ずんぐりむっくり大胆な主張のための様々な種類。 無料で使える装飾品を探してみましょう。 押し花壊れたジュエリーのビーズ、余った手芸用のスパンコール、またはビーチの貝殻など。
紙片を入れる場合は、変色を防ぐためにまず薄い樹脂の層を塗布してください。砕いたCDの破片は、光を美しく反射して見事な虹色の輝きを生み出します。リサイクルがこれほど美しく見えることはありませんでした!
プロのカラーリングテクニック

これらの必須テクニックを習得すれば、レジンを使った作品制作をアマチュアレベルからプロレベルへと引き上げることができます。
色を均一に混ぜる
再現性のある結果を得るには、一貫性が非常に重要です。着色料を正確に計量するためにデジタルスケールを使用し、正確な「レシピ」(例:「青2滴+白1滴+銀雲母少々」)を記したクラフトノートを用意しておきましょう。
余った混合樹脂は、ラベルを貼った容器に入れて保管し、後で色合わせや補修に使用してください。日光と室内照明では色合いが異なるため、必ずさまざまな照明条件下で色を確認してください。
硬化後に色は通常濃くなるので、最終的な仕上がりを確認するために小さなテストサンプルを作成してください。
適切な着色剤と樹脂の比率
適切な硬化を確保するため、着色剤は樹脂混合物全体の5%以下に抑えてください。液体染料の場合は、通常1オンスあたり2~3滴で十分ですが、粉末顔料の場合は、最初は1オンスあたり約1/8ティースプーンが必要です。
以下の簡単な手順に従ってください。
- 透明な外観: 1オンスあたり染料1~2滴
- 半透明:1オンスあたり3~4滴
- 不透明仕上げ:1オンスあたり小さじ1/8の顔料粉末
大規模なプロジェクトに着手する前に、必ず端材を使って配合比率をテストしてください。
カスタムカラーパレットの作成
作品を一目で認識できるような、独自の配色を開発しましょう。まずはテーマに基づいて、3~4色の補色から始めてください。
- 海ターコイズ、白、濃い青
- 日没オレンジ、ピンク、紫、金
- 森緑、茶色、黄色のアクセントカラーが様々
基本色を混ぜ合わせてオリジナルの色合いを作り、少量の白を加えて明るくしたり、黒を加えて深みを出したりして調整しましょう。つまようじの先に少量の白を塗ると、色が劇的に際立ちます。特別な効果を求めるなら、濡れた樹脂の表面にメタリックマイカパウダーを振りかけると、目を引く美しい仕上がりになります。
これらのテクニックを習得すれば、カラーレジンを使った作品はプロ並みのクオリティと個性的なスタイルを実現できるでしょう。
創造的な着色効果
レジンアートは、色彩豊かな可能性の世界を切り開きます!適切なテクニックを使えば、作品を真にユニークなものにする、息を呑むような視覚効果を生み出すことができます。
渦巻き模様とマーブリング技法
異なる色の樹脂を互いに近い場所に注ぎ、つまようじ、串、またはヒートガンで優しく混ぜ合わせることで、魅力的な渦巻き模様を作り出すことができます。重要なのは、混ぜる量を最小限に抑えること。独特の渦巻き模様を損なわない程度に混ぜ合わせるだけで十分です。
複数の色を1つのカップに重ねてから同時に注ぐ「ダーティポア」という技法を試してみてください。色が表面に広がるにつれて、自然と魅惑的な模様が生まれます。
自然な大理石模様を作るには、半硬化状態の樹脂にアルコールインクを垂らし、色が美しく予測不可能な模様に広がる様子を観察してください。大きな作品に取り組む前に、必ず小さなテストピースでテクニックを練習してください。
着色樹脂の重ね塗り
異なる色の樹脂を重ねることで、作品に印象的な奥行きを加えることができます。
まず最初の色を注ぎ、次の層を重ねる前に、粘着性のある、部分的に硬化した状態になるまで待ちます(配合によって異なりますが、通常は2~4時間)。この時間設定により、完全に混ざり合うことなく、適切な密着性を確保できます。
すっきりとした整然とした印象にしたい場合は、直線的なレイヤーを重ねてみてください。よりダイナミックな効果を狙うなら、注ぎ込むようなパターンを試してみましょう。
砂色の樹脂を底に、青色の樹脂を真ん中の水面に、そして透明な樹脂に白い渦巻き模様を描いて上部に重ね、波しぶきを表現することで、ビーチの風景を作ってみてください。
銀河と海をイメージした色彩
見事な銀河効果を出すには、まず黒色の樹脂ベースを用意します。そこに紫、青、ピンクのアルコールインクを少量ずつ加え、ヒートガンを使って優しく温め、色を混ぜ合わせます。
つまようじを使って様々な大きさの白い点を描き、星を作ります。惑星や星雲を表すには、大きめの点を描き加えます。
海の風景を描く際には、透明感のある青や緑を、一番下の濃い色から一番上の薄い色へと重ねていくと、とても美しく映えます。
表面に白い樹脂を塗り、つまようじで引っ張ってリアルな波模様を作ります。最後にラメや雲母の粉を振りかけて、水面にきらめく太陽の光を再現しましょう。
着色樹脂が濁って見える理由が気になりますか?こちらの記事をご覧ください: 「樹脂愛好家が従来の方法よりもPurairを選ぶ理由」 適切な空気質が樹脂の透明度にどのように影響するかを学ぶ。
色の問題のトラブルシューティング

どんなに注意深く作業するレジンアーティストでも、時には色の問題に遭遇することがあります。着色されたレジンを扱うのは難しい場合もありますが、何が起こっているのかを理解すれば、ほとんどの問題は簡単に解決できます。
硬化中の色の変化
丁寧に調合した色が硬化中に変化する(例えば、ピンクが桃色になったり、青が色褪せたりする)場合、いくつかの要因が考えられます。これは、 UV樹脂色が濃いほど光が十分に奥まで浸透せず、適切な硬化が進まないためです。
色の変化を防ぐには:
- 濃い色は薄い層で塗る
- 非常に濃い色合いにはエポキシ樹脂を検討してください
- 必要と思われるよりも少し多めに着色剤を使用してください(事前にテストしてください)。
- 着色樹脂は硬化するまで直射日光を避けて保管してください。
色の安定性は着色剤の種類によって異なります。マイカ粉末やアルコールインクはわずかに色調が変化する可能性がありますが、液体樹脂染料は通常、硬化プロセス全体を通してより安定した色を維持します。
色ムラの修正
色のムラや筋状の分布は、通常、混合不足またはタイミングの問題が原因です。このよくある問題を解決するには、次の手順に従ってください。
- 3~5分間よく混ぜる
- 樹脂が固まり始めるまで待ってから色を混ぜ合わせ、マーブル模様を作る
- より均一に混ぜ合わせるために、木製の棒の代わりにシリコン製のツールを使用する。
- 色が滑らかに混ざり合うように、わずかに温かみのある成分を配合。
既に流し込んだ後に筋状のムラが見られる場合は、完全に固まる前にヒートガンで表面を軽く温めると、色が均一に混ざり合いやすくなります。
着色剤の副作用への対処法
着色剤の中には、樹脂との相性が悪く、凝集、沈殿、質感の問題を引き起こすものがあります。これらの問題に対処するには、以下の実用的な解決策をお試しください。
- 顔料の凝集を防ぐには: まず粉末を少量の樹脂と混ぜ合わせます。
- 油分離の場合: 水性または樹脂専用の着色剤に切り替えてください。
- 着色部分の硬化が不完全な場合顔料の量を減らすか、着色剤の種類を変更する
これらのトラブルシューティング技術を用いることで、たとえ問題が発生しても、カラーレジンを使った作品が美しく仕上がることを保証できます。
結論
樹脂に色を付けることで、あらゆるスキルレベルのクラフト愛好家にとって、無限の創造性が広がります。着色剤として特殊な染料、家庭用品、化粧品などを選ぶ場合でも、重要なのは適切な計量、徹底的な混合、そしてさまざまな添加物が樹脂とどのように相互作用するかを理解することです。
最初の難しさに落胆しないでください。試行錯誤こそが発見につながります!小さな作品から始めて、うまくいった組み合わせをメモしておけば、すぐにあなた独自のスタイルが確立されるでしょう。
これらの樹脂着色技術を習得したら、当社の製品であなたのクラフトを次のレベルに引き上げましょう。 樹脂加工機あなたの鮮やかなDIY作品をさらに引き立てるために特別に設計されています。
このガイドで紹介するテクニックを使えば、見事なプロ品質のカラー写真を作成できるようになります。 樹脂製の部品 あなたの独自の芸術的ビジョンを表現できる作品を作りましょう。楽しい創作活動を!
よくある質問
最新のクラフトプロジェクトで、エポキシ樹脂に彩りを添えるための創造的な方法をいくつか教えてください。
アルコールインクを使えば、透明感があり鮮やかな発色で、色混ざりも美しい仕上がりになります。これらのインクを樹脂に混ぜ込むと、驚くほど美しい効果が得られます。
マイカパウダーは、光を捉えるのに最適な、メタリックまたはパールのような輝きを与えます。樹脂を流し込む前に、少量を混ぜるだけでOKです。
樹脂専用の顔料を使用すると、最も確実な結果が得られます。これらは液体、ペースト、粉末の形態で提供され、エポキシ樹脂との併用を想定して作られています。
添加剤は樹脂総量の5%以下に抑えるようにしてください。着色剤が多すぎると、適切な硬化を妨げる可能性があります。
木材加工において、樹脂を使って鮮やかで長持ちする色合いを実現するにはどうすれば良いでしょうか?
木材を使った作品には、木目の自然な模様を際立たせる透明な着色剤が最適です。アルコールインクや透明な樹脂染料を使えば、木材本来の風合いがそのまま活かされます。
まず、木材に薄い透明な樹脂を塗布して密封してください。こうすることで、着色した樹脂を流し込む際に、木材から気泡が出てくるのを防ぐことができます。
着色剤を使う前に、まず端材でテストしてください。木材の種類によっては、特に天然の油分やタンニンが含まれている場合、色の見え方が変わることがあります。
一度に厚く注ぐのではなく、薄く重ね塗りしてください。こうすることで、よりコントロールしやすくなり、硬化中の過熱を防ぐことができます。
家庭用品や一般的な手芸用品で、レジンアートに安全に色を付けることができるものはありますか?
アクリル絵具は少量であれば使用できます。樹脂の総量の5%以下に抑えてください。多すぎると適切に硬化しない可能性があります。
アイシャドウやメイクアップ用の顔料は、美しい効果を生み出すことができます。最高の仕上がりを得るには、まずそれらを細かく砕いて粉末状にしてください。
油絵具も使用できますが、乾燥時間が長くなる可能性があります。ごく少量を使用し、よく混ぜてください。
チョーク、クレヨン、マーカーなどは樹脂と混ざりにくく、塊や筋ができることがあるため、使用は避けてください。
自家製作品の樹脂を着色する際に、食用色素は効果的かつ安全な選択肢となり得るでしょうか?
食用色素は樹脂にも使用できますが、いくつかの欠点があります。樹脂専用の着色剤とは異なり、光にさらされると時間とともに退色する可能性があります。
より鮮やかな発色を求める場合は、液状の食用色素ではなく、ジェル状の食用色素を使用してください。液状の食用色素に含まれる水分は、樹脂の硬化を妨げる可能性があります。
まずはほんの少量から始めてください。爪楊枝に少しつける程度で十分な場合が多いです。必要に応じて後から追加できます。
最良の結果を得るには、適切な樹脂着色剤への投資を検討してください。これらは硬化後の樹脂中でも安定性と鮮やかな発色を維持するように設計されています。


コメントを書く
このサイトはhCaptchaによって保護されており、hCaptchaプライバシーポリシーおよび利用規約が適用されます。