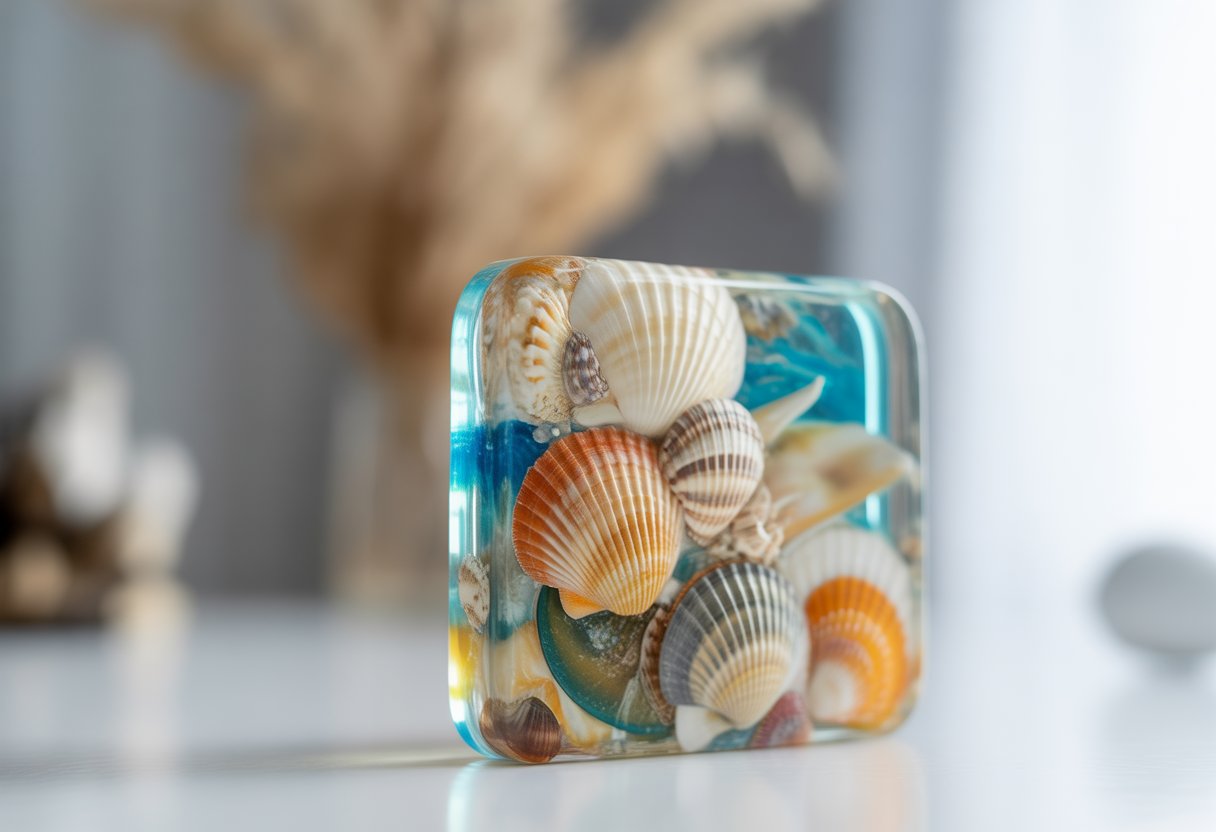
貝殻を使ったレジンアートは、穏やかなビーチの美しさを、長持ちする光沢のあるデザインで表現できます。ありふれた貝殻、砂、シーグラスの破片を、晴れた日の海のように輝く、滑らかで透明感のある作品に変えることができるのです。
貝殻を使った樹脂アートは、自然の質感と樹脂のガラスのような仕上がりを組み合わせ、お気に入りの海辺の発見物を保存しながら、ユニークな海岸風の装飾品を作り出します。
始めるのに高度な美術スキルは必要ありません。簡単な道具、きれいな貝殻、透明なエポキシ樹脂があれば、壁掛け、ジュエリーケース、小さなディスプレイなど、自分のスタイルに合った作品を作ることができます。
その過程はリラックスできて、創造性を刺激する。どの作品も唯一無二のものとなる。
簡単なテクニックを使えば、複雑な手順を踏まずにプロ並みの美しい効果を実現できます。
プロジェクトを開始するには 耐紫外線エポキシ樹脂コレクション あなたの作品を輝かせ続けるために。
シェルレジンアートとは?

貝殻樹脂アートは、天然素材と透明なエポキシ樹脂を組み合わせて、光沢のある海をイメージした作品を作り出す技法です。本物の貝殻や砂、その他の海岸の素材を樹脂に封入することで、何年も長持ちする装飾品や実用的なアート作品が生まれます。
シェルレジンアートの定義
シェルレジンアートとは、透明または着色されたエポキシ樹脂に貝殻、砂、または小さな海洋モチーフのアイテムを埋め込むレジンアートの一種です。樹脂は硬化して滑らかでガラスのような表面になり、貝殻の自然な質感を保護し、際立たせます。
壁掛けアート、コースター、ジュエリー、テーブルデコレーションなどを作ることができます。通常は、2液性エポキシ樹脂を混ぜ合わせ、型やフレームに流し込み、樹脂が硬化する前に貝殻を配置するという工程です。
多くのアーティストが 雲母粉末、 顔料、 または グリッター 色の深みを出したり、海の波を模倣したりするために用いられます。その結果、耐久性があり光沢のある形で、ビーチの雰囲気を捉えた作品が生まれます。
歴史と起源
エポキシ樹脂を使ったアートは、20世紀後半にDIYクラフトや現代的なインテリアのトレンドの高まりとともに人気を博しました。樹脂がより入手しやすくなるにつれ、職人たちは貝殻、石、木材といった自然素材を使った作品作りに挑戦し始めました。
貝殻樹脂を使ったアートは、おそらくビーチのお土産を安全に保管する方法として始まったのだろう。人々は、休暇で持ち帰った貝殻を、色褪せたり割れたりしない形で保存したいと考えていたのだ。
時を経て、アーティストたちはより優れた樹脂や道具を用いて、より透明で気泡のない仕上がりを実現するなど、技法を改良していきました。現在では、貝殻を使った樹脂アートは、海岸をテーマにした住宅、地元の工芸品市場、手作りの装飾品を扱うオンラインショップなどで見かけることができます。
人気のスタイルとトレンド
シェルレジンアートは、使用する素材やデザインの目的に応じて、さまざまな形で制作できます。人気のあるスタイルには以下のようなものがあります。
|
スタイル |
説明 |
|
海の波のアート |
青と白の樹脂の層が、海の泡や波を模倣している。 |
|
沿岸沿岸の人々 |
貝殻と砂を詰めた小さな型。実用的なアート作品として使える。 |
|
壁パネル |
貝殻を埋め込んだ大きな樹脂の流し込みは、印象的な装飾品となる。 |
最近のトレンドは、環境に優しい素材、ミニマルなカラーパレット、ガラスや流木といった異素材の組み合わせに焦点を当てています。また、半透明のレイヤーを重ねることで奥行き感を出し、貝殻が水に浮かんでいるように見せるデザインも見られます。
空間を保護する 樹脂収集用シリコンモールド 簡単に貝殻の形を作ることができます。
必要な材料と道具

美しく長持ちする貝殻樹脂アートを作るには、適切な樹脂、清潔で乾燥した貝殻、そして信頼できる道具がいくつか必要です。材料の質は、作品の透明度、耐久性、気泡の有無に大きく影響します。
適切な樹脂の選び方
エポキシ樹脂は、透明に硬化し、滑らかでガラスのような仕上がりになるため、貝殻を使った樹脂アートに最適です。気泡が抜けやすく、型に均一に充填できるよう、低粘度のエポキシ樹脂を選びましょう。
経年劣化による黄ばみを防ぐため、紫外線耐性のある製品を選びましょう。樹脂と硬化剤は、必ずパッケージに記載されている比率で混ぜてください。
正確な計量のために、目盛りの付いた計量カップと木製またはシリコン製の攪拌棒を使用してください。気泡が入らないようにゆっくりとかき混ぜてください。
換気の良い場所で作業してください。ニトリル手袋と有機蒸気対応の防じんマスクを着用してください。
|
樹脂タイプ |
最適 |
主な利点 |
|
エポキシ樹脂 |
貝殻アート、コースター、ジュエリー |
透明で耐久性のある仕上がり |
|
UV樹脂 |
小さな作品、手軽なプロジェクト |
紫外線照射下で速乾性 |
貝殻の選択と準備
次のような貝殻を選んでください。 クレ乾燥していて、ひび割れがないこと。内部に湿気があると、曇りが発生したり、樹脂が正しく硬化しなくなる可能性があります。
貝殻を温かい石鹸水ですすぎ、少なくとも24時間乾燥させます。貝殻の縁が粗い場合は、目の細かいサンドペーパーで軽く研磨し、型や台座に均等に収まるようにします。
樹脂を流し込む前に貝殻を並べて配置を計画しましょう。繊細な貝殻の場合は、気泡や変色を防ぐために、最初に薄く樹脂を塗布してください。
追加の装飾品と備品
追加 ドライフラワーより深みと色味を出すには、マイカパウダーやグリッターなどを加えてください。硬化時のトラブルを避けるため、加えるものはすべて完全に乾いていることを確認してください。
本作品に使用する前に、少量でテストしてください。必要な道具は以下のとおりです。
完成した作品は平らな場所に置いて乾燥させてください。埃が入らないように、箱やドームで覆ってください。
ガイドをチェックしてください エポキシ樹脂を使った簡単なDIYプロジェクト:初心者向けの簡単なアイデア 海辺をイメージした工芸品をもっと見たい方はこちら。
貝殻樹脂アートの作り方をステップバイステップで解説

美しく長持ちする貝殻樹脂アートを作るには、明確な計画、丁寧な混合、そして根気強い重ね塗りが必要です。デザインから硬化まで、各工程が作品の成否を左右するので、焦らずじっくりと取り組みましょう。
デザインの計画
まず、大きさ、形、色の異なる貝殻を選びましょう。中性洗剤で貝殻を洗い、完全に乾かしてください。そうすることで、樹脂の中に気泡や曇りが入るのを防ぐことができます。
樹脂を流し込む前に、それぞれの貝殻をどこに配置するかを決めましょう。レイアウトをスケッチしたり、樹脂を流し込む前に型の中に貝殻を並べたりすることができます。こうすることで、完成品の見た目をイメージしやすくなります。
コースター、キーホルダー、壁掛けアートなど、作品の種類に応じて、シリコン型または浅いトレイを使用してください。重ね塗りをする場合は、樹脂を流し込む回数を事前に計画しておきましょう。
作業台は水平に保ち、ワックスペーパーかビニールシートで覆ってください。こうすることで、樹脂の垂れがテーブルに付着するのを防ぎ、後片付けが楽になります。
樹脂の混合と着色
説明書を読んでください エポキシ樹脂キット 注意深く行ってください。ほとんどの樹脂は、樹脂と硬化剤を1:1の比率で混合する必要があります。
重さではなく体積で計量してください。そうしないと、べたついたり、柔らかい部分が残ってしまう可能性があります。カップの側面と底をこそげながら、2~3分間ゆっくりと混ぜてください。
かき混ぜる速度が速すぎると気泡が入ります。色を付けたい場合は、マイカパウダー、アルコールインク、または樹脂染料を少量加えてください。
少量でも十分効果があります。色が均一になるまで混ぜますが、混ぜすぎないように注意してください。
本流に流し込む前に、小さなカップで色の組み合わせを試してみてください。こうすることで、樹脂が硬化した後の見た目を確認でき、材料の節約にもなります。
貝殻の配置と設置
まず、型に透明な樹脂を薄く流し込みます。10~15分ほど置いて気泡を抜きます。
ピンセットまたは工作用の棒を使って、貝殻をそっと置きます。貝殻が型の縁に触れないように配置してください。
こうすることで、硬化後も側面が滑らかに仕上がります。貝殻を浮かせたい場合は、半分まで流し込み、固まるまで待ってから、さらに一層流し込んでください。
貝殻を配置したら、残りの樹脂をゆっくりと注ぎ、貝殻を覆います。ヒートガンまたはトーチで軽く炙って、表面の気泡を消します。
樹脂のパッケージに記載されている時間(通常は24~48時間)の間、平らな場所に作品を置いて硬化させてください。硬化中は動かさないようにして、表面が均一で滑らかな状態を保つようにしてください。
あなたのプロジェクトに輝きを加えましょう。 チャンキーグリッターコレクション 波のような輝きのために。
驚異的な効果を生み出すテクニック

波の形、層の奥行き、ガラスと樹脂を通して光がどのように反射するかをコントロールすることで、目を引く貝殻樹脂アート作品を作ることができます。丁寧な仕上げと硬化を行うことで、作品の透明度、滑らかさ、そして耐久性を保つことができます。
海をイメージした波を作り出す
リアルな海の波を作るには、青と白の樹脂顔料を別々のカップに入れます。まず青い樹脂を流し込んで土台を作り、次に泡を作りたい部分の縁に沿って白い樹脂を加えます。
ヒートガンを弱めに設定し、白い樹脂を青い樹脂の上に軽く押し付けます。この動作によって、波が岸に打ち寄せる様子を再現できます。
熱源を小さな円を描くように動かし、過熱しないように注意しながら発泡剤を均一に広げてください。樹脂が流れ落ちないように、シェルやキャンバスは水平に保ってください。
厚みのある一層ではなく、薄い波状の層を複数重ねて流し込むことで、より深みのある仕上がりになります。自然な重ね波効果を得るには、各層が完全に乾いてから次の層を重ねてください。
レイヤリングと奥行き
レジンアートにレイヤーを重ねることで、立体感のある仕上がりになります。まずは、透明または着色されたレジンを薄くベース層として塗布します。
樹脂が部分的に硬化したら、貝殻、砂、または小石を埋め込んだ層をもう1層重ねます。樹脂が過熱したり気泡が抜けたりしないように、各層の厚さは約3mm程度にしてください。
つまようじやヒートガンを使って、注ぐ合間に気泡を消すことができます。透明な層と淡い色の層を交互に重ねることで、奥行きのある仕上がりになります。
透明な層によって細部まで鮮明に見えつつ、遠近感も演出されている。その結果、浅瀬に貝殻が静かに佇んでいるように見える。
砕いたガラスを組み込む
砕いたガラスは、貝殻を使ったレジンアートに輝きと質感を与えます。光沢の度合いに応じて、細かいガラス片または中くらいの大きさのガラス片を使用できます。
大きなガラス片は避けてください。樹脂から飛び出して見た目が悪くなる傾向があります。樹脂を注ぐ前に、砕いたガラスを縁の近くや貝殻の周りに配置してください。
これはガラスが浮いたりずれたりするのを防ぐのに役立ちます。時々、キラキラとした仕上がりにするために、粘着性のある樹脂層の上に少し振りかけるのが好きです。
ガラスを取り扱う際は、手袋と保護メガネを着用してください。樹脂で密封すると、ガラスが光を反射し、作品に美しい海岸の輝きを与えます。
|
ガラスの種類 |
効果 |
配置のヒント |
|
上質なガラス |
繊細な輝き |
樹脂に混ぜる |
|
中型のガラス |
目立つ輝き |
粘着層に押し込む |
|
虹色のガラス |
色の変化 |
ハイライトには少量使用してください |
仕上げと硬化
気泡のない滑らかな表面は、作品をより一層引き立てます。最後の注ぎ込みが終わったら、ヒートガンやトーチを使って表面の気泡を素早く取り除きましょう。
近づけすぎると樹脂が焦げてしまう恐れがあります。樹脂は埃のない場所で少なくとも24時間硬化させるか、メーカーの指示に従ってください。
埃やゴミが入らないように、作品を箱で覆ってください。完全に硬化したら、端がざらざらしている場合は、目の細かいサンドペーパーで軽く研磨してください。
さらに光沢と保護効果を高めたい場合は、薄く透明なコーティング剤を塗布してください。時間をかけて硬化させることで、シェルレジンアートの光沢と耐久性を保つことができます。
また、弊社のガイドもご覧ください。 レジンフラワー:美しいクラフトデコレーションの作り方天然素材と樹脂を組み合わせる方法を学ぶため。
まとめ
貝殻を使ったレジンアートで、ビーチの雰囲気を自宅に!貝殻、砂、小石を集めて透明なレジンに封入すれば、海岸の雰囲気を演出できます。コースターやトレイ、壁掛けアートなど、海のようにキラキラ輝くアイテムが作れます。青い顔料やグリッターを加えれば、一年中夏を感じさせる波のような効果も楽しめます。
海辺の美しさを貝殻樹脂アートで捉えよう! 透明エポキシ樹脂 そして シリコン型 海辺をイメージした、海岸のように輝く作品を制作する。
色のインスピレーションについては、こちらのガイドもお見逃しなく。 マイカパウダーの用途:輝きと色を加えるための創造的な方法。
よくある質問
貝殻を使ったアート作品を作る際に、樹脂を混ぜる際の最適な方法は何ですか?
清潔で乾いたミキシングカップを用意し、樹脂と硬化剤を同量ずつ入れ、2~3分間ゆっくりとかき混ぜます。側面と底をこそげ落とし、全体が均一に混ざるようにします。
かき混ぜるスピードが速すぎると、空気が閉じ込められて気泡ができてしまいます。適切な硬化のためには、メーカー指定の混合比率を守ってください。目分量で混ぜてはいけません。
貝殻を使ったアート作品を制作する際に、樹脂に気泡が入るのを防ぐにはどうすれば良いですか?
樹脂は空気が抜けるように薄く層状に注ぎます。混ぜる前に樹脂を少し温めておくと、気泡の発生を抑えるのに役立ちます。
注ぎ込んだ後、ヒートガンまたは小型トーチを使って表面の気泡を消してください。加熱しすぎると樹脂が焦げてしまうので注意してください。
貝殻アートにおいて、樹脂を硬化させる理想的な時間はどれくらいですか?最高の仕上がりを得るには、どのくらいの時間が必要ですか?
ほとんどのエポキシ樹脂は、ブランドや室温にもよりますが、完全に硬化するまでに約24~72時間かかります。作業中は、埃がかからない場所に保管してください。
固まる前に触ったり動かしたりしないようにしてください。指紋やへこみは修復が困難です。
貝殻をレジンアートに取り入れるための、何か創造的な方法を提案していただけますか?
貝殻を重ねて奥行きを出したり、砂と混ぜて本格的なビーチの雰囲気を演出したり。小さな貝殻をコースターやトレイ、壁飾りなどに埋め込むと、おしゃれなアクセントになります。
海岸をテーマにした作品を作りたいなら、樹脂に海の色を混ぜて着色することもできます。いろいろと試してみる価値はありますよ。
貝殻を使ったアート作品に樹脂を使用する際、どのような安全対策を講じるべきですか?
換気の良い場所で作業し、樹脂が皮膚に付着しないように手袋を着用してください。大量の樹脂を使用する場合は、防じんマスクの着用をお勧めします。
樹脂と硬化剤は火気から遠ざけてください。作業後は手をよく洗ってください。樹脂はベタベタすることがあります。
貝殻樹脂を使ったアート作品に、光沢のある仕上がりを実現するにはどうすればよいですか?
樹脂が硬化したら、目の細かいサンドペーパーで表面のざらつきを滑らかにし、粉塵を拭き取ります。
光沢をさらに出すために、透明な樹脂を薄く上塗りしてください。完全に硬化するまで触らないようにすると、滑らかでガラスのような仕上がりになります。


コメントを書く
このサイトはhCaptchaによって保護されており、hCaptchaプライバシーポリシーおよび利用規約が適用されます。